crwdns2915892:0crwdne2915892:0
If you need to replace a battery, access the left earmuff with this guide. Before proceeding to the following steps, you should know that the Sennheiser headphones require delicacy with the tools mentioned. This involves removing the foam ear pad and also removing the speaker to access the battery on the back of the speaker. For this guide, you will need the black nylon spudger tool, a Phillips #0 screwdriver tool, and nylon tipped tweezers. There are no difficult steps other than removing the battery itself while disconnecting the wires.
Before starting this repair, allow your headphone's battery to drain below 25%. A charged battery may catch fire if damaged.
crwdns2942213:0crwdne2942213:0
-
-
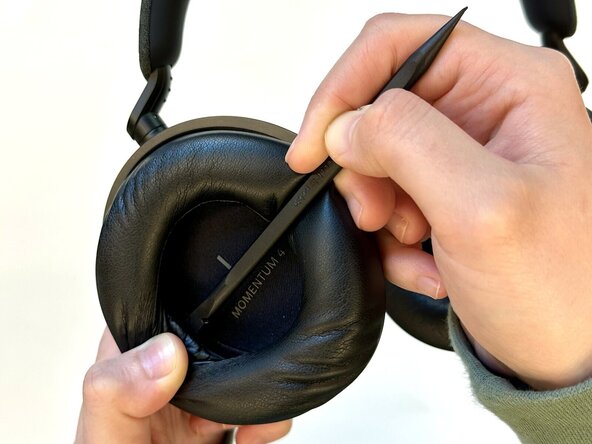
Insert a spudger into the seam between the left ear pad and driver assembly.
-
Gently pry around the perimeter of the ear pad until it fully releases.
-
Remove the left ear pad.
-
-
-
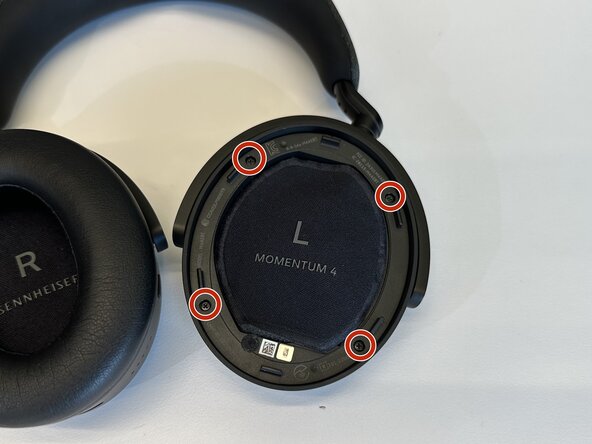
Use a Phillips #00 screwdriver to remove the four 6.5 mm screws that secure the left driver housing.
-
-
-
-
Insert the flat end of a spudger into the driver housing seam.
-
Gently pry the driver housing up and out, with care not to strain or damage the connected cables.
-
-
-
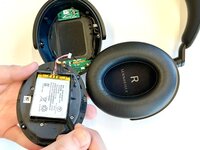
Carefully lift away the driver housing out and flip it over to reveal the battery cover.
-
Use tweezers to pull the white battery connector directly out of the daughterboard socket.
-
-
-
Use the flat end of a spudger to pry open the retaining clips on the battery cover and remove it carefully.
-
-
-
Insert the flat end of a spudger between the lower edge of the battery and the battery housing.
-
Gently lift the battery upward to release the adhesive that secures the battery.
-
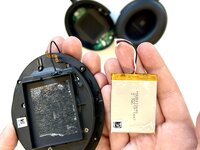
Remove the battery.
-


To reassemble your device, follow the above steps in reverse order.
For optimal performance, after completing this guide, calibrate your newly installed battery.
Take your e-waste to an R2 or e-Stewards certified recycler.
Repair didn’t go as planned? Try some basic troubleshooting or ask our Answers community for help.
crwdns2935221:0crwdne2935221:0
crwdns2935229:04crwdne2935229:0
crwdns2915084:0crwdne2915084:0

Western Carolina University, Team 1-4, Virtue Spring 2025 crwdns2935289:0Western Carolina University, Team 1-4, Virtue Spring 2025crwdne2935289:0
WCU-VIRTUE-S25S1G4
crwdns2931471:04crwdne2931471:0
crwdns2935297:09crwdne2935297:0