crwdns2915892:0crwdne2915892:0
Replace the motherboard of the camera, located underneath the back cover.
crwdns2942213:0crwdne2942213:0
-
-
Use the Phillips #00 screwdriver to remove the four 5.5 mm screws surrounding the viewfinder.
-
Use your fingers to lift the plastic viewfinder cover upward.
-
-
-
Use the Phillips #00 screwdriver to remove the two 5.5 mm screws from the right side of the camera above the SD card port.
-
-
-
Use the Phillips #00 screwdriver to remove one 5.5 mm screw on the left, above the HDMI port.
-
-
-
Use the Phillips #00 screwdriver to remove the five 5.5 mm screws from the bottom, near the battery compartment.
-
Use the Phillips #00 screwdriver to remove one 3.8 mm screw from the bottom of the hand grip, below the battery compartmen.
-
-
-
-
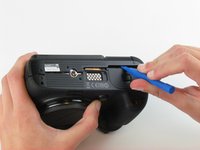
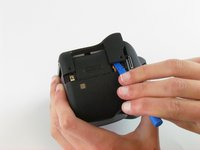
Use a plastic opening tool to separate the back cover from the front cover.
-
-
-
Use your fingers to pull the back cover away from the front cover.
-
-
crwdns2935267:0crwdne2935267:0Tweezers$4.99
-
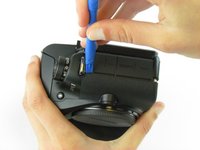
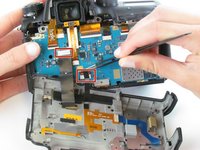
Use tweezers to pull the two ribbon cables horizontally out of their clips.
-
-
crwdns2935267:0crwdne2935267:0Tweezers$4.99
-
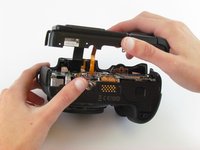
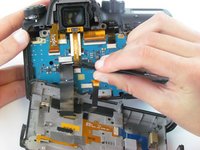
Use tweezers to pull the five ribbon cables horizontally out of their clips.
-
Use a spudger or your fingernail to flip up the four, small retaining flap, or zero insertion force (ZIF) connectors. Then, pull the ribbon cable out to disconnect it.
-
Remove the green tape using your fingernail. Then, use a spudger to pry the one antenna cable connector straight up from the board.
-
Use tweezers or a spudger to pry up each side of the flat-topped connector. Then, lift the one connector straight up from its socket.
-
Use tweezers or your fingers to pull the two double-bundled cables up and away from the connector in the same direction that the individual wires are running.
-
-
-
Use the Phillips #00 screwdriver to remove the six silver 4.5 mm screws.
-
-
-
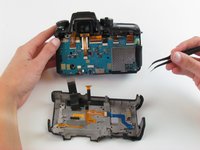
Use a spudger to lift the motherboard up starting on the right side proceeding to the left side.
-
Use your fingers to lift the motherboard completely out of the camera.
Thanks for your repair guides. My question is post it on another thread, but maybe you can help me.
The tripod connector on the bottom of my Samsung NX1 camera became stripped. I have tried to fix it with a repair kit, with 1/4"-20 coil to insert in the hole.I had no luck and this way it can't be repaired. I am now trying to find a spare part (a tripod plate or the socket inside the camera), but I have not succeeded. Do you know where I can find it? Maybe another socket from a different camera model might fit. On eBay I have found several from other cameras, they look very similar to each other, but I haven't opened the camera and I don't know what the one on the NX1 looks like. Since you opened the camera several times for your repair guides, do you by any chance have a picture of what this socket looks like? Thank you very much. -


To reassemble your device, follow these instructions in reverse order.
To reassemble your device, follow these instructions in reverse order.
crwdns2935221:0crwdne2935221:0
crwdns2935229:04crwdne2935229:0
crwdns2915084:0crwdne2915084:0

USF Tampa, Team 1-4, Leahy Spring 2016 crwdns2935289:0USF Tampa, Team 1-4, Leahy Spring 2016crwdne2935289:0
USFT-LEAHY-S16S1G4
crwdns2931471:03crwdne2931471:0
crwdns2935297:06crwdne2935297:0
crwdns2947412:04crwdne2947412:0
Hi this was very informative, bt do you know where i can find a replacemen mainboard ?...i've been looking but no luck
Hi all
Does anyone know where can I found the service manual for this camera? I really need it!!! I need to take off the upper buttons and the upper LCD screen!!!
Thanks in advance.
Sotirios Konstantinou
sotsma@gmail.com
Hi, thanks for the tutorial ! I would like to know where i can find a motherboard for samsung nx1 please ? I would like to buy it because my sd card broke the sd slot of my camera. Thanks for your help.
Hello, the mode switch does not function well. I want to buy a top cover complete with all the switches. Please tell me how to replace this cover. Thank.