crwdns2933423:0crwdne2933423:0

Samsung Galaxy Tab A 10.1 Screen Replacement

crwdns2942213:0crwdne2942213:0

  1. Samsung Galaxy Tab A 10.1 Screen Replacement, Back Panel: crwdns2935265:01crwdnd2935265:01crwdnd2935265:02crwdne2935265:0 Samsung Galaxy Tab A 10.1 Screen Replacement, Back Panel: crwdns2935265:01crwdnd2935265:02crwdnd2935265:02crwdne2935265:0
    • Have the front of the device facing you.

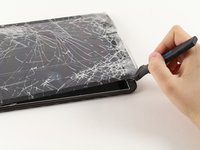
    • Begin near one of the curved edges of the device (see photo two for visual example).

    • Place a plastic opening tool between the front and back panels.

    • If a plastic opening tool doesn’t work, using a metal spudger may work, but it may damage the plastic on the device.

    • Remember to remove the micro SD card (if present) before you begin.

    AWESOME!! I was trying to open it from the “NOT OK” place and you saved me to broken the screen… thanks!!

    David Leiva - crwdns2934203:0crwdne2934203:0

    No problem, enjoy.

    Roger L. Ortiz -

    Felt it was easier for me to do it from the middles out.

    Tanin Garcia - crwdns2934203:0crwdne2934203:0

    @rogerlortiz You two seem to be miscommunicating. The author points out the location between the digitizer and frame in which to place a tool. While @Tanin Garcia, whom no longer seems to be member, was pointing out where along the edge from corner to corner it was best to start the separating process.

    B. A. Computer Services -

    Important: the display is sourrounded with a plastic frame. You need to get beween this frame an the backcover (not directly at glass edge as I tried it first and almost broke the glass). Get a closeup picture of it to clarify.

    Oliver Dawid - crwdns2934203:0crwdne2934203:0

    wer lesen kann, ist klar im Vorteil - ich hab die SD-Karte drin gelassen. Hat aber funktioniert…

    Thomas Wolter - crwdns2934203:0crwdne2934203:0

    Don’t use a very small flathead screwdriver as a spudger. Just shattered the screen :(

    nikvoss - crwdns2934203:0crwdne2934203:0

    Yes, shattered the screen. To the garbage, it goes. A little knowledge is a dangerous thing. This a repair better suited for a professional repair! Thanks for helping me make the decision to get another one!

    vancega - crwdns2934203:0crwdne2934203:0

  2. Samsung Galaxy Tab A 10.1 Screen Replacement: crwdns2935265:02crwdnd2935265:01crwdnd2935265:02crwdne2935265:0 Samsung Galaxy Tab A 10.1 Screen Replacement: crwdns2935265:02crwdnd2935265:02crwdnd2935265:02crwdne2935265:0
    • Once the plastic opening tool is fully inserted, wedge it around the device’s edges to separate the panels.

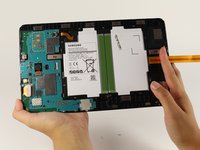
    • Lift the back panel off of the device.

    • The back panel will make a clicking noise while being lifted off of the device.

  3. Samsung Galaxy Tab A 10.1 Screen Replacement, Disconnecting the battery: crwdns2935265:03crwdnd2935265:01crwdnd2935265:01crwdne2935265:0
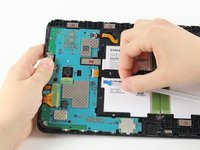
    • Remove the adhesive film and flip up the retaining flap on the ZIF battery connector.

    • Slide the orange battery ribbon cable out of the ZIF connector.

    BEWARE!!! later on Samsung tablets the tab holding the main cable (marked “MAIN”) breaks as soon as you attempt to lift the tab to remove the ribbon! I reckon Samsung designed this breakabloe tab to not only avoid the warranty, but the render the tablet useless!

    graham chapman - crwdns2934203:0crwdne2934203:0

    Happened to me also, in order to replace that broken tab, do you think it will be necessary to replace the motherboard? I highly doubt we can find the parts to fix (replace) the flip-tab.

    jeanuhlik -

    I also had this problem, the connector broke, even if i was very careful, i still can use the tablet, i pushed the “main” cable in place and used a little bit of hotmelt glue to hold it in place.

    Yannick - crwdns2934203:0crwdne2934203:0

    I tried using aluminum foil to make the connection but it didn’t help at all, how did you attach it with the glue gun???

    jeanuhlik - crwdns2934203:0crwdne2934203:0

    LOOK what I found!!! its the replacement for the connector we broke!!!https://www.parts4repair.com/samsung-gal...

    jeanuhlik - crwdns2934203:0crwdne2934203:0

    i just wonder how u gonna solder this tiny thingie

    Mike Muley -

    I wish I had read this thread before I removed the cable and broke the connector. Unfortunately I have not been able to reattach the cable and my tablet is dead.

    If there is no way to remove this cable, why is this fix even posted here? I find this exceptionally uncool!

    Derek N. Eder - crwdns2934203:0crwdne2934203:0

    Whoever broke the connector was trying to open it the wrong way. I have oil spilled in mine after I replaced my screen and digitizer together if you only replace the screen it is more difficult. I say changing both together is simpler. And I will share a pic either way I just might mess up MY connector. To be continued

    909 - crwdns2934203:0crwdne2934203:0

  4. Samsung Galaxy Tab A 10.1 Screen Replacement: crwdns2935265:04crwdnd2935265:01crwdnd2935265:02crwdne2935265:0 Samsung Galaxy Tab A 10.1 Screen Replacement: crwdns2935265:04crwdnd2935265:02crwdnd2935265:02crwdne2935265:0
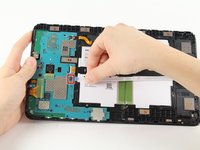
    • Remove the adhesive film, lift the retaining tab and withdraw the white speaker ribbon.

  5. Samsung Galaxy Tab A 10.1 Screen Replacement: crwdns2935265:05crwdnd2935265:01crwdnd2935265:03crwdne2935265:0 Samsung Galaxy Tab A 10.1 Screen Replacement: crwdns2935265:05crwdnd2935265:02crwdnd2935265:03crwdne2935265:0 Samsung Galaxy Tab A 10.1 Screen Replacement: crwdns2935265:05crwdnd2935265:03crwdnd2935265:03crwdne2935265:0
    • Lift the retaining tab and withdraw the black LCD ribbon.

    It's possible to replace only the lcd cable connector? Ist das möglich nur das Flachbandkabel zu tauschen?

    Lima - crwdns2934203:0crwdne2934203:0

  6. Samsung Galaxy Tab A 10.1 Screen Replacement, Battery removal: crwdns2935265:06crwdnd2935265:01crwdnd2935265:02crwdne2935265:0 Samsung Galaxy Tab A 10.1 Screen Replacement, Battery removal: crwdns2935265:06crwdnd2935265:02crwdnd2935265:02crwdne2935265:0
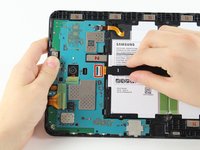
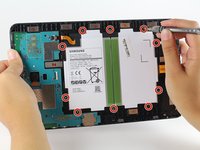
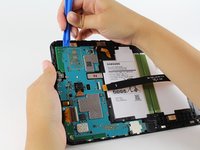
    • Using a Phillips #000 screwdriver, remove the ten 4 mm screws around the battery.

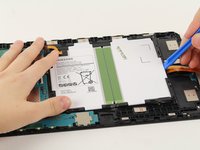
    • Slide a plastic opening tool under the bottom of the battery close to the speakers and lift up.

    • The large rectangular white and black piece is the entire battery. Be careful not to puncture it.

  7. Samsung Galaxy Tab A 10.1 Screen Replacement, Motherboard: crwdns2935265:07crwdnd2935265:01crwdnd2935265:03crwdne2935265:0 Samsung Galaxy Tab A 10.1 Screen Replacement, Motherboard: crwdns2935265:07crwdnd2935265:02crwdnd2935265:03crwdne2935265:0 Samsung Galaxy Tab A 10.1 Screen Replacement, Motherboard: crwdns2935265:07crwdnd2935265:03crwdnd2935265:03crwdne2935265:0
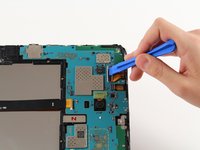
    • Flip up the two ZIF connectors on the motherboard using the plastic opening tool.

    • Slide the orange ribbon cables out of the ZIF connectors.

    • Remove the front-facing camera.

    This step omits the disconnection of the battery from the motherboard , which is shown disconnected in this picture but was connected in the previous step

    Christopher Ford - crwdns2934203:0crwdne2934203:0

    Thanks for bringing this to our attention. We added the relevant battery disconnection steps—hope this helps!

    Kristen Gismondi - crwdns2934203:0crwdne2934203:0

    If the model you are working on is the T585 you will need to carefully pry up the blue antennae cable and disconnect the sim card slot from the motherboard.

    Brendon Gould - crwdns2934203:0crwdne2934203:0

  8. Samsung Galaxy Tab A 10.1 Screen Replacement: crwdns2935265:08crwdnd2935265:01crwdnd2935265:01crwdne2935265:0
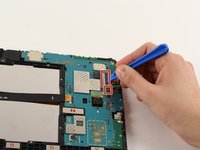
    • Disconnect the headphone jack from the motherboard.

    • Use a Phillips # 000 to remove six 4mm screws.

    die ganze Platine musste ich gar nicht ausbauen. Ich konnte die Kopfhörerbuchse vorsichtig mit einem kleinen flachen Schrubendreher lösen.

    Thomas Wolter - crwdns2934203:0crwdne2934203:0

  9. Samsung Galaxy Tab A 10.1 Screen Replacement: crwdns2935265:09crwdnd2935265:01crwdnd2935265:02crwdne2935265:0 Samsung Galaxy Tab A 10.1 Screen Replacement: crwdns2935265:09crwdnd2935265:02crwdnd2935265:02crwdne2935265:0
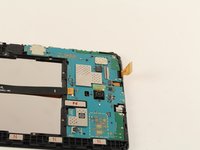
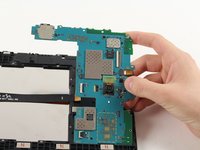
    • Lodge the plastic opening tool under and lift the motherboard out of the tablet.

    • Be careful not to snag any connectors.

    • Remove the metal bracket that was underneath the charging port and set aside.

    Replacing the broken screen, I stupidly unhooked the LCD with a metal screwdriver. It makes the sound of coming on but no picture. Is that the motherboard?

    MARGARET - crwdns2934203:0crwdne2934203:0

    I replaced screen once before and had no problem except using a screwdriver this time.

    MARGARET - crwdns2934203:0crwdne2934203:0

    I have tab a charging and show on screen but not starting at all motherboard water damage I clean all there any way make it start by motherboard with out power button

    waleed nawzad - crwdns2934203:0crwdne2934203:0

    TIP: Before next step (or sooner), cover cracked/broken glass with transparent tape to avoid (I didn't) or minimize small shards of glass falling into work area and onto your clothing.

    Bruce Grant - crwdns2934203:0crwdne2934203:0

  10. Samsung Galaxy Tab A 10.1 Screen Replacement, Screen: crwdns2935265:010crwdnd2935265:01crwdnd2935265:02crwdne2935265:0 Samsung Galaxy Tab A 10.1 Screen Replacement, Screen: crwdns2935265:010crwdnd2935265:02crwdnd2935265:02crwdne2935265:0
    • The screen may crack during removal, so be wary of broken glass. Apply heat as necessary around the edges of the screen to loosen the adhesive, but be careful not to melt the plastic frame of the tablet.

    • Starting on the side of the tablet near the bottom, heat the area and insert a metal jimmy or opening pick between the digitizer and the frame.

    • Separate the adhesive on the bottom of the tablet first, then work up the sides. The digitizer ribbon cable is located at the top and passes through a slot in the mid-frame. It is easily torn or damaged in the final stages of removing the glass.

    • If the glass is intact and you intent ro reuse it, take care not to insert the jimmy further than the width of the black screen border or you risk damaging the digitiser, which is a thin plastic film stuck to the bck of the glass.

    • The adhesive tends to stick to the plastic mid-frame rather than the glass but it will separate more easily and cleanly from the midframe if you can start it lifting at one point. This will also reduce the risk of damaging the digitiser film.

    The screen glass extremely stick to the LCD. I broke the LCD because the screen glass is already broken terribly so I had to pull the plastic (between screen and LCD) together with the broken glass. So sad. This is the worst step which took hours to complete

    Muhammad Ichsan - crwdns2934203:0crwdne2934203:0

  11. Samsung Galaxy Tab A 10.1 Screen Replacement: crwdns2935265:011crwdnd2935265:01crwdnd2935265:01crwdne2935265:0
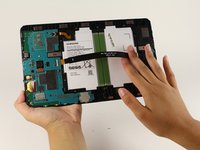
    • Turn the tablet over and lodge the plastic opening tool under the screen to take it out of the device.

    • The LCD panel is stuck to the mid-frame with double sided tape. Lift gently and progressively, giving the adhesive time to give way.

    This picture does not appear to be from an SM-T580. I have one in front of me and the glass goes all the way to the edge, one piece with a cutout for the home button in middle of the glass at the bottom.

    B. A. Computer Services - crwdns2934203:0crwdne2934203:0

crwdns2915888:0crwdne2915888:0

To reassemble your device, follow these instructions in reverse order.

crwdns2935229:044crwdne2935229:0

Isabella Li

crwdns2935283:010/02/17crwdne2935283:0

2,358 crwdns2915208:0crwdne2915208:0

crwdns2935297:07crwdne2935297:0

crwdns2915084:0crwdne2915084:0

Cal Poly, Team S15-G6, Livingston Fall 2017 crwdns2935289:0Cal Poly, Team S15-G6, Livingston Fall 2017crwdne2935289:0

CPSU-LIVINGSTON-F17S15G6

crwdns2931471:04crwdne2931471:0

crwdns2935297:026crwdne2935297:0

crwdns2944067:021crwdne2944067:0

Will be trying this in the next couple of days, see there was no heat gun used to take the front glass off, I’m only replacing the LCD so does the touch glass need warming to remove or does it just jimmy off?

tcatt - crwdns2934203:0crwdne2934203:0

I would Personally HIGHLY RECOMMEND Heat.

this Guide Perturbs me slightly.It never detaches the battery from motherboard and misses a couple of the Connectors it feels like its skipping steps.

iCovers Customer Service -

After replacing the digitizer, my soft keys do not function. The home button works just fine, but i cannot press the back button or the recent application button. Would this be due to a faulty digitizer? Or could it possibly be a faulty ‘ daughter board “? ( not positive if the home button working excludes this theory )

Lance Basinger - crwdns2934203:0crwdne2934203:0

Same problem here. Did u fix a fix?

Jesse Martucci -

Same here HAS ANYONE SOLVED THIS ISSUE

Collin Babb -

Hi, could you help me with how to change a LCD cable for same device. Many thanks

Timur H - crwdns2934203:0crwdne2934203:0

Hi, is it still possible to replace just the touchscreen which is cracked, the LCD seems fine and the touch sensitivity is still there. Iam looking for guidance as where to purchase a replacement screen and the correct adhesive tape to be used. Some advice would be greatly appreciated.

Colin Kelly - crwdns2934203:0crwdne2934203:0

Look for a model number on the back of your tablet and search ebay, MobileSentrix, etc for a digitizer. The correct adhesive tape to use is Tesa 61395, sold by iFixit and elsewhere.

Patrick -

I only had to replace the digitizer on mine, lcd was good.

Heat did the trick for me. Start at the end with the bottom so it can hinge to finish. I also put packing tape on the edges so the glass might stay in place.

Thanks for the guide!

George Tedrick - crwdns2934203:0crwdne2934203:0

Hey guys. Just changed mine. All is rightly connected, but when I hit the power button, I see lines from top to bottom instead of the samsung logo. As if the display could only proceed the vertical display. Any hints?

Mtler - crwdns2934203:0crwdne2934203:0

Likely a damaged LCD or LCD cable.

Patrick -

Hello,

first of all thanks for the guide!!

After completing all the steps, i tried to turn it on. But nothing happened, screen was black. Only hear a „beep“ when plugging it off… Does anyone have an idea?

Thanks in advance!

Tobias - crwdns2934203:0crwdne2934203:0

I am waiting on my digitizer I hope I ordered the right one

ill let you know how it goes

909 - crwdns2934203:0crwdne2934203:0

I am using this guide to simply open and disconnect the LCD from the power to (hopefully) deal with the battery being drained and when charging automatically using up the intitial charge trying to light up the screen (either a non-charging battery sign on the screen for a few seconds before turning off, or it begins to flicker, either state lasts indefinitely w ith no response to any button configuration).

If it t urns out to be right off or bang on, I will try to check back and post the results.

The pain in the *** that has me upset is that when it came time to “lift the retaining tab for the battery cable, the %#*@ instructions didn’t specify that it was only needed to a minute degree, rather than the 90 degrees required by most of it’s bigger cousins.

So now I have to figure out how to replace THAT without going to a Samsung repair location when I am having to worry about rent after losing my job.

THAT is why including EVERY SINGLE STEP and detail is important for DIY instructions, including repetition.

dreadnex.inc - crwdns2934203:0crwdne2934203:0

Constructive comments (once you’ve cooled off from your frustration) are always welcome. If you’ve ever tried writing a guide yourself you’ll know how hard it is to cover every problem anyone will encounter, including people with different skill levels to your own, and meanwhile, manufacturers change things. Some 15 people have contributed to this guide or added useful comments and it’s still not perfect as no guide will ever be, but 23 people have successfully completed it, which isn’t bad! In fixing you WILL make mistakes and sometimes you WILL break things - it’s all part of the learning process.

Philip Le Riche - crwdns2934203:0crwdne2934203:0

Thanks a lot for this amazing tutorial! I had the complete screen including plastic frame as a replacement part. Therefore everything after step 9 was slightly different. Would you be able to add this alternative route to the tutorial? All the best!

Banana - crwdns2934203:0crwdne2934203:0

Thanks. My tablet is useless now. All because of image 2 in step 1.

Denis - crwdns2934203:0crwdne2934203:0

I had much the same problem and result referencing image 1.2.

I think part of the problem may be that this guide is for Galaxy Tab A 10.1 2016 (T585?).

I deduced that from image 4.2 which shows a 2016 date on the battery, also reviewing the dates of the earlier posts.

Mine is a Galaxy Tab A 10.1 2019 T515 (someone I loaned it to shattered the screen for me.)

Might want to make a note of the model on the post and in particular the display reorder link .

Thanks

Darrel Dronet -

Can I just use a hairdryer?

N64 - crwdns2934203:0crwdne2934203:0

Possibly. You need to get the screen (or the bit you’re working on) slightly hotter than you can comfortably touch.

Philip Le Riche -

I just replaced the digitizer on my Galaxy Tab A 2016 SM-T580 and.. everything has gone from bad to worse. Upon replacement, I never disconnected the battery; when I installed the new screen and tested it, my touchscreen wouldn't respond. I tried to turn off the device somehow using only buttons, didn't work, so I went ahead and disconnected the white and gold cables. Upon reattaching them, my tablet is completely unresponsive and won't turn on.

Shlingus Dingus - crwdns2934203:0crwdne2934203:0

crwdns2917038:0crwdne2917038:0

crwdns2936625:0crwdne2936625:0:

crwdns2936751:024crwdne2936751:0 13

crwdns2936753:07crwdne2936753:0 135

crwdns2936753:030crwdne2936753:0 568

crwdns2942667:0crwdne2942667:0 132,728