crwdns2915892:0crwdne2915892:0
If you cannot take pictures with your device, you may need to replace the camera.
In this guide, you will learn how to replace the front camera.
Caution: Some images display the steps using a metal spudger. Use the heavy-duty spudger instead to avoid damaging your circuits.
For more information on connectors, visit this page.
crwdns2942213:0crwdne2942213:0
-
crwdns2935267:0crwdne2935267:0Heavy-Duty Spudger$4.99
-
Insert the plastic opening tool between the glass screen and the back cover so the curved end of the plastic opening tool is under the glass. Gently pry the back cover away from the glass screen.
-
Be sure to lift the entire display from the body and that you are not are lifting the glass from the display. You will need to reach down a little further for the correct removal.
-
Continue inserting the plastic opening tool around the whole device screen to completely separate the back cover from the glass screen.
-
-
-
Gently lift the screen up with your finger.
-
-
-
-
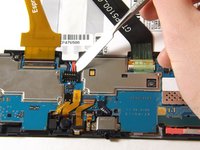
Using your fingers, remove the green tape covering the battery connector.
-
-
crwdns2935267:0crwdne2935267:0Heavy-Duty Spudger$4.99
-
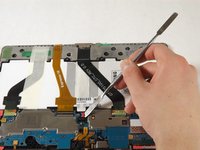
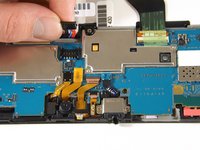
Insert the flat end of the heavy-duty spudger between the wires and underneath the battery connector. Carefully lift the black battery connector up to disconnect it from the motherboard.
-
-
crwdns2935267:0crwdne2935267:0Heavy-Duty Spudger$4.99
-
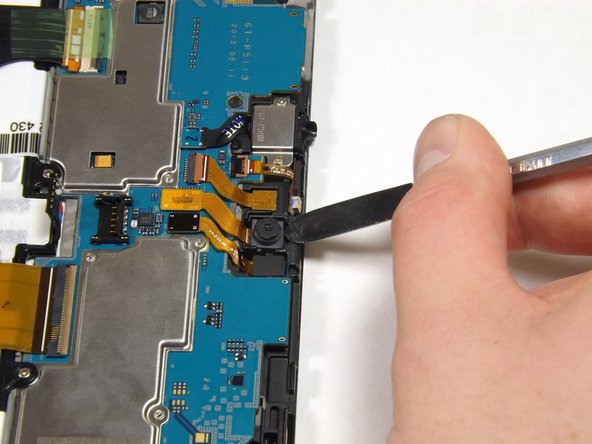
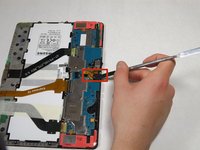
Gently lift the camera from its socket with the flat end of the heavy-duty spudger.
-
-
-
Gently lift the gold cable connector with the flat end of the heavy-duty spudger to disconnect it from the device.
-


To reassemble your device, follow these instructions in reverse order.
To reassemble your device, follow these instructions in reverse order.
crwdns2935221:0crwdne2935221:0
crwdns2935229:08crwdne2935229:0

crwdns2915084:0crwdne2915084:0

Cal Poly, Team 6-26, Amido Winter 2015 crwdns2935289:0Cal Poly, Team 6-26, Amido Winter 2015crwdne2935289:0
CPSU-AMIDO-W15S6G26
crwdns2931471:05crwdne2931471:0
crwdns2935297:014crwdne2935297:0
Note that the headphone port protrudes into the back cover framing. Hence the rest of the back needs to be unclipped and taken off first.
Levi Howard - crwdns2934203:0crwdne2934203:0
I had problems getting it to separate at first. Pushing down with my thumb on the very edge of the case from the front while pushing up with my fingers from the back flexed it enough to get a very small jeweler’s screwdriver in the gap. From there I worked it until I could get the little bread wrapper plastics clips in the space. When it needed something stronger a 1 or 2 inch plastic putty knife from Walmart did the trick.
William H Bowers - crwdns2934203:0crwdne2934203:0
I replaced the battery and nothing no screen nothing. the batt was 3.7 V though.
The old one had 0V. I might have messed up the ribbon cables?
I put back the cover on it.
Held on the power button for 10 seconds, nothing. Held the power button and the volume up button for 10 seconds… also nothing..
I am leaving it charge for a while now. Even though if your battery is like full (3.7V measured) it should come on… but nothing..
Lets wait and see. Or this will be garbage…
xbox40489 - crwdns2934203:0crwdne2934203:0