crwdns2933423:0crwdne2933423:0

Samsung Galaxy S8 Plus Back Glass Replacement

crwdns2942213:0crwdne2942213:0

  1. Samsung Galaxy S8 Plus Back Glass Replacement, Back Glass: crwdns2935265:01crwdnd2935265:01crwdnd2935265:01crwdne2935265:0
    • Opening your phone will compromise its waterproof seals. Have replacement adhesive ready before you proceed, or take care to avoid liquid exposure if you reassemble your phone without replacing the adhesive.

    • Prepare an iOpener and heat the back of the phone along its left edge for about two minutes. This will help soften the adhesive securing the back cover.

    • You may need to reheat and reapply the iOpener several times to get the phone warm enough. Follow the iOpener instructions to avoid overheating.

    • A hair dryer, heat gun, or hot plate may also be used, but be careful not to overheat the phone—the OLED display and internal battery are both susceptible to heat damage.

  2. Samsung Galaxy S8 Plus Back Glass Replacement: crwdns2935265:02crwdnd2935265:01crwdnd2935265:02crwdne2935265:0 Samsung Galaxy S8 Plus Back Glass Replacement: crwdns2935265:02crwdnd2935265:02crwdnd2935265:02crwdne2935265:0
    • In the following steps, you'll be cutting through the adhesive securing the back cover.

    • The adhesive is laid out as seen in the first image, which shows the inside of the cover after it has been removed.

    • As seen from outside the phone, you'll be slicing through the adhesive in the areas shown:

    • Thick portions of adhesive

    • Thin areas of adhesive

    • Avoid prying or slicing in this area, to protect the fingerprint sensor flex cable.

  3. Samsung Galaxy S8 Plus Back Glass Replacement: crwdns2935265:03crwdnd2935265:01crwdnd2935265:02crwdne2935265:0 Samsung Galaxy S8 Plus Back Glass Replacement: crwdns2935265:03crwdnd2935265:02crwdnd2935265:02crwdne2935265:0
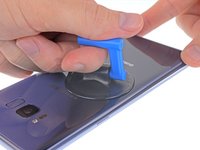
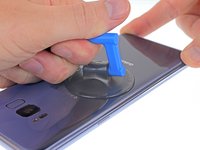
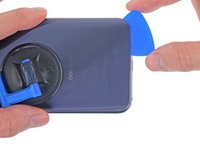
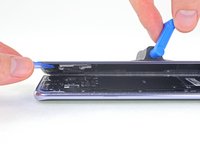
    • Secure a suction cup to the back cover, as close to the heated edge as possible.

    • The suction cup will not make a good seal on the curved portion of the glass, so avoid putting it on the very edge.

    • If the phone's back cover is cracked, the suction cup may not stick. Try lifting it with strong tape, or superglue the suction cup in place and allow it to cure so you can proceed.

    • Lift the back cover's left edge with your suction cup, opening a slight gap between the back cover and the frame.

    • This may require a significant amount of force, but you only need to open a very slight gap with the suction cup to insert your tool.

    • If you have trouble, apply more heat to further soften the adhesive, and try again. The adhesive cools very fast, so you may need to heat it repeatedly.

    • If you're using an iOpener, follow instructions to avoid overheating it, or the gel pack may burst.

  4. Samsung Galaxy S8 Plus Back Glass Replacement: crwdns2935265:04crwdnd2935265:01crwdnd2935265:02crwdne2935265:0 Samsung Galaxy S8 Plus Back Glass Replacement: crwdns2935265:04crwdnd2935265:02crwdnd2935265:02crwdne2935265:0
    • Insert an opening pick into the gap.

    • The rear glass can break if you use too much force or attempt to pry with metal tools.

    • Optionally, once the pick is inserted, you can add a few drops of isopropyl alcohol into the gap to help weaken the adhesive in the following steps.

    I strongly advise using a modeling knife to cut the adhesive when you get a sufficient gap otherwise you may easily break the corners of the extremely thin back glass on the phone (as I did).

    Michael De Angelis - crwdns2934203:0crwdne2934203:0

    There are NO "Opening Picks" in the repair kit!!!!!

    CA Winters - crwdns2934203:0crwdne2934203:0

  5. Samsung Galaxy S8 Plus Back Glass Replacement: crwdns2935265:05crwdnd2935265:01crwdnd2935265:03crwdne2935265:0 Samsung Galaxy S8 Plus Back Glass Replacement: crwdns2935265:05crwdnd2935265:02crwdnd2935265:03crwdne2935265:0 Samsung Galaxy S8 Plus Back Glass Replacement: crwdns2935265:05crwdnd2935265:03crwdnd2935265:03crwdne2935265:0
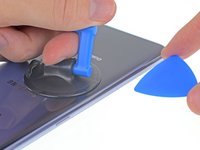
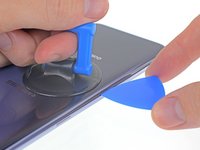
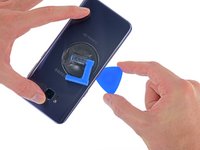
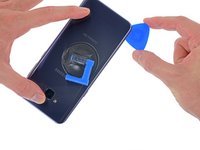
    • Slide your opening pick along the left edge of the phone to slice through the adhesive securing the back cover.

    • Afterward, it may help to leave the pick in place and grab a second pick as you proceed to the next step. Leaving the pick inserted can help prevent the glue you just separated from re-adhering.

  6. Samsung Galaxy S8 Plus Back Glass Replacement: crwdns2935265:06crwdnd2935265:01crwdnd2935265:02crwdne2935265:0 Samsung Galaxy S8 Plus Back Glass Replacement: crwdns2935265:06crwdnd2935265:02crwdnd2935265:02crwdne2935265:0
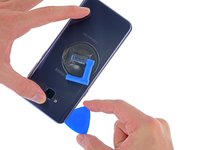
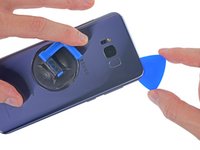
    • Continue slicing through the adhesive along the bottom edge of the phone.

    • Re-heat the back cover as needed to prevent the glue from cooling and hardening.

    • The glued area is larger here, so you'll need to insert your pick farther into the phone to fully separate it.

    • Again, it may help to leave the opening pick in place and grab another one for the following step.

  7. Samsung Galaxy S8 Plus Back Glass Replacement: crwdns2935265:07crwdnd2935265:01crwdnd2935265:03crwdne2935265:0 Samsung Galaxy S8 Plus Back Glass Replacement: crwdns2935265:07crwdnd2935265:02crwdnd2935265:03crwdne2935265:0 Samsung Galaxy S8 Plus Back Glass Replacement: crwdns2935265:07crwdnd2935265:03crwdnd2935265:03crwdne2935265:0
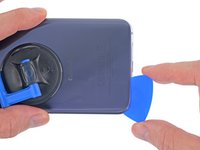
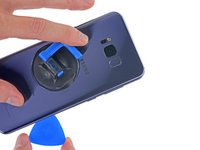
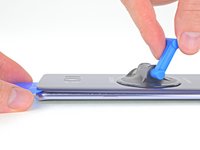
    • Slice through the remaining adhesive along the top edge and right side.

    • You can damage the fingerprint sensor's flex cable if you insert your pick too far in this step. Work carefully and use the diagram in step 2 for guidance.

  8. Samsung Galaxy S8 Plus Back Glass Replacement: crwdns2935265:08crwdnd2935265:01crwdnd2935265:02crwdne2935265:0 Samsung Galaxy S8 Plus Back Glass Replacement: crwdns2935265:08crwdnd2935265:02crwdnd2935265:02crwdne2935265:0
    • Don't try to fully remove the back cover yet.

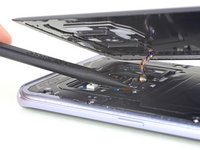
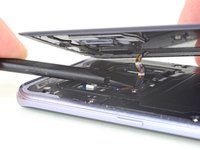
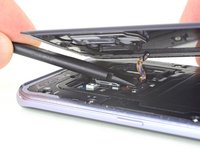
    • Lift the back cover from its left edge and hinge it open slightly.

  9. Samsung Galaxy S8 Plus Back Glass Replacement: crwdns2935265:09crwdnd2935265:01crwdnd2935265:02crwdne2935265:0 Samsung Galaxy S8 Plus Back Glass Replacement: crwdns2935265:09crwdnd2935265:02crwdnd2935265:02crwdne2935265:0
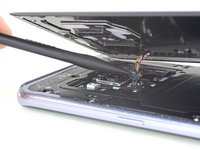
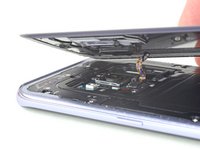
    • Use the point of a spudger to pry up and disconnect the fingerprint sensor flex cable.

  10. Samsung Galaxy S8 Plus Back Glass Replacement: crwdns2935265:010crwdnd2935265:01crwdnd2935265:03crwdne2935265:0 Samsung Galaxy S8 Plus Back Glass Replacement: crwdns2935265:010crwdnd2935265:02crwdnd2935265:03crwdne2935265:0 Samsung Galaxy S8 Plus Back Glass Replacement: crwdns2935265:010crwdnd2935265:03crwdnd2935265:03crwdne2935265:0
    • During reassembly, in order to reconnect the fingerprint sensor cable, first angle the back cover into position until the cable connector lines up perfectly over its socket.

    • Then, use the flat end of your spudger to gently snap the connector into place by pressing it straight down.

    • If you have slender hands, you may be able to press the connector into place with your finger. Just be careful not to strain the cable.

    • This takes patience and a bit of practice. Don't rush it or attempt to force the connector into place.

  11. Samsung Galaxy S8 Plus Back Glass Replacement: crwdns2935265:011crwdnd2935265:01crwdnd2935265:01crwdne2935265:0
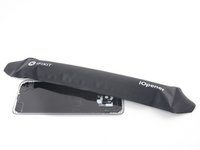
    • Remove the back cover.

    • To install a new back cover:

    • Use tweezers to peel away any remaining adhesive from the phone's chassis. Then clean the adhesion areas with high concentration isopropyl alcohol (at least 90%) and a lint-free cloth to prep the surface for the new adhesive.

    • Peel the adhesive backing off of the new rear glass, carefully line up one edge of the glass against the phone chassis, and firmly press the glass onto the phone.

    • To reinstall the back cover, or to install a back cover without pre-installed adhesive, follow this guide.

    • Be sure to turn on your phone and test your repair before installing new adhesive and resealing the phone.

    • If desired, you may reinstall the back cover without replacing the adhesive. Remove any large chunks of adhesive that might prevent the back cover from sitting down flush. After installation, heat the back cover and apply pressure to secure it. It won't be waterproof, but the glue is usually more than strong enough to hold.

    • You may also need to transfer the camera bezel to your new part. If that's the case, follow our camera bezel replacement guide.

  12. Samsung Galaxy S8 Plus Back Glass Replacement, Back Glass: crwdns2935265:012crwdnd2935265:01crwdnd2935265:02crwdne2935265:0 Samsung Galaxy S8 Plus Back Glass Replacement, Back Glass: crwdns2935265:012crwdnd2935265:02crwdnd2935265:02crwdne2935265:0
    • If you're installing a new rear glass panel, you'll also need to transfer the fingerprint sensor to your new rear glass panel as follows:

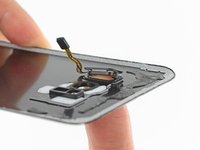
    • Reheat an iOpener and apply it to the fingerprint sensor, in order to soften the adhesive securing it to the rear glass.

    • Push gently but firmly against the fingerprint sensor from the outward-facing side of the glass panel, until the adhesive securing it separates.

    • If you have trouble pushing the fingerprint sensor out, apply more heat, and/or carefully slide a pick along the edge of the sensor to cut some of the adhesive.

    There is a small plastic bracket between the fingerprint sensor and the back plate. Make sure this is on your replacement part, the sensor doesn’t adhere right without it. If it isn’t, transfer it over from the old plate. In my infinite wisdom, I ended up breaking the new part trying to press the sensor into place.

    zwinkey98 - crwdns2934203:0crwdne2934203:0

  13. Samsung Galaxy S8 Plus Back Glass Replacement: crwdns2935265:013crwdnd2935265:01crwdnd2935265:01crwdne2935265:0
    • If the fingerprint sensor adhesive is intact, it may be reused, but if damaged at all you should remove the old adhesive and apply replacements.

    • After removing the old adhesive, clean the edges of the fingerprint sensor with high concentration isopropyl alcohol (at least 90%), then apply the new adhesive.

crwdns2915888:0crwdne2915888:0

To reassemble your device, follow these instructions in reverse order.

After you've completed the repair, follow this guide to test your repair.

crwdns2935229:036crwdne2935229:0

Adam O'Camb

crwdns2935283:004/11/15crwdne2935283:0

195 348 crwdns2915208:0crwdne2915208:0

crwdns2935297:0416crwdne2935297:0

crwdns2944067:017crwdne2944067:0

If I don't have a microwave to heat the iOpener, can i boil it for a few seconds maybe?

Nick F - crwdns2934203:0crwdne2934203:0

I’d highly recommend skipping the iOpener all together and just buy some isopropyl alcohol (found at most Walgreen/RiteAids/Walmarts) and some q-tips instead. Even with the iOpener as hot as they say to get it and hours of letting the heat soak into the adhesive, I still ended up cracking my rear panel glass in the corners, which makes removal even harder/dangerous with shards of glass falling off.

Scott -

@Nick sure, you even can put some noodles while you cook your s8.

Jaro Alekseenko - crwdns2934203:0crwdne2934203:0

If the back is very cracked, it will be a lot harder!

bartonjenn314 - crwdns2934203:0crwdne2934203:0

If I'm purchasing the Tesa 61395 Tape separately, which size did I need? The 1mm?

Ana Hernandez - crwdns2934203:0crwdne2934203:0

Hi Ana, I’d recommend the 1 mm tape, as it can fit into the small edges around the cover.

Adam O'Camb -

Will using the Tesa 61395 1mm Tape also ensure a watertight seal (similar to the default IP68 rating)? Or will I never be able to trust my phone around water again after replacing the back glass?

Tom Bard - crwdns2934203:0crwdne2934203:0

Hi Tom! Unfortunately, using Tesa tape won’t guarantee any kind of seal. Using a rear cover adhesive strip instead would add some water resistance—definitely more than tape—but I still wouldn’t trust an opened phone to be watertight at all.

Adam O'Camb -

Do I need to purchase another Fingerprint sensor if the one currently on my phone works properly??

The Nerd You know - crwdns2934203:0crwdne2934203:0

You shouldn’t need to, as long as it still works and the ribbon cable isn’t damaged. You will need to remove it from the rear glass panel and transfer it to the new rear panel you’re installing. Word of caution though: you have to buy the fingerprint sensor replacement adhesive separately as it doesn’t come with the rear glass panel adhesive kit. This seemed a bit misleading to me, but I found out the hard way and ended up having to buy some tape locally to get it done. I’m not sure why they don’t include it in the kit, since the camera and flash adhesive is included.

I personally used isoproyl alcohol (and avoided the iOpener) to remove the fingerprint reader carefully. I also avoided separating the fingerprint reader from its circuit board assembly, because otherwise there is another gasket you’d have to replace.

Scott -

Be careful not to remove the pad from fingerprint sensor.

Miroslav Pálka - crwdns2934203:0crwdne2934203:0

I have replaced back glass but it looks a little lose , I do not know how to fix it.

Matt B - crwdns2934203:0crwdne2934203:0

Highly recommend putting books (a few pounds of them) on it on a hard flat surface after installation of the new adhesive, for at least 30 minutes. As long as everything is lined up properly between the rear cover and the phone, it should go back to being nearly perfectly flush (no gaps for water to get in).

Scott -

Definitely use isopropyl alcohol instead of the iOpener. Wait 10-15 minutes after using the alcohol. The iOpener does not reach high enough temperatures for long enough to significantly weaken the adhesive properly. Worked on it for hours (followed the guide to a T) and still cracked my glass to figure this one out. Don’t make the same mistake (same goes for the battery adhesive as well, use a syringe and isopropyl alcohol as well for that one too).

Scott - crwdns2934203:0crwdne2934203:0

Where is the rest of this? How do I put it back together? Where do these glue strips go? What orientation? The green one didn't fit and I have no idea what to do with the blue one. The link for reassembly doesn't match, even slightly, to what I have. Overall I am not very impressed with any of these guides.

Jon Christensen - crwdns2934203:0crwdne2934203:0

If you have a 3D printer, you can just heat the bed to 70-80 Celsius, set the phone on it face-up, and let it cook for about 8-10 minutes before prying at it. Little isopropanol from a swab around the edges after it cooks and it should be easier to remove. Just don't forget about it. Excessive heat can damage several parts.

PsychoSunshine178 - crwdns2934203:0crwdne2934203:0

crwdns2917038:0crwdne2917038:0

crwdns2936625:0crwdne2936625:0:

crwdns2936751:024crwdne2936751:0 3

crwdns2936753:07crwdne2936753:0 35

crwdns2936753:030crwdne2936753:0 115

crwdns2942667:0crwdne2942667:0 46,051