crwdns2915892:0crwdne2915892:0
Use this guide to replace the motherboard.
crwdns2942213:0crwdne2942213:0
-
-
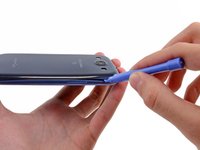
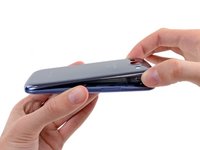
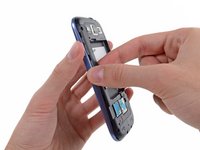
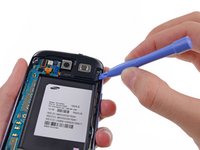
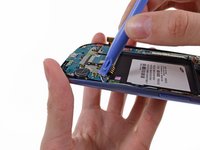
Insert a plastic opening tool or fingernail into the notch in the gap between the rear case and the rest of the phone, located at the top of the device.
-
Gently twist the opening tool to disconnect the clips securing the top of the rear case.
-
-
-
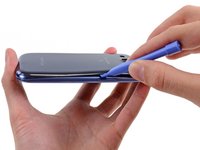
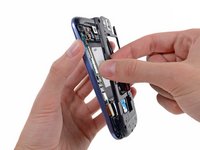
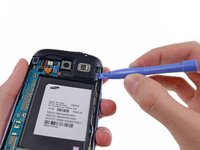
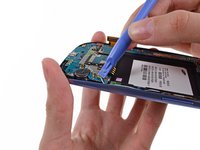
Slide the plastic opening tool left along the top edge and repeat the twisting motion to widen the gap between the rear case and the phone.
-
-
-
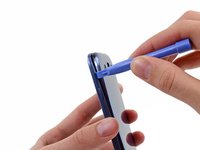
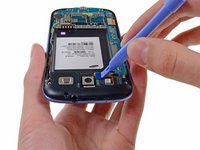
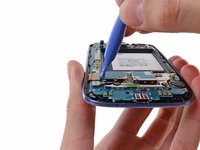
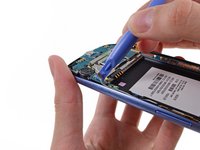
Continue to move the plastic opening tool around the perimeter of the top left corner, gently prying up along the rear case.
-
-
-
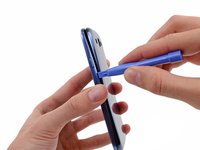
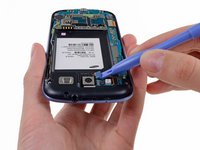
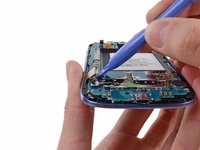
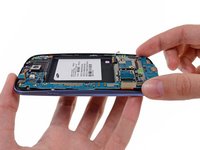
Pry along the top right side, and continue prying down the right side of the rear case.
-
-
-
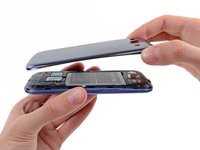
Lift up and remove the rear case from the phone.
-
-
-
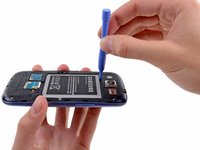
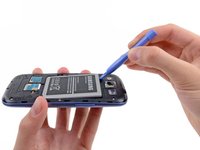
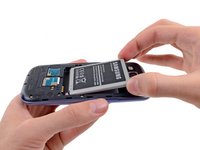
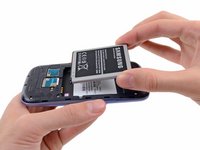
Wedge a plastic opening tool into the small notch above the battery.
-
Pry the battery up out of its recess.
-
-
-
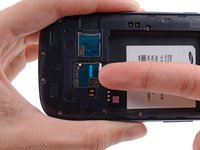
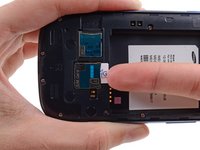
Using your fingernail, push the SIM card slightly deeper into its slot, until you hear a click.
-
After the click, release the card and it will pop out of its slot.
-
-
-
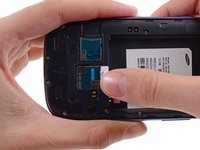
Use your thumb to slide enough of the SIM card out of its slot to grab ahold of it.
-
Grasp and remove the SIM card away from the phone.
-
-
-
-
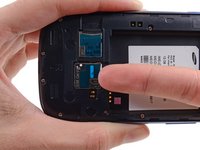
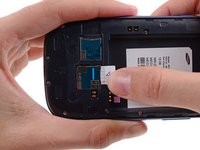
Using your fingernail, push the microSD card slightly deeper into its slot, until you hear a click.
-
After the click, release the card and it will pop out of its slot.
-
-
-
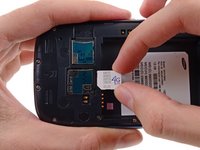
Use your thumb to slide the microSD card out of the slot.
-
Remove the microSD card from the phone.
Forgot about the step to remove the back casing...pretty simple though, just several screws then pop it off.
-
-
-
Remove the ten 4.0 mm Phillips screws securing the midframe to the front panel assembly.
What would you use to remove the screws
I used both P#000 and J#00 precision bits to good effect. I tend to prefer the Japanese Standard bits in place of Philips, as the JIS bits seem not to cam out and strip screws as easily.
E West -
-
-
-
Grasp the left side of the plastic midframe with your thumb and forefinger and lift it away from the phone.
There's another piece of the frame that needs to be taken out, but it doens't come out as nicely... unless I did something wrong. It's the part that covers the speaker. I couldn't find a nice way of taking it out.
I had to use a guitar-pick to pry that section off of the frame. Start at the front-facing camera edge and run the pick underneath the plastic cover. The catches should release.
I used a pointed prying too to get it started, then the flat one. It took some fiddling but finally came off nicely.
READ ME!
For a guide that takes you step by step on how to remove the SIM and microSD, I'm surprised they didn't mention the top part of this midframe (still attached, in the pictures). This top part of the midframe also needs to be removed before you can take out the motherboard.
You need to disconnect a ribbon not listed in these directions first, then pry that midframe up with the help of a guitar pick. This ribbon is located by the back-camera, next to the digitizer ribbon. This ribbon is connected to the midframe so it is essential you disconnect this before lifting the frame up.
The frame is really snapped in there so don't be afraid to use a little force - for reference, you will use more force to pull this frame off than you did to pull off the back-cover of the phone. Once this piece is off, your phone should look like the picture in step 14.
-
-
-
Use a plastic opening tool to pry the rear-facing camera connector up from its socket on the motherboard.
This is not a rear facing camera connector. This is the connector for the lHeadphone Jack/Speaker Assembly
You're right I
-
-
-
Insert a plastic opening tool outboard of the speaker portion of the headphone jack/speaker assembly.
-
Gently pry the headphone jack/speaker assembly up from the front assembly.
-
-
-
Lift the headphone jack/speaker assembly out of the Galaxy S III.
-
-
-
Use a plastic opening tool to pry the front-facing camera connector from its socket on the motherboard.
-
-
-
Disconnect the digitizer cable by gently prying its connector up from its socket on the motherboard.
Step 18 says the front digitizer connector, but later calls it the earpiece/buttons/ambient light sensor ribbon cable.
Is the Digitizer connector part of the display connector, or is it elsewhere?
It's the volume and speaker
-
-
-
Disconnect the display data cable from the motherboard.
-
-
-
Pry the Wi-Fi antenna cable connector up from its socket on the motherboard.
-
Gently move the cable out of the way of the motherboard.
Be very careful,as it is very easy to break the connector off the motherboard.
Has anyone tried just folding the motherboard back to the left after removing all the screws WITHOUT disconnecting the wi-fi antenna? I'm just a little worried about this one step.
Folding the motherboard back without disconnecting the WiFi antenna worked for me! :)
I broke the WiFi antenna connector bit off motherboard. How do I fix it?
-
-
-
Remove the single 3.0 mm Phillips screw securing the motherboard to the front panel assembly.
-
-
-
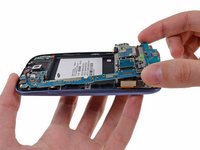
Carefully lift the bottom of the motherboard assembly away from the front panel assembly.
-
Remove the motherboard assembly from the front panel assembly, minding any cables that may snag on it.
When reassembling your device, there can be a problem with connecting display data cable to the motherboard. I fixed display data cable on the motherboard before mounting motherboard: it gave me some freedom and simplified positioning of data cable on the motherboard
If I am not mistaking, there is a screw also on the motherboard needs to be removed before removing motherboard from the assembly
It's covered in Step 21
Amy Losh -
-
-
-
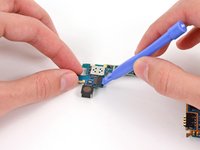
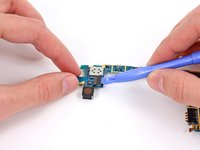
Use a plastic opening tool to pry the rear-facing camera connector from its socket.
-
-
-
Remove the rear-facing camera off the motherboard.
-
-
-
The motherboard remains.
Where is the IC which is the responsible of charging and discharging?, cuz my phone's battery drops very fast! and I have to change this IC
@Amjad Modovski New Motherboard will have new IC on it. Change whole Motherboard.
My phone won't turn on at all even with a fully charged battery. How do I get all my info off of it if it won't turn on and has to be in a specific position just for the USB to work?
-


To reassemble your device, follow these instructions in reverse order.
To reassemble your device, follow these instructions in reverse order.
crwdns2935221:0crwdne2935221:0
crwdns2935229:0270crwdne2935229:0

crwdns2947412:043crwdne2947412:0
Between step 13 and 14, there should be a step to detach the cable to the camera lens and speaker assembly and the removal of the assembly.
The are usually $100 and Galaxy S III (Verizon) Motherboard
Where do i buy the original motherboard and what is the cost
I have a motherboard of samsung galaxy s3 sgh-t999 t mobile pm me here's my email tan.jeffrey84@yahoo.com for more info
Cheapest place to buy them is ebay.
I need Mother board for S3. If anyone have then contact idris.dw@gmail.com
I have a samsung sgh-t999 board pm me if u want tan.jeffrey84@yahoo.com
Can you please suggest where can I get the replacement parts for my S3 Korean version
Hey looks easy! but where do you get the motherboard from?
Sounds easy!!!!
but where do you buy the motherboard?
I followed the instructions to a tee. Trying to save my old info/motherboard from my galaxy III that has a smashed screen, so I bought a used one and put my old motherboard in it. Everything went perfectly except the most essential thing - the on/off switch for the phone doesn't match up anymore. There's no way for me to turn on my phone on or off unless I go through steps 1-14 and proceed to use a needle to turn it on. I might as well use both phones as door stops now. If anyone wants a motherboard or 2 feel free to contact me before I chuck 'em over a cliff.
hey i am looking for a motherboard, pls drop a mail at mshah0510@yahoo.com
mihirs9 -
Do yo have a extra motherboard, mine will turn my phone on then instantly turn off but it will charger batteries, it will vibrate and light up all the time it has slight water damage too a spot I have taken it apart a dozen times. It's a galaxy s3 how much would you want for it.darrinpease@Gmail. Com
Need a s3 GT-I9300 mother board please email me carter.89@live.com.au
hello! we are missing a step between 13 and 14. the top portion of the cover which is the speaker assembly!
I samsung s3 having a problem, I need help fix it. thanks Ayub
i replaced my old galaxy s3 motherboard today ... but i had lots of pics in an galery lock application soo can anyone get those pics from a damaged motherboard ??
hi ... i replaced my old motherboard of galaxy s3 today ... but i want to ask tat is it posible tat some one can get pics from a galery lock aplication in my old and damaged motherboard ???
I have a i9305 with broken glass and a i9300 in perfect shape. is it possible just to replace the motherboard in the i9300 with the i9305 (to get more RAM and LTE support?) or should the antennas and more (?) also be replaced?
Hi!
I want to do the same.
Have you tried it? Is it worked?
No, FRAMES ARE INCOMATIBLE
Hi, will a i9301 (s3 neo) motherboard fit into a i9300 (regular s3) case?
No,
You need to modificate the frame (verrrrrry diiiifiiicult)
Or separate screen from frame
(FRAMES ARE INCOMPATIBLE)
so are all s3 models have compatible motherboards ? I have I9300 and it has a broken LCD, can I buy sprint samsung s3 and replace only the motherboards ?
How can you tell which mother board you need there is like 5 different motherboards up there ?
How do I know what motherboard I need there is about 5 up there and I don't know which one it is ?
I need Mother board for S3 I9300. If anyone have them contact Shovokhan55@gmail.com
I need Mother board for S3 I9300. If anyone have them contact Shovo201372@yahoo.com
Need SGS3 T999 I747 phone to put my motherboard in. Any color. LCD and glass must be good.
I would like to add my experience with a motherboard replacement with Sprint. I bought a replacement SPH-L710 motherboard through iFixit.com's website. The motherboard was sealed in an electrostatic bag; however, upon opening the bag I noticed the SD card reader had signs of slight wear/scratches on the component. Other than that, product was fine. Replacement and install went off without a hitch. Booting up revealed a fully wiped, Knox enabled OS.
After calling Sprint to activate the phone, they informed me the IMEI/ESN number was not valid due to it being already activated through another carrier. They will flat out refuse to activate it. So, to sum up, be careful when replacing GS3 motherboards as the replacement may be on Sprint's internal blacklist even though sites like Swappa.com will tell you that the IMEI/ESN number is fine.
I was able to switch the motherboards of two phones following these steps. Thanks very much for providing these.
My Repair is for a tablet not a phone
The power switch broke and I had to replace it. It's half the size of a grain of rice and the smallest thing I ever tried to solder on. In the end I succeeded, but just out of luck and sheer stubbornness. Can't recommend that to sane (non-pro) people.
Hy I Need Galaxy s3 i9305 lte Motherboard My Email is rj.abid1@yahoo.com
Motherboard for galaxy s3 needed please.
Thanks
Jag
Is the galaxy s3&s4 mother boards compatible
screw size #0 in instructions but #00 screwdriver is needed. Why?
Hey Jack, #0 might work, but the #00 should be the best fit. The guide has been updated to reflect this.
Hi, I need a working logic board for S3, AT&T. The charging connector on mine broke. The phone still works. Currently charging the phone with a wireless charging module adapter which doesnt make contact reliably and is inytermittent. was wondering changing the board would be a cheaper option. When you use a new Logic board i suppose the phone’s old IMEI is no longer good. Is that True.
Any one with a logic board please e-mail me at trcengineer@yahoo.com
Samsung s3 board ma network i.c problem ha I.c Chang Kara ka doga
Battery charger samsung battery
Battery charger samsung battery m02 battery
Done deal! Thank you, I had taken apart one of these months ago and this got me back onto what I was doing and success!