crwdns2915892:0crwdne2915892:0
prereq only Battery disconnect
crwdns2942213:0crwdne2942213:0
-
-
Power off your phone before beginning disassembly.
-
Use an iOpener to loosen the adhesive beneath the back cover. Apply the iOpener for at least two minutes. You might want to repeat this step several times during the back cover removal.
-
-
-
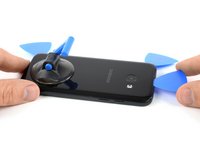
Use a small suction handle to create a gap at the bottom end of the Galaxy A3.
-
Insert an opening pick and slide the tip to the bottom left corner to cut the adhesive.
-
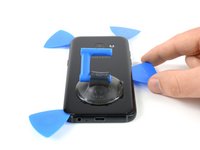
Leave the opening pick in the bottom left corner to prevent the adhesive from resealing.
-
Insert a new opening pick and start to cut the adhesive towards the bottom left side of the phone.
-
-
-
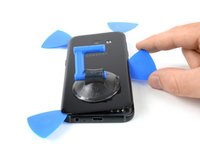
Use an opening pick to cut the adhesive on all sides of the phone. Leave one opening pick in every corner to prevent the adhesive from resealing.
-
Insert an opening pick on the right side of the phone after you cut the adhesive on all sides. Flip it sideways until you can get a good grip on the back cover.
-
-
-
-
Remove the back cover from the phone.
-
-
-
Remove the five Phillips #00 screws that hold the motherboard covers in their place.
-
-
crwdns2935267:0crwdne2935267:0Tweezers$4.99
-
Use a pair of tweezers to remove the upper part of the motherboard cover.
-
-
-
Use a pair of tweezers to lift up the motherboard cover including the loudspeaker and the NFC antenna and remove it.
-
-
-
Use the flat end of a spudger to disconnect the battery flex connector.
-


To reassemble your device, follow these instructions in reverse order.
To reassemble your device, follow these instructions in reverse order.

