crwdns2915892:0crwdne2915892:0
Use this guide to replace a cracked or broken screen on your Samsung Galaxy A10.
Note: This guide instructs you to replace only the screen while leaving the original frame and motherboard in place. However, some replacement screens for this phone come pre-installed in a new frame (a.k.a. chassis), which requires a very different procedure. Make sure you have the correct part before starting this guide.
Before disassembling your phone, discharge the battery below 25%. The battery can catch fire and/or explode if accidentally punctured, but the chances of that happening are much lower if discharged.
You’ll need replacement adhesive to reattach components when reassembling the device.
crwdns2942213:0crwdne2942213:0
-
-
Insert a SIM card eject tool, a SIM eject bit or a straightened paper clip into the hole on the SIM tray located at the left side of the phone.
-
Press firmly to eject the tray.
-
-
-
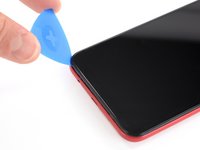
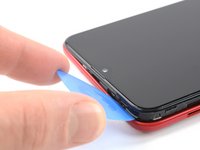
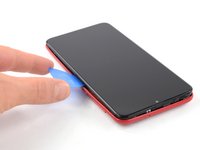
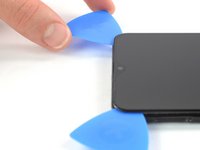
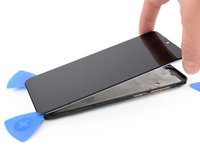
Insert an opening pick between the screen and the back cover on the bottom of the phone where the charging port is located.
-
-
-
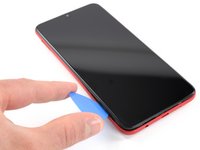
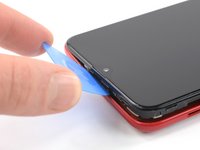
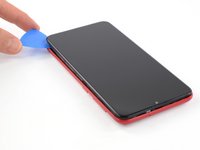
Slide the opening pick to the bottom left corner to release the clips.
-
-
-
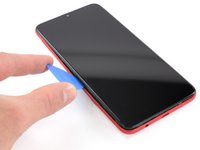
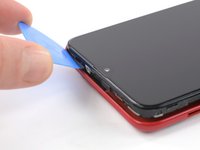
Slide the opening pick along the left edge to the top left corner of the phone, to release the clips.
-
-
-
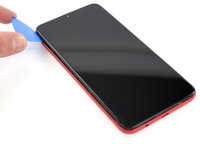
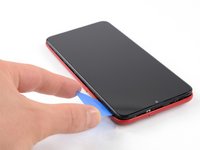
Slide the opening pick from the top left corner to the top right corner to release the plastic clips.
-
-
-
Slide the opening pick from the top left corner to the bottom right corner to release the remaining clips.
-
-
-
-
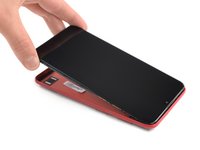
Remove the back cover.
-
-
-
Remove the three Phillips #00 screws (3 mm length).
On my A10E the second screw from the right on the top line of 4 screws had to be removed also
It’s easier if you remove all 4 screws across the small top panel.
-
-
-
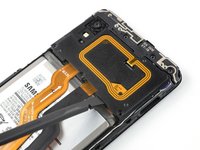
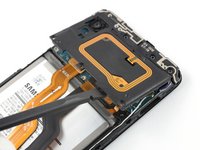
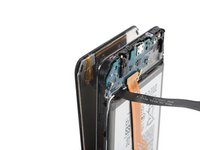
Use the flat end of a spudger to pry up the motherboard cover to release the plastic clips which hold the cover in its place.
-
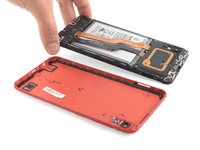
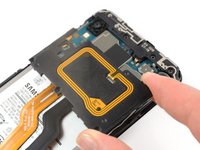
Remove the motherboard cover.
-
-
-
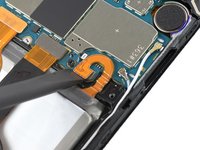
Use a spudger to disconnect the battery by prying the connector straight up from its socket.
-
-
-
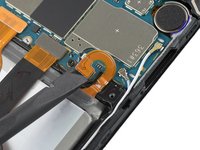
Use the flat end of a spudger to pry up and disconnect the display flex cable from the motherboard.
-
-
-
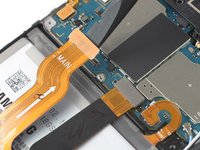
Remove the 8 Phillips #00 screws on the bottom (3 mm length).
Que pasa si no se sale el tornillo
Que pasa si no se sale el tornillo
Que puedo hacer
-
-
-
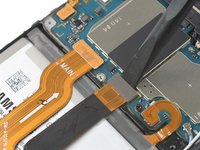
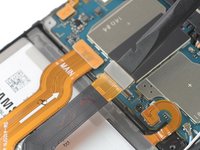
Remove the daughterboard cover from the bottom.
Hola! En este punto sería muy recomendable retirar la batería, antes de calentar la pantalla, ya sea en la plancha o con una pistola de calor.
-
-
-
Heat an iOpener and apply it on the display for at least two minutes to soften the adhesive underneath.
-
-
-
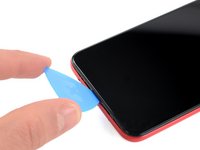
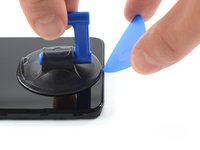
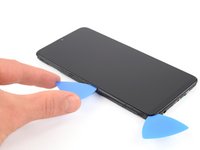
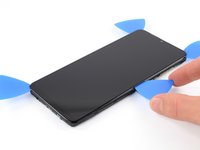
Place a suction cup on the screen near the bottom edge of the phone.
-
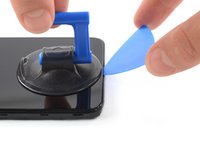
Pull the suction cup upwards and insert an opening pick in the gap between the display glass and the frame.
-
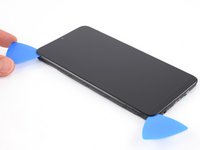
Slide the opening pick to the bottom left corner to cut through the bottom adhesive.
-
Leave the opening pick in in the corner to prevent the adhesive from resealing.
-
-
-
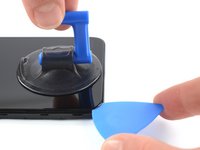
Insert a second opening pick and slide it to the top left corner. Leave the opening picks in place to prevent the adhesive from resealing.
-
-
-
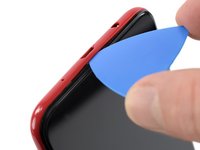
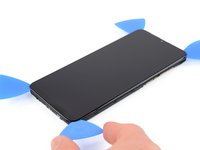
Insert a third opening pick under the top left corner of the display.
-
Slide the opening pick along the top edge of the phone to cut the adhesive.
-
Leave the opening pick in place to prevent the adhesive from resealing.
-
-
-
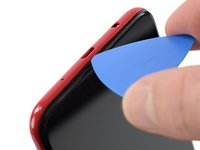
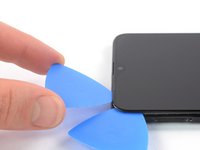
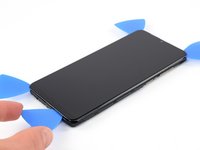
Insert a fourth opening pick at the top right corner of the phone.
-
Slide the opening pick along the right edge and around the bottom corner to cut the remaining adhesive.
-
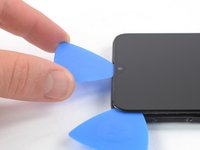
Leave the fourth opening pick in the bottom right corner to prevent the adhesive from resealing.
-
-
-
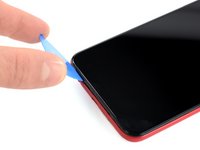
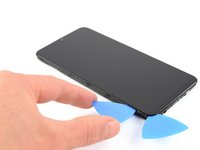
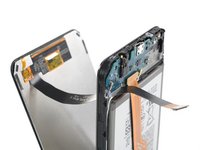
Lift the screen from the top edge of the phone.
-
Thread the display flex cable through the gap in the frame and remove the display.
-


If possible, turn on your device and test your repair before installing new adhesive and resealing.
To reassemble your device, follow these instructions in reverse order. Apply new adhesive where necessary after cleaning the relevant areas with isopropyl alcohol (>90%).
Take your e-waste to an R2 or e-Stewards certified recycler.
Repair didn’t go as planned? Try some basic troubleshooting, or ask our Answers community for help.
crwdns2935221:0crwdne2935221:0
crwdns2935229:091crwdne2935229:0


crwdns2947412:012crwdne2947412:0
Usefully website. Thanks ifixit team.
screen replacement for samsung galaxy a10s…or a10 screen is the same size as a10s
Useful service guide for display replacement, best website for repairs !
The Missus dropped her phone and the inevitable happened, this guide was invaluable in helping me fit a new screen, and in under thirty minutes! Extremely grateful for this guide, definitely one of the better ones out there…
gracias por las directiones
Loved this. Thanks, Ifixit, I fixed my own phone screen. The only problem I had was not having any adhesive so my screen is still loose. It would have been helpful to have this part of the Tools needed list. I will have to buy Two-way tape at some stage. But very happy to have a screen I can see properly.
Hi Teresa, thank you for sharing your experience with us. I'm glad your A10 is up and running again! You're right, I've edited the guide and added adhesive to the necessary parts.
excelente, preciso y muy didactico
I need a replacement screen for a Galaxy A10, most I see on the web have two holes at the top but mine has only one. What is the difference and will the two hole work on my phone. Thanks
I've used your help before and found it best way, very easy to use and covered everything, I'm using it again for a friend phone and recommend to everyone to use it, thank you for your help
Thank you, Nicky!
خیلی عالی است
Habe nur das Frontglas mit Werkzeug gekauft. Kann ich nur dieses von vorn ersetzen, ohne das Gerät komplett zerlegen zu müssen? Sprich defektes Glas erhitzen und nach vorn abheben etc
Hans Weschta - crwdns2934203:0crwdne2934203:0
Hallo Hans, leider musst du dein A10 zerlegen um den Screen zu wechseln. Hier ist der Guide für deine Reparatur: Samsung Galaxy A10 Screen Replacement. Viel Erfolg beim Reparieren!
Adriana Zwink -