crwdns2933423:0crwdne2933423:0

Samsung ATIV Book 9 Lite Hard Drive Replacement

crwdns2942213:0crwdne2942213:0

  1. Samsung ATIV Book 9 Lite Hard Drive Replacement, Hard Drive: crwdns2935265:01crwdnd2935265:01crwdnd2935265:02crwdne2935265:0 Samsung ATIV Book 9 Lite Hard Drive Replacement, Hard Drive: crwdns2935265:01crwdnd2935265:02crwdnd2935265:02crwdne2935265:0
    • Put a protective lining such as a piece of cloth in between the screen and the keyboard when closed to protect your screen when performing this replacement.

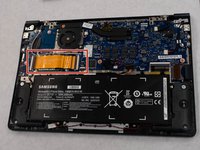
    • Turn the laptop upside down to show the screws holding the back cover on.

    • Using a Phillips #0, remove the ten 4mm screws located around the edges and one central.

  2. Samsung ATIV Book 9 Lite Hard Drive Replacement: crwdns2935265:02crwdnd2935265:01crwdnd2935265:03crwdne2935265:0 Samsung ATIV Book 9 Lite Hard Drive Replacement: crwdns2935265:02crwdnd2935265:02crwdnd2935265:03crwdne2935265:0 Samsung ATIV Book 9 Lite Hard Drive Replacement: crwdns2935265:02crwdnd2935265:03crwdnd2935265:03crwdne2935265:0
    • Use two plastic opening tools to separate the back cover from the laptop.

    • This may take some force because the back cover is snapped into place before the screws are used to keep it in place.

  3. Samsung ATIV Book 9 Lite Hard Drive Replacement: crwdns2935265:03crwdnd2935265:01crwdnd2935265:03crwdne2935265:0 Samsung ATIV Book 9 Lite Hard Drive Replacement: crwdns2935265:03crwdnd2935265:02crwdnd2935265:03crwdne2935265:0 Samsung ATIV Book 9 Lite Hard Drive Replacement: crwdns2935265:03crwdnd2935265:03crwdnd2935265:03crwdne2935265:0
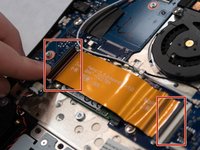
    • Using your hands or a plastic opening tool, release the yellow motherboard connection strip on both ends by lifting the clamps.

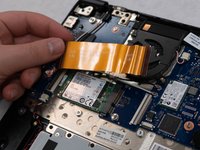
    • Remove the strip to reveal the hard drive.

  4. Samsung ATIV Book 9 Lite Hard Drive Replacement: crwdns2935265:04crwdnd2935265:01crwdnd2935265:02crwdne2935265:0 Samsung ATIV Book 9 Lite Hard Drive Replacement: crwdns2935265:04crwdnd2935265:02crwdnd2935265:02crwdne2935265:0
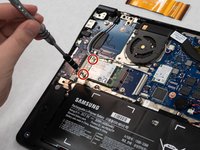
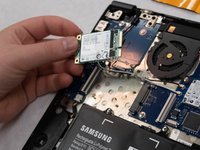
    • Using a Phillips #0, remove the two 3mm screws holding the hard drive in place.

    • Remove the hard drive by pulling it out with your hands.

crwdns2915888:0crwdne2915888:0

To reassemble your device, follow these instructions in reverse order.

crwdns2935229:02crwdne2935229:0

Phat Tran

crwdns2935283:009/16/18crwdne2935283:0

786 crwdns2915208:0crwdne2915208:0

crwdns2935297:05crwdne2935297:0

crwdns2915084:0crwdne2915084:0

Washington State, Team S2-G5, Hope Fall 2018 crwdns2935289:0Washington State, Team S2-G5, Hope Fall 2018crwdne2935289:0

WSU-HOPE-F18S2G5

crwdns2931471:04crwdne2931471:0

crwdns2935297:05crwdne2935297:0

crwdns2944067:00crwdne2944067:0

crwdns2917038:0crwdne2917038:0

crwdns2936625:0crwdne2936625:0:

crwdns2936751:024crwdne2936751:0 4

crwdns2936753:07crwdne2936753:0 16

crwdns2936753:030crwdne2936753:0 50

crwdns2942667:0crwdne2942667:0 4,573