crwdns2915892:0crwdne2915892:0
This guide describes how to fix the H02/H07 error that is common with Panasonic DVD/VCR players.
crwdns2942213:0crwdne2942213:0
-
-
With the front display of the device facing you, rotate the device 90 degrees counter clockwise.
-
Remove the screw that is on the right side of the panel facing you.
-
Now rotate the device 180 degrees and remove the second screw.
-
Remove all screws with a phillips head screwdriver.
-
-
-
Rotate the device so that the back faces you.
-
With a phillips head screwdriver, locate and remove the two screws highlighted by the red circles in image one.
-
-
-
-
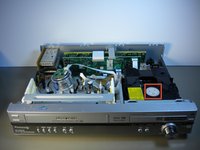
Before removing top cover make sure that the back of the device is facing you.
-
Remove the top cover by bending out on the sides, and pulling the cover towards you while applying upward pressure.
-
-
-
Tilt the device on its front side until you can see underneath the white circular component mentioned in the note above.
-
Locate the spindle circled in figure two and apply one or two drops of 3 in 1 lubricating oil to the spindle.
-


To reassemble your device, follow these instructions in reverse order.
crwdns2935221:0crwdne2935221:0
crwdns2935227:0crwdne2935227:0

crwdns2935287:0crwdne2935287:0

Cal Poly, Team 16-5, Maness Spring 2010 crwdns2935289:0Cal Poly, Team 16-5, Maness Spring 2010crwdne2935289:0
CPSU-MANESS-S10S16G5
crwdns2931471:04crwdne2931471:0
crwdns2935297:08crwdne2935297:0
crwdns2947412:03crwdne2947412:0
Thanks you saved my Christmas and nailed this as my wife loves Christmas music in the background for our family dinner. Thanks again and Merry Christmas
I have a Panasonic NV-SD235 and I have a tape stuck with the error H02.
Can’t get screws undone on ours… Help!