crwdns2915892:0crwdne2915892:0
This guide outlines how to remove the lithium-ion battery in the Razer Blade Stealth 2017. Battery replacement may be necessary if the battery is not charging, not powering the computer, swollen, leaking, or not lasting as long as you would like. Some tools are required for this replacement.
crwdns2942213:0crwdne2942213:0
-
-
Use a Torx T5 screwdriver to remove the eight, 3mm screws on the bottom cover of the laptop.
-
-
-
Remove the bottom cover of the laptop by sliding it away from the hinge.
-
-
-
-
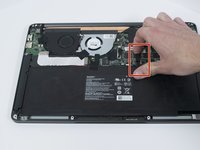
Use your fingernail to pry up and disconnect the battery from the motherboard.
-
-
-
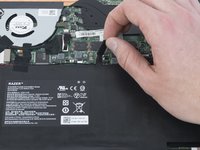
Use a Phillips #00 screwdriver to remove the six, 5mm screws securing the battery.
-
-
-
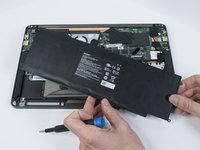
Use the plastic spudger to pry out the battery.
-


To reassemble your device, follow these instructions in reverse order.
For optimal performance, after completing this guide, calibrate your newly installed battery.
Take your e-waste to an R2 or e-Stewards certified recycler.
Repair didn’t go as planned? Try some basic troubleshooting, or ask our Answers community for help.
crwdns2935221:0crwdne2935221:0
crwdns2935229:016crwdne2935229:0

crwdns2935287:0crwdne2935287:0

Cal Poly, Team S11-G3, Regan Fall 2019 crwdns2935289:0Cal Poly, Team S11-G3, Regan Fall 2019crwdne2935289:0
CPSU-REGAN-F19S11G3
crwdns2931471:04crwdne2931471:0
crwdns2935297:07crwdne2935297:0
crwdns2947412:05crwdne2947412:0
ive done everything correctly and laptop boots up but now I have no battery percentage information. any solutions on how to fix?
Where did you get the replacement battery? The replacement we purchased for two Razer units about a year ago worked fine, but a replacement battery purchased online about a month and a half ago from Amazon is showing the same issue. Essentially, it's not detected by the operating system at all, or only very rarely. Looks like a bad batch of batteries from wherever these sellers are getting their supply.
The laptop powers on but when plugged in it starts then stops charging
Hey Boogie!
I am also having same issue, have you manage to solve it?
My laptop powers on, charges, holds the charge, shows battery percentage on screen, BUT now the white charge light does not turn on. Anyone know how to fix this or if this is a common issue with this part?
I tried all the solutions from Google which said to:
1. Verify Power Adapter and Connection:
- I checked all physical connections and the charger I use is an new official one from Razer that is barely about a year old.
2. Check Battery and Cable Connections:
Opened the laptop again to make sure all the connections were good.
3. Software and Driver Checks:
Battery Report: Created one and every thing looks like it checks out the new batttery read 42% when I installed it and after the calibration from iFixit everything look good.
Driver Updates: My Laptop says it is up- to-date with the last windows 10 update.
BIOS Update: Didn’t really do this one on the count of that I am scared that I might break my laptop, but if it gets updated when Windows is updated then it should be fine.
4. Power Discharge Procedure
Unplugged the battery from the motherboard, held power for 1 min., plugged laptop directly into charger without battery, powered on no issues, and then reassembled it.
Again this is not a deal breaker for me the laptop works just fine, but would just like to know if there is a fix.
Thank you iFixit for the tools and parts and thank you iFixit community for any help.