crwdns2933423:0crwdne2933423:0

QNAP TVS-h874T RAM Replacement

crwdns2942213:0crwdne2942213:0

  1. QNAP TVS-h874T RAM Replacement, QNAP TVS-h874T Ram & SSD Upgrade: crwdns2935265:01crwdnd2935265:01crwdnd2935265:02crwdne2935265:0 QNAP TVS-h874T RAM Replacement, QNAP TVS-h874T Ram & SSD Upgrade: crwdns2935265:01crwdnd2935265:02crwdnd2935265:02crwdne2935265:0
    • Ensure the QNAP is safely shut down using the console before starting.

    • Mark all cables attached to the QNAP.

    • This QNAP has an SAS card, and each cable must go into the correctly numbered port matching the external enclosure, failure to reconnect the cables in the correct orientation may cause data loss.

    • If the device has any drives installed, mark the bay they were in before removing them, as they must be re-inserted into the correct bay if removed.

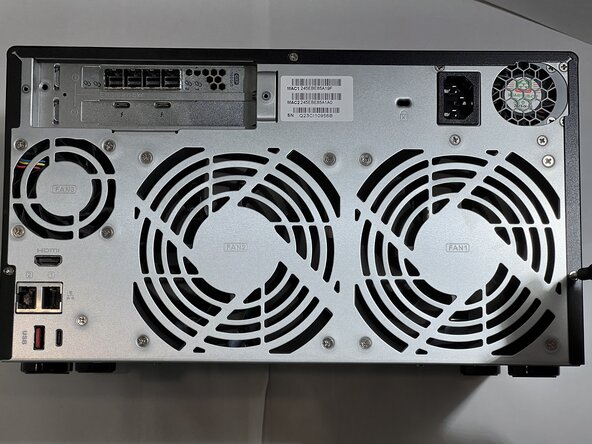
    • Turn the QNAP with the back facing upwards so it is easier to access the screws.

  2. QNAP TVS-h874T RAM Replacement: crwdns2935265:02crwdnd2935265:01crwdnd2935265:03crwdne2935265:0 QNAP TVS-h874T RAM Replacement: crwdns2935265:02crwdnd2935265:02crwdnd2935265:03crwdne2935265:0 QNAP TVS-h874T RAM Replacement: crwdns2935265:02crwdnd2935265:03crwdnd2935265:03crwdne2935265:0
    • Turn the QNAP with the back facing upwards so it is easier to access the screws.

    • Use a #2 Phillips screwdriver to remove the three 3.9 mm screws that hold the black cover to the back.

    • These are the only screws that need to be removed for the entire process.

    • Do not remove any other screws. The other screws hold the fans to the case, and the drive bay supports together.

  3. QNAP TVS-h874T RAM Replacement: crwdns2935265:03crwdnd2935265:01crwdnd2935265:03crwdne2935265:0 QNAP TVS-h874T RAM Replacement: crwdns2935265:03crwdnd2935265:02crwdnd2935265:03crwdne2935265:0 QNAP TVS-h874T RAM Replacement: crwdns2935265:03crwdnd2935265:03crwdnd2935265:03crwdne2935265:0
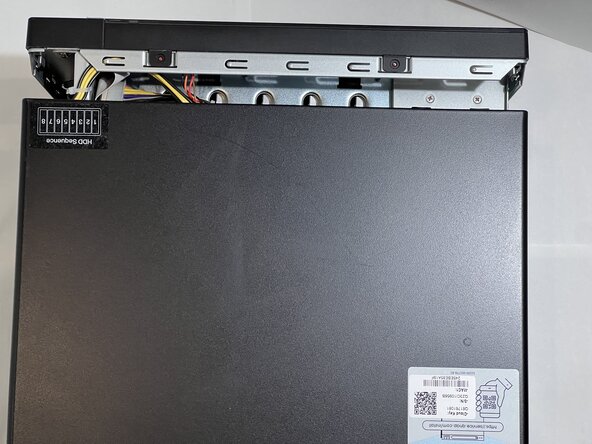
    • Turn the QNAP so the back is facing you.

    • Gently press on both sides of the cover at the rear and slide the cover towards the you.

    • The cover should slide on and off with minimal force.

    • When reassembling ensure that the bottom and sides of the cover align with the body of the case.

    • Once the cover is free of the front bezel, it can be lifted off.

  4. QNAP TVS-h874T RAM Replacement: crwdns2935265:04crwdnd2935265:01crwdnd2935265:02crwdne2935265:0 QNAP TVS-h874T RAM Replacement: crwdns2935265:04crwdnd2935265:02crwdnd2935265:02crwdne2935265:0
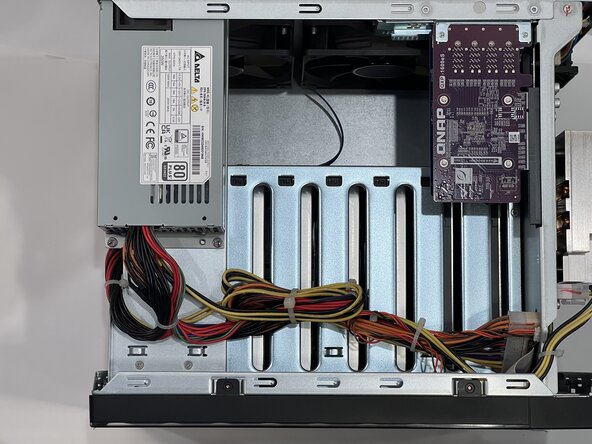
    • With the cover off you can see:

    • The power supply and power connectors

    • Any installed PCI cards

    • The motherboard is mounted vertically on the left side if you are facing the rear of the QNAP.

    • Turn the device onto the right side if you are facing the rear of the QNAP.

  5. QNAP TVS-h874T RAM Replacement: crwdns2935265:05crwdnd2935265:01crwdnd2935265:03crwdne2935265:0 QNAP TVS-h874T RAM Replacement: crwdns2935265:05crwdnd2935265:02crwdnd2935265:03crwdne2935265:0 QNAP TVS-h874T RAM Replacement: crwdns2935265:05crwdnd2935265:03crwdnd2935265:03crwdne2935265:0
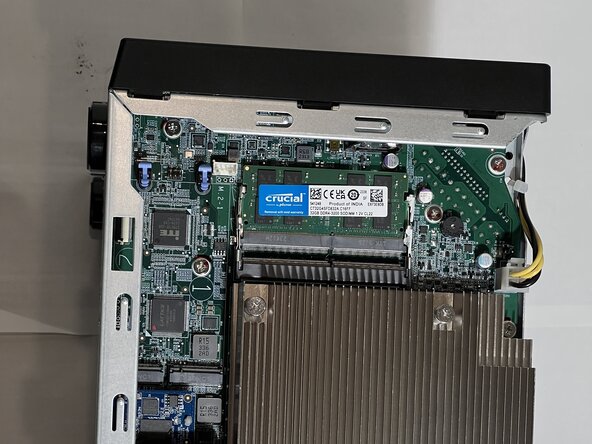
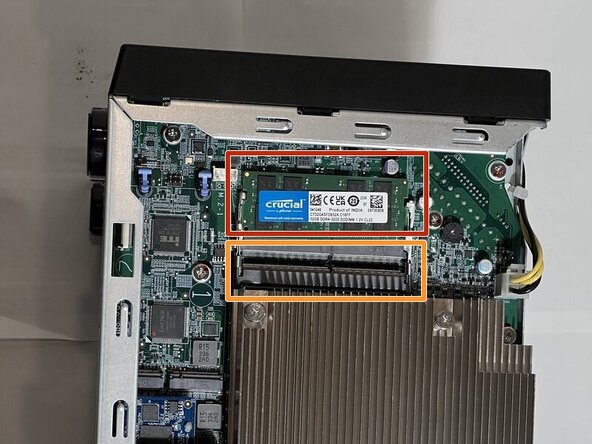
    • With the motherboard facing up, you will see 2 DIMMS for RAM.

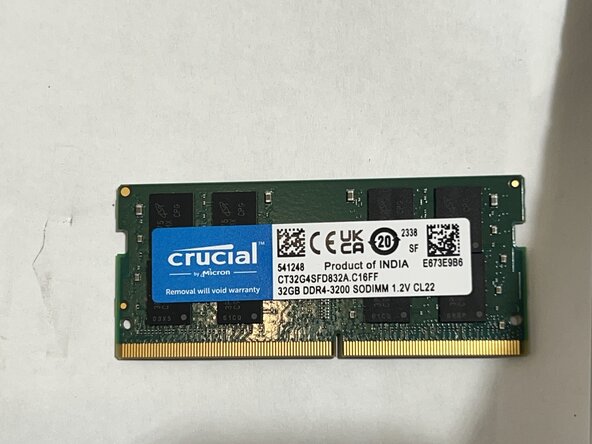
    • If the NAS has 16GB of RAM you will want to install either (1) 16GB DIMM or replace the existing DIMM with (2) 32GB DIMMS.

    • Please check the QNAP Memory compatibility site to ensure you have DIMMS that will work.

    • This NAS has a single 32GB DIMM installed.

    • The new DIMM will go into the empty slot.

    • If you need to remove a damaged RAM chip, use your fingers to pull the metal arms on both sides of the RAM away enough to release it.

    • The RAM will pop up by a few millimeters.

    • Remove it at an angle and not straight up so you don't damage the socket.

  6. QNAP TVS-h874T RAM Replacement: crwdns2935265:06crwdnd2935265:01crwdnd2935265:03crwdne2935265:0 QNAP TVS-h874T RAM Replacement: crwdns2935265:06crwdnd2935265:02crwdnd2935265:03crwdne2935265:0 QNAP TVS-h874T RAM Replacement: crwdns2935265:06crwdnd2935265:03crwdnd2935265:03crwdne2935265:0
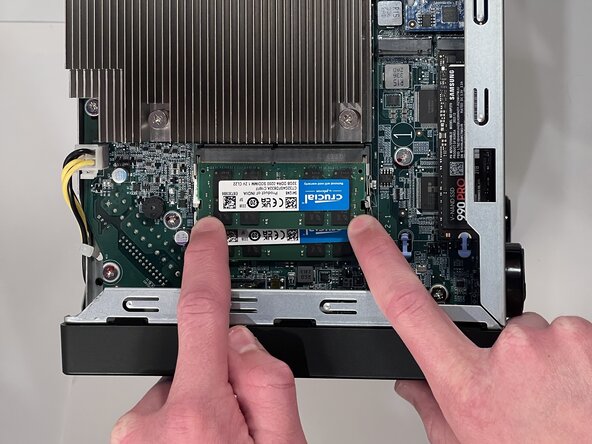
    • To insert the RAM, align the pins with the slot.

    • The DIMM has a single slot that allows it to only be inserted one way. Ensure the slot in the DIMM is aligned with the divider in the slot.

    • Insert the DIMM at a 45° angle.

    • The DIMM should slide in easily so don't force it. If it does not slide in, make sure the DIMM is aligned with the guide in the socket.

    • Gently press on both corners to lower it into the retaining clips.

    • Do not press hard, the DIMM should snap in without very much pressure. Too much pressure may damage the retaining clips on the sides.

  7. QNAP TVS-h874T RAM Replacement: crwdns2935265:07crwdnd2935265:01crwdnd2935265:02crwdne2935265:0 QNAP TVS-h874T RAM Replacement: crwdns2935265:07crwdnd2935265:02crwdnd2935265:02crwdne2935265:0
    • This is a good time to install one or two M.2 SSD drives to accelerate the performance of the QNAP.

    • Ensure the M.2 SSD drives are compatible with the QNAP using the QNAP SSD compatibility site

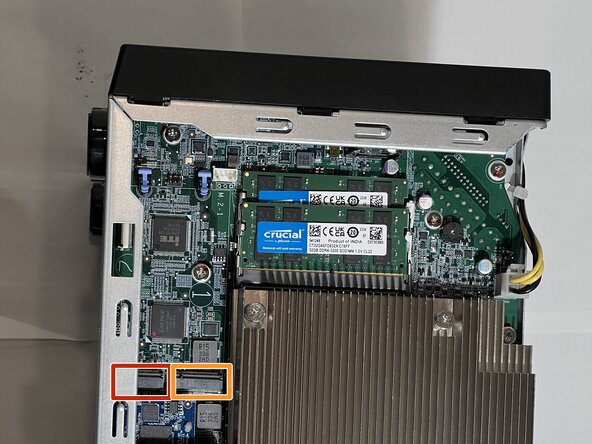
    • There are two M.2 slots towards the bottom of the motherboard.

    • Install the #2 drive first as it is under the side rail of the case.

    • The second slot is slightly hidden by the bottom rail of the case but still accessible.

    • Install the SSD Drive slot (1).

    • If you are only installing a single drive use this slot.

  8. QNAP TVS-h874T RAM Replacement: crwdns2935265:08crwdnd2935265:01crwdnd2935265:03crwdne2935265:0 QNAP TVS-h874T RAM Replacement: crwdns2935265:08crwdnd2935265:02crwdnd2935265:03crwdne2935265:0 QNAP TVS-h874T RAM Replacement: crwdns2935265:08crwdnd2935265:03crwdnd2935265:03crwdne2935265:0
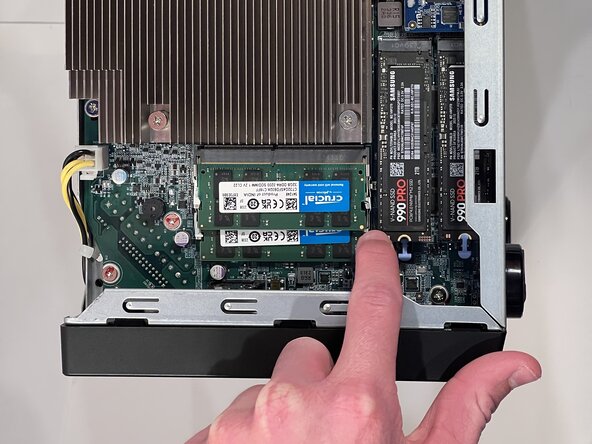
    • Insert the M.2 drive at a 45° angle

    • The M.2 socket has a divider that must be aligned.

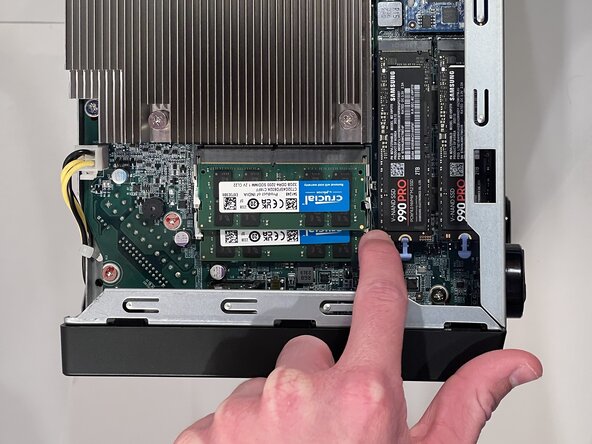
    • Gently press the M.2 drive down with your finger.

    • Hold the M.2 drive down with a finger on one corner, and engage the blue latch with the second finger.

    • The M.2 Drive is retained by a spring, and requires the latch to hold it in place for proper contact.

    • Inserting and retaining the M.2 drive should not require force, it should slide in easily and require very little pressure to hold it in place while engaging the blue latch.

  9. QNAP TVS-h874T RAM Replacement: crwdns2935265:09crwdnd2935265:01crwdnd2935265:03crwdne2935265:0 QNAP TVS-h874T RAM Replacement: crwdns2935265:09crwdnd2935265:02crwdnd2935265:03crwdne2935265:0 QNAP TVS-h874T RAM Replacement: crwdns2935265:09crwdnd2935265:03crwdnd2935265:03crwdne2935265:0
    • Make sure to turn the QNAP back onto it's feet to reinstall the cover.

crwdns2915888:0crwdne2915888:0

To reassemble your device, follow these instructions in reverse order. Take your e-waste to an R2 or e-Stewards certified recycler.

Jason

crwdns2935283:003/19/25crwdne2935283:0

169 crwdns2915208:0crwdne2915208:0

crwdns2935295:0crwdne2935295:0

crwdns2915084:0crwdne2915084:0

CSU Los Angeles, Team 2-6, Ribeiro Spring 2025 crwdns2935289:0CSU Los Angeles, Team 2-6, Ribeiro Spring 2025crwdne2935289:0

CSULA-RIBEIRO-S25S2G6

crwdns2931471:05crwdne2931471:0

crwdns2935303:01crwdne2935303:0

crwdns2947412:00crwdne2947412:0

crwdns2917038:0crwdne2917038:0

crwdns2936625:0crwdne2936625:0:

crwdns2936751:024crwdne2936751:0 0

crwdns2936753:07crwdne2936753:0 4

crwdns2936753:030crwdne2936753:0 6

crwdns2942667:0crwdne2942667:0 34