crwdns2915892:0crwdne2915892:0
Installing RAM involves removing the outer case before installation.
crwdns2942213:0crwdne2942213:0
-
-
Release the back handle of the PowerMac. Slowly pull out the cube by holding the end of the handle. Watch for any parts that may become entangled with the outer case.
-
Push back the handle after you have taken the core out of the case.
-
-
-
Place the cube upside down and remove the four T10 Torx screws on the front plate. Then remove the two screws on each side.
-
-
-
-
Remove the four pillars from each corner.
If the Cube has an Airport card installed, it must be removed. This can be accomplished by disconnecting its antenna, and pulling gently on the clear plastic tab on its end. The bracket it is contained in must be unlatched from the frame and rotated out of the way to get to the two optical drive mounting screws beneath it.
There is a ribbed cooling plate attached to the hard drive that must be removed before step 7.
There is no need to remove the four pillars. Skip step 4. In step 5, don't turn the Cube on it's side. The Airport slot swings out like a door, providing access to the IDE ribbon and power cables to complete step 6. Complete steps 6 and 7 while the cube is upright.
You really don’t need to remove all four pillars, or any of them depending on the repair you’re doing. They can be pulled out easily enough, just remove any that get in the way.
-
-
-
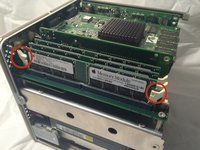
Flip the two latches on the side of the RAM chip.
-
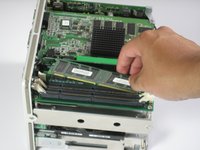
Remove the chip from the logic board and replace with new RAM.
-


To reassemble your device, follow these instructions in reverse order.
To reassemble your device, follow these instructions in reverse order.
crwdns2935221:0crwdne2935221:0
crwdns2935229:011crwdne2935229:0

crwdns2915084:0crwdne2915084:0

Cal Poly, Team 2-7, Johann Summer 2010 crwdns2935289:0Cal Poly, Team 2-7, Johann Summer 2010crwdne2935289:0
CPSU-JOHANN-R10S2G7
crwdns2931471:05crwdne2931471:0
crwdns2935297:014crwdne2935297:0
crwdns2947410:01crwdne2947410:0
Unless you have really fat fingers, you shouldn’t need to remove the metal plate and pillars. I’m able to replace the RAM without those steps.