crwdns2933423:0crwdne2933423:0

PlayStation Vita Right Shoulder Button Replacement

crwdns2942213:0crwdne2942213:0

  1. PlayStation Vita Right Shoulder Button Replacement, Case Separation: crwdns2935265:01crwdnd2935265:01crwdnd2935265:02crwdne2935265:0 PlayStation Vita Right Shoulder Button Replacement, Case Separation: crwdns2935265:01crwdnd2935265:02crwdnd2935265:02crwdne2935265:0
    • Power off and remove the memory card.

    • Using a Phillips #00 screwdriver, remove the four 6.4mm screws on the back casing.

  2. PlayStation Vita Right Shoulder Button Replacement: crwdns2935265:02crwdnd2935265:01crwdnd2935265:03crwdne2935265:0 PlayStation Vita Right Shoulder Button Replacement: crwdns2935265:02crwdnd2935265:02crwdnd2935265:03crwdne2935265:0 PlayStation Vita Right Shoulder Button Replacement: crwdns2935265:02crwdnd2935265:03crwdnd2935265:03crwdne2935265:0
    • Using your fingernail or a spudger, pry open the accessory port cover on the top of the device.

    • Using a Phillips #00 screwdriver, remove the two 5.4mm screws hidden beneath the accessory port cover.

  3. PlayStation Vita Right Shoulder Button Replacement: crwdns2935265:03crwdnd2935265:01crwdnd2935265:02crwdne2935265:0 PlayStation Vita Right Shoulder Button Replacement: crwdns2935265:03crwdnd2935265:02crwdnd2935265:02crwdne2935265:0
    • Remove the two 5.4mm Phillips #00 screws on the bottom of the device near the charging port.

  4. PlayStation Vita Right Shoulder Button Replacement: crwdns2935265:04crwdnd2935265:01crwdnd2935265:03crwdne2935265:0 PlayStation Vita Right Shoulder Button Replacement: crwdns2935265:04crwdnd2935265:02crwdnd2935265:03crwdne2935265:0 PlayStation Vita Right Shoulder Button Replacement: crwdns2935265:04crwdnd2935265:03crwdnd2935265:03crwdne2935265:0
    • Beginning at the sides of the device, use a plastic opening tool to separate the front and rear cases.

    • Continue working your way around the device gently prying it open.

    • There are still wires holding the front and rear cases together. You may damage the connections if you yank the cases completely apart.

  5. PlayStation Vita Right Shoulder Button Replacement: crwdns2935265:05crwdnd2935265:01crwdnd2935265:02crwdne2935265:0 PlayStation Vita Right Shoulder Button Replacement: crwdns2935265:05crwdnd2935265:02crwdnd2935265:02crwdne2935265:0
    • Gently separate the two cases, minding the battery and the touch screen controller connectors holding the two cases together.

  6. PlayStation Vita Right Shoulder Button Replacement: crwdns2935265:06crwdnd2935265:01crwdnd2935265:01crwdne2935265:0
    • Using a spudger, free the touch screen controller flex cable by gently prying up the connection.

  7. PlayStation Vita Right Shoulder Button Replacement: crwdns2935265:07crwdnd2935265:01crwdnd2935265:01crwdne2935265:0
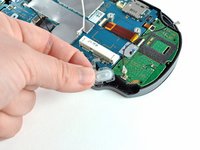
    • Free the battery cable by gently prying up on the connection with a spudger.

  8. PlayStation Vita Right Shoulder Button Replacement: crwdns2935265:08crwdnd2935265:01crwdnd2935265:01crwdne2935265:0
    • Separate the front and rear cases.

  9. PlayStation Vita Right Shoulder Button Replacement, Wireless Card: crwdns2935265:09crwdnd2935265:01crwdnd2935265:03crwdne2935265:0 PlayStation Vita Right Shoulder Button Replacement, Wireless Card: crwdns2935265:09crwdnd2935265:02crwdnd2935265:03crwdne2935265:0 PlayStation Vita Right Shoulder Button Replacement, Wireless Card: crwdns2935265:09crwdnd2935265:03crwdnd2935265:03crwdne2935265:0
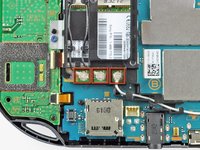
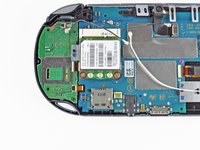
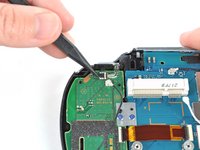
    • Using the pointy end of the spudger, disconnect the three antenna cable connectors on top of the wireless card.

    • Deroute the antenna cables so that they are out of the wireless card casing. Rest the wires out of the way.

  10. PlayStation Vita Right Shoulder Button Replacement: crwdns2935265:010crwdnd2935265:01crwdnd2935265:02crwdne2935265:0 PlayStation Vita Right Shoulder Button Replacement: crwdns2935265:010crwdnd2935265:02crwdnd2935265:02crwdne2935265:0
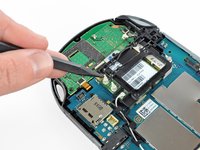
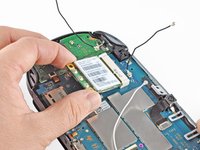
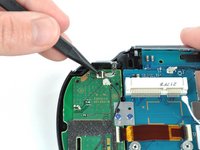
    • Hook the spudger beneath the tab on the wireless card casing and release the tab.

    • Peel up and remove the wireless card casing.

  11. PlayStation Vita Right Shoulder Button Replacement: crwdns2935265:011crwdnd2935265:01crwdnd2935265:02crwdne2935265:0 PlayStation Vita Right Shoulder Button Replacement: crwdns2935265:011crwdnd2935265:02crwdnd2935265:02crwdne2935265:0
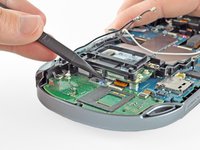
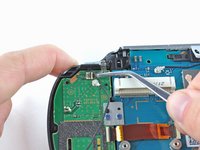
    • Remove the two 4.4mm Phillips #00 screws on the wireless card.

    • The wireless card will naturally pop out at an angle.

    • Pull out the wireless card.

  12. PlayStation Vita Right Shoulder Button Replacement, Right Shoulder Button: crwdns2935265:012crwdnd2935265:01crwdnd2935265:03crwdne2935265:0 PlayStation Vita Right Shoulder Button Replacement, Right Shoulder Button: crwdns2935265:012crwdnd2935265:02crwdnd2935265:03crwdne2935265:0 PlayStation Vita Right Shoulder Button Replacement, Right Shoulder Button: crwdns2935265:012crwdnd2935265:03crwdnd2935265:03crwdne2935265:0
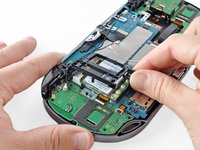
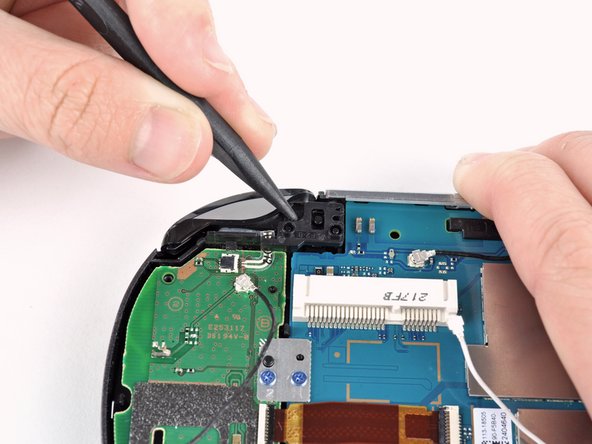
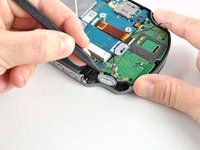
    • Pry up the right shoulder button casing with a spudger and set it aside.

  13. PlayStation Vita Right Shoulder Button Replacement: crwdns2935265:013crwdnd2935265:01crwdnd2935265:01crwdne2935265:0
    • Remove the translucent, plastic right shoulder button cover.

  14. PlayStation Vita Right Shoulder Button Replacement: crwdns2935265:014crwdnd2935265:01crwdnd2935265:03crwdne2935265:0 PlayStation Vita Right Shoulder Button Replacement: crwdns2935265:014crwdnd2935265:02crwdnd2935265:03crwdne2935265:0 PlayStation Vita Right Shoulder Button Replacement: crwdns2935265:014crwdnd2935265:03crwdnd2935265:03crwdne2935265:0
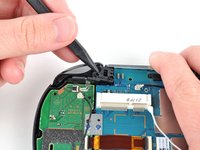
    • Release the right shoulder button flex cable socket by using a spudger to gently pry open the tab.

    • Using tweezers, slide the flex cable out of the socket.

  15. PlayStation Vita Right Shoulder Button Replacement: crwdns2935265:015crwdnd2935265:01crwdnd2935265:02crwdne2935265:0 PlayStation Vita Right Shoulder Button Replacement: crwdns2935265:015crwdnd2935265:02crwdnd2935265:02crwdne2935265:0
    • Using a spudger, gently peel up the right shoulder button from the light adhesive connecting it to casing.

crwdns2915888:0crwdne2915888:0

To reassemble your device, follow these instructions in reverse order.

crwdns2935229:04crwdne2935229:0

Brittany McCrigler

crwdns2935283:003/05/12crwdne2935283:0

89,014 crwdns2915208:0crwdne2915208:0

crwdns2935297:0131crwdne2935297:0

crwdns2915084:0crwdne2915084:0

iFixit crwdns2935289:0iFixitcrwdne2935289:0

Staff

crwdns2931471:0135crwdne2931471:0

crwdns2935297:016,817crwdne2935297:0

crwdns2944067:05crwdne2944067:0

Is anyone else experiencing the button getting stuck?

Fantasy Silicone Statuettes - crwdns2934203:0crwdne2934203:0

Yes, mine is getting stuck, too. I am hoping a replacement will solve this problem.

aseelau -

Has anyone experienced or seen an issue where the trigger button acts with the same functionality as the home button. Every time I press the right trigger it exits to home or exits the game.....help please

Daniel - crwdns2934203:0crwdne2934203:0

I followed this guide on my 3G vita in order to replace the right trigger cable. I found it wasn't necessary to remove the wireless card if anyone else finds that part tricky.

Caleb - crwdns2934203:0crwdne2934203:0

i am replacing the whole front part of my vita do to screen cracked and wont turn on, when i put the button back on, how would i do so to make it stick back on? would i need to reglue it or will it stick back on by itself?

Saul Calderon - crwdns2934203:0crwdne2934203:0

crwdns2917038:0crwdne2917038:0

crwdns2936625:0crwdne2936625:0:

crwdns2936751:024crwdne2936751:0 5

crwdns2936753:07crwdne2936753:0 23

crwdns2936753:030crwdne2936753:0 118

crwdns2942667:0crwdne2942667:0 14,438