crwdns2915892:0crwdne2915892:0
If your PlayStation is having trouble reading discs, the optical drive may need to be replaced. The optical drive is prone to fail on earlier models due to plastic rails warping over time. This guide will take you through the process of replacing the optical drive, which includes the laser and motor assemblies.
Note: This repair is demonstrated on a SCPH-1001 model. The process may differ slightly if you have a later model.
crwdns2942213:0crwdne2942213:0
-
-
Turn the console upside down and remove the five 15.8 mm-long Phillips #1 screws.
-
-
-
While holding the top and bottom halves of the console together, flip the console back over. Lift the top cover straight up to remove it.
-
-
-
-
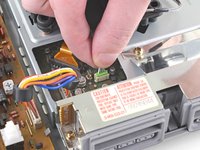
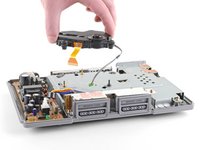
Pull the optical drive power cable straight up and out of its socket on the motherboard to disconnect it.
-
-
-
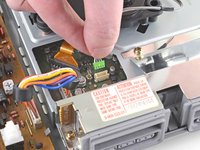
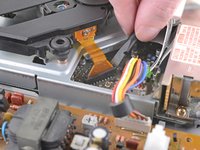
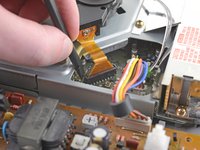
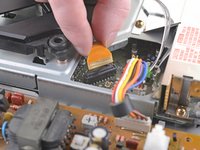
Use the flat end of a spudger to lift up and unlock one side of the data cable's connector on the motherboard. Repeat this step on the other side of the connector.
-
Gently pull the optical drive data cable straight up and out of its socket on the motherboard to disconnect it.
-
-
-
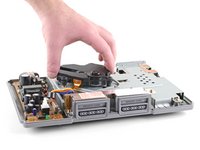
Lift the optical drive straight up to remove it.
-


Compare your new replacement part to the original part—you may need to transfer remaining components or remove adhesive backings from the new part before installing.
To reassemble your device, follow the above steps in reverse order.
Take your e-waste to an R2 or e-Stewards certified recycler.
Repair didn’t go as planned? Check out our Answers community for troubleshooting help.
crwdns2935221:0crwdne2935221:0
crwdns2935229:051crwdne2935229:0

crwdns2947412:04crwdne2947412:0
Laser Drive Models
SCPH-100x : KSM-440AAM and KSM-440ACM
SCPH-550x-700x : KSM-440ADM
SCPH-750x-900x : KSM-440AEM
SCPH-10x : KSM-440BAM
Chances are most, if not all of the original AAM and ACM lasers are worn out.
Some vendors still carry an supposed original KSM-440BAM laser unit only.
I could not make this laser work in a SCPH-1001 unit, even after the transfer of parts.
I heard a rumor of spacers and motherboard adjustment.
This: https://web.archive.org/web/201010090109...
PU-8 test point: CL708, voltage reading to ground without disk - 1.7 volts DC, voltage reading with disk 1.85 volts DC.
Very fine adjustment… I have yet to try this step. Has anyone?
What about spacers? Do I need these?
You must transfer the rubber grommets and the plastic laser cover from the old laser to the new.
If you don’t, the new laser will be too large for the SCPH-1001 chassis.
What about model SCPH-5501?
Will a KSM-440BAM optical drive from a scph-1001 ps1 work with a scph-1001 ps1 that had a KSM-440ACM optical drive?
Hello! Has anyone had success with replacing the optical drive on a 1001?
If so, which model of drive was used?