crwdns2933423:0crwdne2933423:0

PlayStation Motherboard Replacement

crwdns2942213:0crwdne2942213:0

  1. PlayStation Motherboard Replacement, Open the Console: crwdns2935265:01crwdnd2935265:01crwdnd2935265:01crwdne2935265:0
    • Before you begin, make sure the console is turned off and unplugged.

    • Turn the console upside down and remove the five 15.8 mm-long Phillips #1 screws.

  2. PlayStation Motherboard Replacement: crwdns2935265:02crwdnd2935265:01crwdnd2935265:02crwdne2935265:0 PlayStation Motherboard Replacement: crwdns2935265:02crwdnd2935265:02crwdnd2935265:02crwdne2935265:0
    • While holding the top and bottom halves of the console together, flip the console back over. Lift the top cover straight up to remove it.

  3. PlayStation Motherboard Replacement, Remove the Controller Ports: crwdns2935265:03crwdnd2935265:01crwdnd2935265:01crwdne2935265:0
    • Remove five Phillips #1 screws securing the metal shield to the controller ports:

    • Two 14 mm screws

    • Three 8 mm screws

  4. PlayStation Motherboard Replacement: crwdns2935265:04crwdnd2935265:01crwdnd2935265:02crwdne2935265:0 PlayStation Motherboard Replacement: crwdns2935265:04crwdnd2935265:02crwdnd2935265:02crwdne2935265:0
    • Lift the metal shield straight up to remove it.

  5. PlayStation Motherboard Replacement: crwdns2935265:05crwdnd2935265:01crwdnd2935265:02crwdne2935265:0 PlayStation Motherboard Replacement: crwdns2935265:05crwdnd2935265:02crwdnd2935265:02crwdne2935265:0
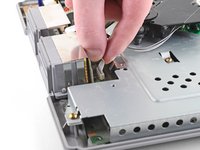
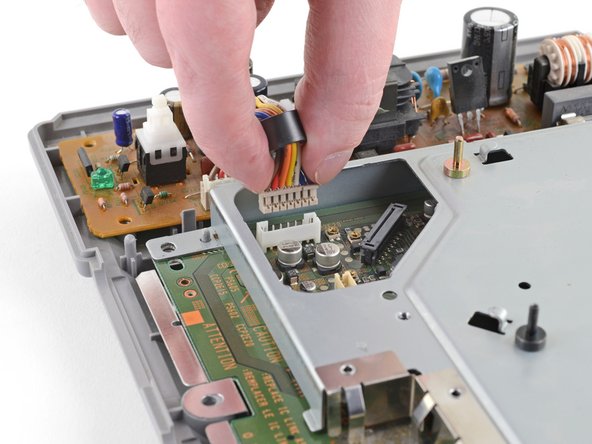
    • Pull the controller port's ribbon cable straight up and out of its socket on the motherboard to disconnect it.

  6. PlayStation Motherboard Replacement: crwdns2935265:06crwdnd2935265:01crwdnd2935265:02crwdne2935265:0 PlayStation Motherboard Replacement: crwdns2935265:06crwdnd2935265:02crwdnd2935265:02crwdne2935265:0
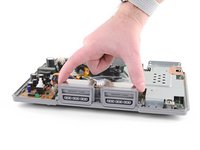
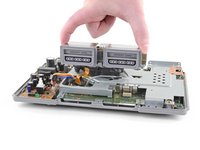
    • Lift the controller ports straight up and out of the bottom case.

  7. PlayStation Motherboard Replacement, Remove the Optical Drive: crwdns2935265:07crwdnd2935265:01crwdnd2935265:02crwdne2935265:0 PlayStation Motherboard Replacement, Remove the Optical Drive: crwdns2935265:07crwdnd2935265:02crwdnd2935265:02crwdne2935265:0
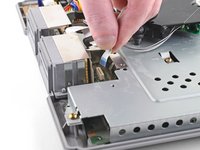
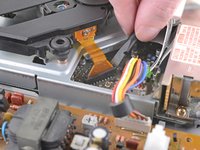
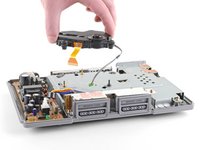
    • Pull the optical drive power cable straight up and out of its socket on the motherboard to disconnect it.

  8. PlayStation Motherboard Replacement: crwdns2935265:08crwdnd2935265:01crwdnd2935265:03crwdne2935265:0 PlayStation Motherboard Replacement: crwdns2935265:08crwdnd2935265:02crwdnd2935265:03crwdne2935265:0 PlayStation Motherboard Replacement: crwdns2935265:08crwdnd2935265:03crwdnd2935265:03crwdne2935265:0
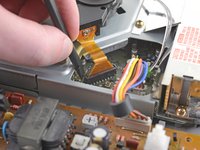
    • Use the flat end of a spudger to lift up and unlock one side of the data cable's connector on the motherboard. Repeat this step on the other side of the connector.

    • You'll hear a faint click noise when unlocking the connector. Make sure not to apply too much pressure when lifting up on the connector with the spudger, or else damage may result.

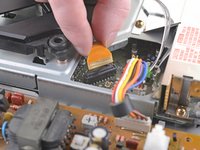
    • Gently pull the optical drive data cable straight up and out of its socket on the motherboard to disconnect it.

  9. PlayStation Motherboard Replacement: crwdns2935265:09crwdnd2935265:01crwdnd2935265:02crwdne2935265:0 PlayStation Motherboard Replacement: crwdns2935265:09crwdnd2935265:02crwdnd2935265:02crwdne2935265:0
    • Lift the optical drive straight up to remove it.

  10. PlayStation Motherboard Replacement, Unplug the Power Supply: crwdns2935265:010crwdnd2935265:01crwdnd2935265:02crwdne2935265:0 PlayStation Motherboard Replacement, Unplug the Power Supply: crwdns2935265:010crwdnd2935265:02crwdnd2935265:02crwdne2935265:0
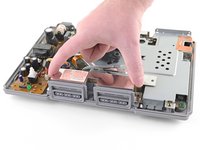
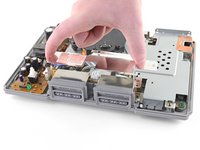
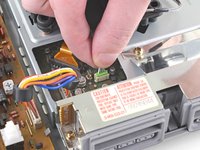
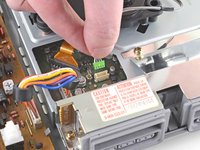
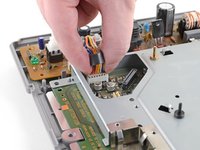
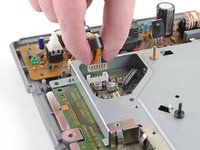
    • Pull the power supply cable straight up and out of its socket on the motherboard to disconnect it.

  11. PlayStation Motherboard Replacement, Remove the Motherboard's Metal Shield: crwdns2935265:011crwdnd2935265:01crwdnd2935265:01crwdne2935265:0
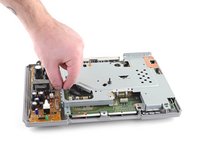
    • Remove the five 14 mm-long Phillips #1 screws from the motherboard's metal shield.

  12. PlayStation Motherboard Replacement: crwdns2935265:012crwdnd2935265:01crwdnd2935265:03crwdne2935265:0 PlayStation Motherboard Replacement: crwdns2935265:012crwdnd2935265:02crwdnd2935265:03crwdne2935265:0 PlayStation Motherboard Replacement: crwdns2935265:012crwdnd2935265:03crwdnd2935265:03crwdne2935265:0
    • From the left side, lift up the metal shield and rotate it about its right edge, opening it like a book.

    • There may be strips of tape holding the right side of the metal shield to the case, necessitating this kind of removal procedure. If there isn't tape, you can simply lift the shield straight up to remove it.

  13. PlayStation Motherboard Replacement, Remove the Motherboard: crwdns2935265:013crwdnd2935265:01crwdnd2935265:01crwdne2935265:0
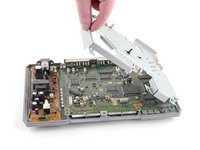
    • Remove the three 14 mm-long Phillips #1 screws securing the motherboard to the bottom case.

  14. PlayStation Motherboard Replacement: crwdns2935265:014crwdnd2935265:01crwdnd2935265:02crwdne2935265:0 PlayStation Motherboard Replacement: crwdns2935265:014crwdnd2935265:02crwdnd2935265:02crwdne2935265:0
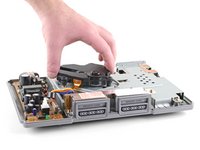
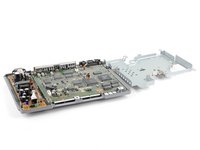
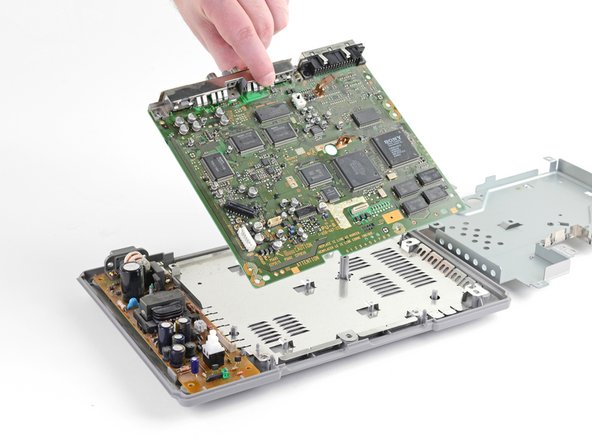
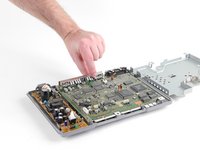
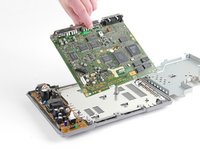
    • Lift the motherboard out of the bottom case.

crwdns2915888:0crwdne2915888:0

Compare your new replacement part to the original part—you may need to transfer remaining components or remove adhesive backings from the new part before installing.

To reassemble your device, follow the above steps in reverse order.

Take your e-waste to an R2 or e-Stewards certified recycler.

Repair didn’t go as planned? Check out our Answers community for troubleshooting help.

crwdns2935229:027crwdne2935229:0

Craig Lloyd

crwdns2935283:002/10/16crwdne2935283:0

35,351 crwdns2915208:0crwdne2915208:0

crwdns2935297:082crwdne2935297:0

crwdns2944067:02crwdne2944067:0

Hi there.

Here i can buy that copper tape from the right of the metal shield ?

Thkx in adv

Haitham - crwdns2934203:0crwdne2934203:0

Excelente guía, esto ayuda a muchos para aprender a reparar y no hacer gastos innecesarios.

aldrin peñate - crwdns2934203:0crwdne2934203:0

crwdns2917038:0crwdne2917038:0

crwdns2936625:0crwdne2936625:0:

crwdns2936751:024crwdne2936751:0 8

crwdns2936753:07crwdne2936753:0 66

crwdns2936753:030crwdne2936753:0 201

crwdns2942667:0crwdne2942667:0 25,945