crwdns2933423:0crwdne2933423:0

PlayStation 5 USB Board Replacement

crwdns2942213:0crwdne2942213:0

  1. PlayStation 5 USB Board Replacement, Remove the stand screw: crwdns2935265:01crwdnd2935265:01crwdnd2935265:01crwdne2935265:0
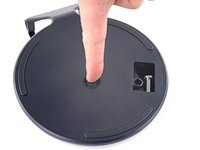
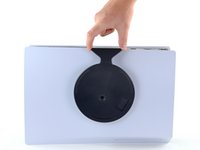
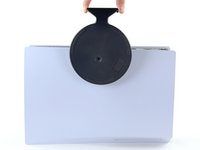
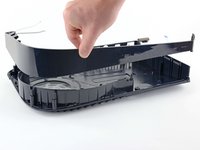
    • If your PlayStation 5 is in its vertical orientation, flip it upside down so the stand is facing up.

    • If your PlayStation 5 is in its horizontal orientation, skip to Step 6.

    • Work on a flat surface to prevent your PlayStation from falling over.

    • Use a coin or a flathead screwdriver to remove the 26.5 mm-long stand screw.

  2. PlayStation 5 USB Board Replacement, Remove the vertical stand: crwdns2935265:02crwdnd2935265:01crwdnd2935265:02crwdne2935265:0 PlayStation 5 USB Board Replacement, Remove the vertical stand: crwdns2935265:02crwdnd2935265:02crwdnd2935265:02crwdne2935265:0
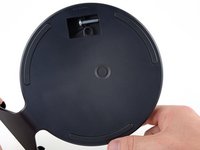
    • Lift straight up to remove the stand.

  3. PlayStation 5 USB Board Replacement, Store the stand screw: crwdns2935265:03crwdnd2935265:01crwdnd2935265:02crwdne2935265:0 PlayStation 5 USB Board Replacement, Store the stand screw: crwdns2935265:03crwdnd2935265:02crwdnd2935265:02crwdne2935265:0
    • Insert the screw into the cubby on the bottom of the stand.

  4. PlayStation 5 USB Board Replacement, Cap the screw hole: crwdns2935265:04crwdnd2935265:01crwdnd2935265:03crwdne2935265:0 PlayStation 5 USB Board Replacement, Cap the screw hole: crwdns2935265:04crwdnd2935265:02crwdnd2935265:03crwdne2935265:0 PlayStation 5 USB Board Replacement, Cap the screw hole: crwdns2935265:04crwdnd2935265:03crwdnd2935265:03crwdne2935265:0
    crwdns2935267:0crwdne2935267:0
    Tweezers
    $4.99
    • Use a pair of tweezers or your fingernail to remove the cap from the cubby.

    • Use your finger to press the cap into the screw hole.

  5. PlayStation 5 USB Board Replacement, Close the cubby: crwdns2935265:05crwdnd2935265:01crwdnd2935265:03crwdne2935265:0 PlayStation 5 USB Board Replacement, Close the cubby: crwdns2935265:05crwdnd2935265:02crwdnd2935265:03crwdne2935265:0 PlayStation 5 USB Board Replacement, Close the cubby: crwdns2935265:05crwdnd2935265:03crwdnd2935265:03crwdne2935265:0
    • Twist the stand counterclockwise to close the cubby.

  6. PlayStation 5 USB Board Replacement, Remove the horizontal stand: crwdns2935265:06crwdnd2935265:01crwdnd2935265:02crwdne2935265:0 PlayStation 5 USB Board Replacement, Remove the horizontal stand: crwdns2935265:06crwdnd2935265:02crwdnd2935265:02crwdne2935265:0
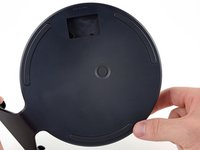
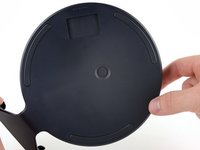
    • If your PlayStation 5 is in its horizontal orientation, rest it on its face with the charging port facing up.

    • Lift the stand straight up to remove it.

    Steps 1 through 6 are just about removing the stand, correct? Storing the screw and all that is just about being neat and tidy?

    tofu - crwdns2934203:0crwdne2934203:0

  7. PlayStation 5 USB Board Replacement, Remove the right faceplate: crwdns2935265:07crwdnd2935265:01crwdnd2935265:03crwdne2935265:0 PlayStation 5 USB Board Replacement, Remove the right faceplate: crwdns2935265:07crwdnd2935265:02crwdnd2935265:03crwdne2935265:0 PlayStation 5 USB Board Replacement, Remove the right faceplate: crwdns2935265:07crwdnd2935265:03crwdnd2935265:03crwdne2935265:0
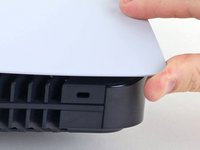
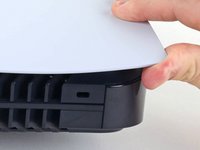
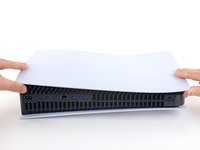
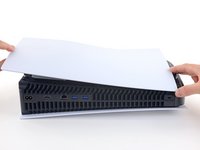
    • Flip the device over so that the USB and ethernet ports are on the left side from your perspective.

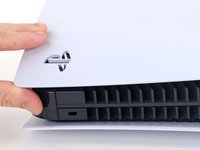
    • Lift up the corner of the faceplate to unclip it from the case.

  8. PlayStation 5 USB Board Replacement: crwdns2935265:08crwdnd2935265:01crwdnd2935265:02crwdne2935265:0 PlayStation 5 USB Board Replacement: crwdns2935265:08crwdnd2935265:02crwdnd2935265:02crwdne2935265:0
    • While lifting up the corner, slide the faceplate towards the bottom of the device.

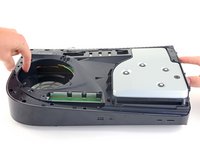
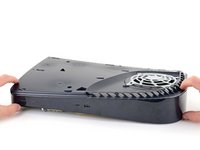
    • Remove the right faceplate.

    I recommend doing both covers at this time, to avoid hassle later. Skip to step 38, then come back here

    UnitedShoes - crwdns2934203:0crwdne2934203:0

    Why remove the other cover? You only need to remove the cover shown in order to access the disc drive.

    timepants -

  9. PlayStation 5 USB Board Replacement, Pry up the grille: crwdns2935265:09crwdnd2935265:01crwdnd2935265:03crwdne2935265:0 PlayStation 5 USB Board Replacement, Pry up the grille: crwdns2935265:09crwdnd2935265:02crwdnd2935265:03crwdne2935265:0 PlayStation 5 USB Board Replacement, Pry up the grille: crwdns2935265:09crwdnd2935265:03crwdnd2935265:03crwdne2935265:0
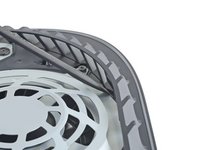
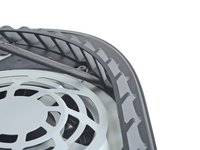
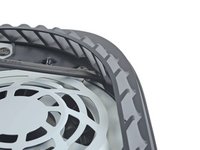
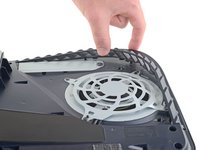
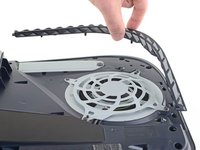
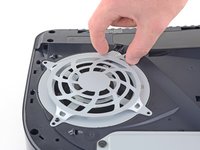
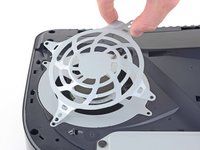
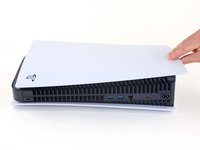
    • Insert the flat end of a spudger underneath the grille and into the gap above the fan.

    • Lift up with the spudger to pry the grille away from the case.

  10. PlayStation 5 USB Board Replacement, Remove the grille: crwdns2935265:010crwdnd2935265:01crwdnd2935265:02crwdne2935265:0 PlayStation 5 USB Board Replacement, Remove the grille: crwdns2935265:010crwdnd2935265:02crwdnd2935265:02crwdne2935265:0
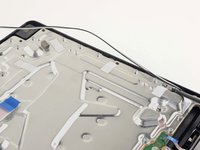
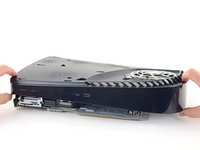
    • Lift the grille away from the case to remove it.

    During reassembling:

    There is a little flat pin in each end, they need to go into the console

    Janick Carstens - crwdns2934203:0crwdne2934203:0

  11. PlayStation 5 USB Board Replacement, Remove the fan shroud screws: crwdns2935265:011crwdnd2935265:01crwdnd2935265:01crwdne2935265:0
    crwdns2935267:0crwdne2935267:0
    Magnetic Project Mat
    $19.95
    • Use a TR8 Torx security driver to remove the four screws securing the fan shroud to the case:

    • Two 23.3 mm-long screws

    • One 11.4 mm-long screw

    • One 31 mm-long screw

    • Throughout this repair, keep track of each screw and make sure it goes back exactly where it came from to avoid damaging your console.

    My ps5 seems to have tiny black caps over each screw. My spudger can’t get them off I see no other way to move forward besides breaking the shroud

    Anthony Pouliot - crwdns2934203:0crwdne2934203:0

    wrong side, take the cover off the other side

    Alan Sears -

    The 31 mm-long screw just wont budge! do I turn that one counter-clockwise or clockwise? someone please help!

    Chris Love - crwdns2934203:0crwdne2934203:0

    counter clockwise to remove

    Alan Sears -

    I damaged the 23.3mm on the bottom right next to fan connector. Is there any replacements? Can't seem to find any 23.3mm t8 screw anywhere online

    forsage.rh - crwdns2934203:0crwdne2934203:0

    I used a t8 for all of them and had no problem removing, except for that bottom right screw

    forsage.rh -

    Is there any replacement screws you can buy for the fan? I slightly damage 23.3mm screw.

    Kevin Sarmiento - crwdns2934203:0crwdne2934203:0

    My PS5 has TX8 (security Torx bit) screws on my fan shroud and all the case screws. A normal Torx driver won’t work you need the one with the hole in the middle of the bit driver.

    Daniel Sutczak - crwdns2934203:0crwdne2934203:0

    Why does my ps5 have 3 different screws? 2 are the same then 2 other ones? Why?

    GoodContentKing - crwdns2934203:0crwdne2934203:0

    Does anyone know the thread pitch of these screws? I just bought a used PS5 and the screws are missing. The fan has been glued in. Can't make this up.....

    Steven Brien - crwdns2934203:0crwdne2934203:0

    Ci sono viti di ricambio?

    Dove posso trovarle?

    Ho guardato dappertutto e non se ne trovano

    Alessio Zecca - crwdns2934203:0crwdne2934203:0

    Sind mit den Massen die dicke oder die Länge gemeint

    Zombiehunter -_- - crwdns2934203:0crwdne2934203:0

    Thickness I'm sure

    Stephen Zarella -

    9h works also or I HAD a mix up

    Stephen Zarella - crwdns2934203:0crwdne2934203:0

  12. PlayStation 5 USB Board Replacement, Remove the fan shroud: crwdns2935265:012crwdnd2935265:01crwdnd2935265:02crwdne2935265:0 PlayStation 5 USB Board Replacement, Remove the fan shroud: crwdns2935265:012crwdnd2935265:02crwdnd2935265:02crwdne2935265:0
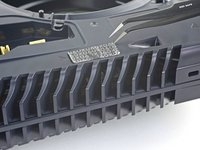
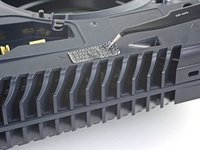
    • Lift the fan shroud straight up to remove it.

    wo bekomme ich die original Torx M8 für die Ps5?

    Elli Pirelly - crwdns2934203:0crwdne2934203:0

  13. PlayStation 5 USB Board Replacement, Remove the wire cover: crwdns2935265:013crwdnd2935265:01crwdnd2935265:03crwdne2935265:0 PlayStation 5 USB Board Replacement, Remove the wire cover: crwdns2935265:013crwdnd2935265:02crwdnd2935265:03crwdne2935265:0 PlayStation 5 USB Board Replacement, Remove the wire cover: crwdns2935265:013crwdnd2935265:03crwdnd2935265:03crwdne2935265:0
    • Insert the flat end of a spudger beneath the black wire cover and into the gap above the fan wires.

    • Pry only on the wire cover, not on the fan wires themselves.

    • Use the spudger to peel up the wire cover until you can grip it with your fingers.

    Some PS5's have a smaller sticky cover instead , remove it in this step

    UnitedShoes - crwdns2934203:0crwdne2934203:0

  14. PlayStation 5 USB Board Replacement: crwdns2935265:014crwdnd2935265:01crwdnd2935265:03crwdne2935265:0 PlayStation 5 USB Board Replacement: crwdns2935265:014crwdnd2935265:02crwdnd2935265:03crwdne2935265:0 PlayStation 5 USB Board Replacement: crwdns2935265:014crwdnd2935265:03crwdnd2935265:03crwdne2935265:0
    • Use your fingers to peel off the wire cover.

  15. PlayStation 5 USB Board Replacement, Disconnect the fan: crwdns2935265:015crwdnd2935265:01crwdnd2935265:02crwdne2935265:0 PlayStation 5 USB Board Replacement, Disconnect the fan: crwdns2935265:015crwdnd2935265:02crwdnd2935265:02crwdne2935265:0
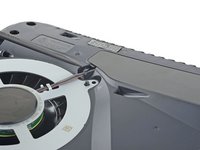
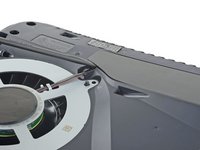
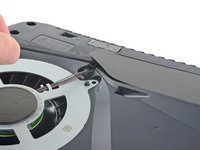
    • Use your fingers to grip the edges of the fan cable connector, and pull up to disconnect it from the motherboard.

    • Always pull cables by their connectors and not the wires themselves.

    Normally I don't have an issue with this type of connector, but I couldn't get it out with my fingers. I ended up using two plastic pry tools, one on each side of the connector, like a claw game.

    timepants - crwdns2934203:0crwdne2934203:0

    So weird you just posted this yesterday. I am doing this right now and your comment helped so much, I couldn’t get mine out at all before I tried that.

    Zach Rogers -

  16. PlayStation 5 USB Board Replacement, Remove the fan: crwdns2935265:016crwdnd2935265:01crwdnd2935265:03crwdne2935265:0 PlayStation 5 USB Board Replacement, Remove the fan: crwdns2935265:016crwdnd2935265:02crwdnd2935265:03crwdne2935265:0 PlayStation 5 USB Board Replacement, Remove the fan: crwdns2935265:016crwdnd2935265:03crwdnd2935265:03crwdne2935265:0
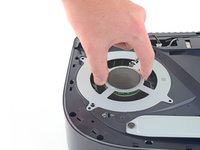
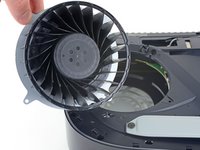
    • Lift the fan up and out of the case to remove it.

  17. PlayStation 5 USB Board Replacement, Remove the SSD cover: crwdns2935265:017crwdnd2935265:01crwdnd2935265:01crwdne2935265:0
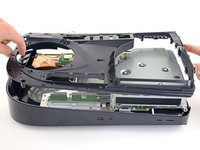
    • Use a Phillips screwdriver to remove the 17 mm-long SSD cover screw.

    It seems to be a Phillips #1 screw.

    timepants - crwdns2934203:0crwdne2934203:0

  18. PlayStation 5 USB Board Replacement: crwdns2935265:018crwdnd2935265:01crwdnd2935265:03crwdne2935265:0 PlayStation 5 USB Board Replacement: crwdns2935265:018crwdnd2935265:02crwdnd2935265:03crwdne2935265:0 PlayStation 5 USB Board Replacement: crwdns2935265:018crwdnd2935265:03crwdnd2935265:03crwdne2935265:0
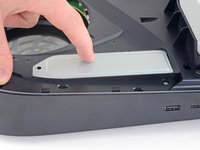
    • Use your finger to slide the SSD cover towards the top of the device to unclip it from the case.

    • Remove the SSD cover.

    It is unnecessary to remove the SSD screw and cover for power supply replacement.

    Daniel Sutczak - crwdns2934203:0crwdne2934203:0

    The only thing you can do without removing the ssd cover and screw is remove the fan.

    David Fear -

  19. PlayStation 5 USB Board Replacement, Remove the optical drive wire: crwdns2935265:019crwdnd2935265:01crwdnd2935265:02crwdne2935265:0 PlayStation 5 USB Board Replacement, Remove the optical drive wire: crwdns2935265:019crwdnd2935265:02crwdnd2935265:02crwdne2935265:0
    • Use your fingers to grip the edges of the optical drive cable connector, and pull up to disconnect it from the motherboard.

    • Always pull cables by their connectors and not the wires themselves.

    For some PS5's, the optical drive connector is still covered in this step. Proceed up to step 22, then you will be able to access these connecters. The connectors will be running across the heatsink visible from step 24.

    UnitedShoes - crwdns2934203:0crwdne2934203:0

  20. PlayStation 5 USB Board Replacement: crwdns2935265:020crwdnd2935265:01crwdnd2935265:02crwdne2935265:0 PlayStation 5 USB Board Replacement: crwdns2935265:020crwdnd2935265:02crwdnd2935265:02crwdne2935265:0
    • Use your fingers to grip the edges of the optical drive cable connector, and pull up to disconnect it from the optical drive.

  21. PlayStation 5 USB Board Replacement, Remove the tamper-evident sticker: crwdns2935265:021crwdnd2935265:01crwdnd2935265:03crwdne2935265:0 PlayStation 5 USB Board Replacement, Remove the tamper-evident sticker: crwdns2935265:021crwdnd2935265:02crwdnd2935265:03crwdne2935265:0 PlayStation 5 USB Board Replacement, Remove the tamper-evident sticker: crwdns2935265:021crwdnd2935265:03crwdnd2935265:03crwdne2935265:0
    crwdns2935267:0crwdne2935267:0
    Tweezers
    $4.99
    • Use a pair of tweezers to remove the tamper-evident sticker covering the remaining case screw.

    • If your PlayStation 5 hasn't been opened before, this sticker will be completely black. The pattern will appear after you remove it.

    • Technically, these are tamper-evident stickers—but don't worry—Sony can't legally void your warranty, as long as you don't damage anything. Have fun!

  22. PlayStation 5 USB Board Replacement, Remove the case screws: crwdns2935265:022crwdnd2935265:01crwdnd2935265:01crwdne2935265:0
    • Use a T8 Torx driver to remove the eleven screws securing the case:

    • Six 18.6 mm-long screws

    • Two 23.3 mm-long screws

    • Two 43.2 mm-long screws

    • One 7.3 mm-long screw

  23. PlayStation 5 USB Board Replacement, Remove the case: crwdns2935265:023crwdnd2935265:01crwdnd2935265:02crwdne2935265:0 PlayStation 5 USB Board Replacement, Remove the case: crwdns2935265:023crwdnd2935265:02crwdnd2935265:02crwdne2935265:0
    • Lift the case straight up to remove it.

  24. PlayStation 5 USB Board Replacement, Remove the optical drive ribbon cable: crwdns2935265:024crwdnd2935265:01crwdnd2935265:03crwdne2935265:0 PlayStation 5 USB Board Replacement, Remove the optical drive ribbon cable: crwdns2935265:024crwdnd2935265:02crwdnd2935265:03crwdne2935265:0 PlayStation 5 USB Board Replacement, Remove the optical drive ribbon cable: crwdns2935265:024crwdnd2935265:03crwdnd2935265:03crwdne2935265:0
    • Use the flat end of a spudger to press down on the optical drive connector's metal locking tab.

    • With the metal tab depressed, use a pair of tweezers to pull the blue pull tab directly away from the connector to disconnect the cable from the optical drive.

    • Pull only on the pull tab, not the cable itself.

  25. PlayStation 5 USB Board Replacement, Remove the optical drive: crwdns2935265:025crwdnd2935265:01crwdnd2935265:02crwdne2935265:0 PlayStation 5 USB Board Replacement, Remove the optical drive: crwdns2935265:025crwdnd2935265:02crwdnd2935265:02crwdne2935265:0
    • Lift the optical drive away from the device to remove it.

  26. PlayStation 5 USB Board Replacement, Remove the optical drive ribbon cable: crwdns2935265:026crwdnd2935265:01crwdnd2935265:03crwdne2935265:0 PlayStation 5 USB Board Replacement, Remove the optical drive ribbon cable: crwdns2935265:026crwdnd2935265:02crwdnd2935265:03crwdne2935265:0 PlayStation 5 USB Board Replacement, Remove the optical drive ribbon cable: crwdns2935265:026crwdnd2935265:03crwdnd2935265:03crwdne2935265:0
    crwdns2935267:0crwdne2935267:0
    Tweezers
    $4.99
    • Use the flat end of a spudger to press down on the optical drive connector's metal locking tab.

    • With the metal tab depressed, use a pair of tweezers to pull the blue pull tab directly away from the connector to disconnect the cable from the motherboard.

  27. PlayStation 5 USB Board Replacement, Remove the power and eject button ribbon cable: crwdns2935265:027crwdnd2935265:01crwdnd2935265:02crwdne2935265:0 PlayStation 5 USB Board Replacement, Remove the power and eject button ribbon cable: crwdns2935265:027crwdnd2935265:02crwdnd2935265:02crwdne2935265:0
    • Use a pair of tweezers to pull the blue pull tab directly away from the connector to disconnect the power and eject button ribbon cable.

    where to get the ribbon cable from

    sameh - crwdns2934203:0crwdne2934203:0

  28. PlayStation 5 USB Board Replacement, Remove the LED ribbon cable: crwdns2935265:028crwdnd2935265:01crwdnd2935265:02crwdne2935265:0 PlayStation 5 USB Board Replacement, Remove the LED ribbon cable: crwdns2935265:028crwdnd2935265:02crwdnd2935265:02crwdne2935265:0
    • Use a pair of tweezers to pull the blue pull tab directly away from the connector to disconnect the LED ribbon cable.

  29. PlayStation 5 USB Board Replacement, Remove the antenna wires: crwdns2935265:029crwdnd2935265:01crwdnd2935265:03crwdne2935265:0 PlayStation 5 USB Board Replacement, Remove the antenna wires: crwdns2935265:029crwdnd2935265:02crwdnd2935265:03crwdne2935265:0 PlayStation 5 USB Board Replacement, Remove the antenna wires: crwdns2935265:029crwdnd2935265:03crwdnd2935265:03crwdne2935265:0
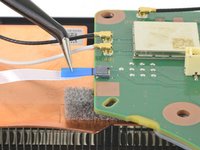
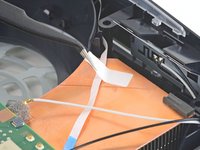
    • Use a pair of tweezers to grip the white Wi-Fi antenna wire at its metal base, as close to the connector as possible.

    • Lift the wire's connector straight up to disconnect it from the motherboard.

    • Repeat for the black Wi-Fi antenna wire.

    • Some board revisions may not have these antenna wires. If your board is missing these connectors, skip this step.

    Black and white antennas are reversed, black should go on RB and white on RW

    iPod Fix It - crwdns2934203:0crwdne2934203:0

    It looks like some models of PS5 lack these antenna wires. My PS5 only has Power Supply antennas, which are in the next step.

    UnitedShoes - crwdns2934203:0crwdne2934203:0

    Can confirm, on a PS5 I got for repair, there are only antenna connectors that are in the next step. The antenna connectors of this step are physically absent from the PCB. There are only 2 coaxial connectors in total, not 4. From the image it seems the PCB routing is slightly different (my board with missing connectors seems to use PCB traces as antennae given trace shapes)

    Ilya - crwdns2934203:0crwdne2934203:0

  30. PlayStation 5 USB Board Replacement: crwdns2935265:030crwdnd2935265:01crwdnd2935265:03crwdne2935265:0 PlayStation 5 USB Board Replacement: crwdns2935265:030crwdnd2935265:02crwdnd2935265:03crwdne2935265:0 PlayStation 5 USB Board Replacement: crwdns2935265:030crwdnd2935265:03crwdnd2935265:03crwdne2935265:0
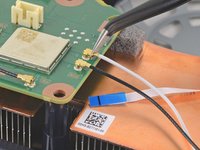
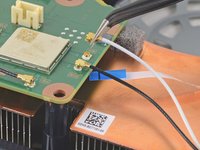
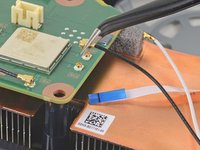
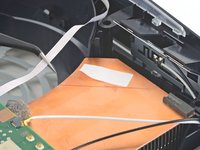
    • Use a pair of tweezers to grip the black or blue power supply antenna wire at its metal base, as close to the connector as possible.

    • Lift the wire's connector straight up to disconnect it from the motherboard.

    • Repeat for the white power supply antenna wire.

  31. PlayStation 5 USB Board Replacement, Remove the white stickers: crwdns2935265:031crwdnd2935265:01crwdnd2935265:03crwdne2935265:0 PlayStation 5 USB Board Replacement, Remove the white stickers: crwdns2935265:031crwdnd2935265:02crwdnd2935265:03crwdne2935265:0 PlayStation 5 USB Board Replacement, Remove the white stickers: crwdns2935265:031crwdnd2935265:03crwdnd2935265:03crwdne2935265:0
    • Use a pair of tweezers to peel back the white sticker holding the antenna wires to the top shield plate.

    • Remove the antenna wires from underneath the sticker.

    • Press the white sticker back down onto the top shield plate so it can be reused.

  32. PlayStation 5 USB Board Replacement: crwdns2935265:032crwdnd2935265:01crwdnd2935265:03crwdne2935265:0 PlayStation 5 USB Board Replacement: crwdns2935265:032crwdnd2935265:02crwdnd2935265:03crwdne2935265:0 PlayStation 5 USB Board Replacement: crwdns2935265:032crwdnd2935265:03crwdnd2935265:03crwdne2935265:0
    • Repeat the previous step to peel back the four remaining stickers.

  33. PlayStation 5 USB Board Replacement: crwdns2935265:033crwdnd2935265:01crwdnd2935265:03crwdne2935265:0 PlayStation 5 USB Board Replacement: crwdns2935265:033crwdnd2935265:02crwdnd2935265:03crwdne2935265:0 PlayStation 5 USB Board Replacement: crwdns2935265:033crwdnd2935265:03crwdnd2935265:03crwdne2935265:0
    • Use a pair of tweezers to peel back the white sticker holding the LED ribbon cable to the heat sink.

    • Remove the LED ribbon cable from underneath the sticker.

    • Press the white sticker back down onto the heat sink so it can be reused.

  34. PlayStation 5 USB Board Replacement, Remove the top shield plate screws: crwdns2935265:034crwdnd2935265:01crwdnd2935265:01crwdne2935265:0
    • Use a T8 Torx driver to remove the forty-two screws securing the top shield plate:

    • Forty-one 7.3 mm-long screws

    • One 43.2 mm-long screw

    Your image already has the long black screw removed from the left hand side half way down.

    You should add a step for this screw for people re-assembling.

    infiniti25 - crwdns2934203:0crwdne2934203:0

    I second this! I had an extra long screw when I was done, it was likely this. This is one of the screws that reach down to the PSU

    UnitedShoes -

    I believe that this was an unintentional oversight in the guide, as I cannot find any guide that mentions removing this screw. I have made an edit to this guide to clarify that final screw must also be removed, hoping it is approved and published!

    Cyberdragon E207 -

    I can’t see how removing 41 of these 7.3mm screws to replace the power supply. None of them hold the power supply to the board. Waste of time.

    Daniel Sutczak - crwdns2934203:0crwdne2934203:0

    The reason why is because you need to remove the top shield plate to get to the usb ribbon cable.

    Bryson Morgan -

    Some PS5's have a removable cover for the USB board (step 36). If this is your situation, then I think removing this entire plate is unnecessary for removing the PSU (80% sure, I haven't exactly tried.)

    UnitedShoes -

  35. PlayStation 5 USB Board Replacement, Remove the top shield plate: crwdns2935265:035crwdnd2935265:01crwdnd2935265:03crwdne2935265:0 PlayStation 5 USB Board Replacement, Remove the top shield plate: crwdns2935265:035crwdnd2935265:02crwdnd2935265:03crwdne2935265:0 PlayStation 5 USB Board Replacement, Remove the top shield plate: crwdns2935265:035crwdnd2935265:03crwdnd2935265:03crwdne2935265:0
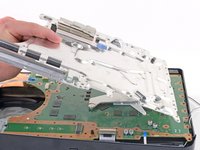
    • Lift the top shield plate off of the motherboard to remove it.

    • During reassembly, this is a good point to replace any thermal pads on the top of the main board, if necessary. The pads may be stuck to both the top shield plate and the main board.

    • It's important that the replacement pads are the same thickness as the originals, otherwise the foam around the APU may not seal properly.

    Unnecessary step to replace power supply.

    Daniel Sutczak - crwdns2934203:0crwdne2934203:0

    Debatable, removing the top shield makes it much more comfortable to remove the USB ribbon cable.

    Bryson Morgan -

    I would say it's required since there's no way to get to the metal release otherwise

    UnitedShoes -

    The grey rubber came off in some spots, what do I use to replace it? It attaches to cylinder things (opposite side of power supply) which then attaches to a copper bus.

    Fortyr - crwdns2934203:0crwdne2934203:0

    That's thermal paste, it's recommended to keep it all on there. If you lost some paste, check on Google for the proper thermal paste for the PS5

    UnitedShoes -

  36. PlayStation 5 USB Board Replacement, Disconnect the USB board: crwdns2935265:036crwdnd2935265:01crwdnd2935265:03crwdne2935265:0 PlayStation 5 USB Board Replacement, Disconnect the USB board: crwdns2935265:036crwdnd2935265:02crwdnd2935265:03crwdne2935265:0 PlayStation 5 USB Board Replacement, Disconnect the USB board: crwdns2935265:036crwdnd2935265:03crwdnd2935265:03crwdne2935265:0
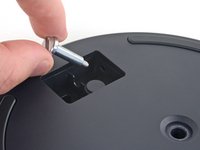
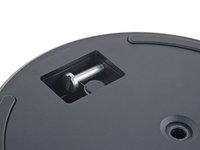
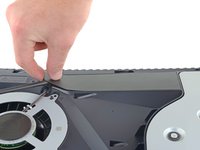
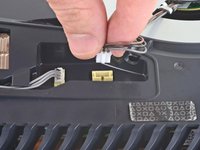
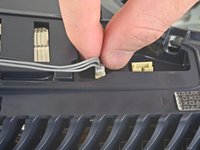
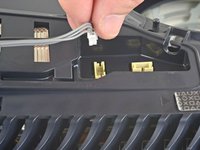
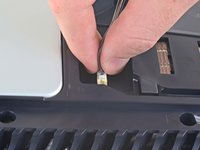
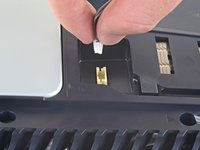
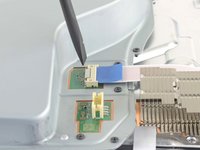
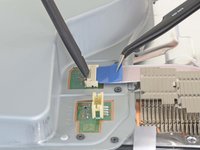
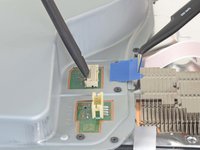
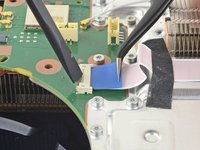
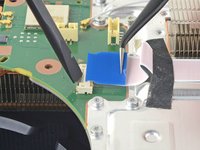
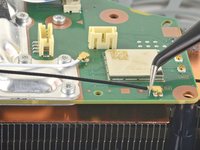
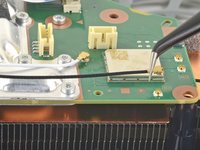
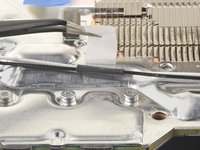
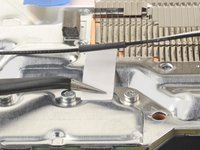
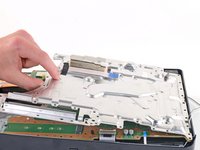
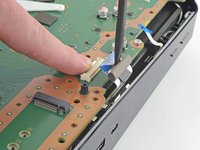
    • Use your finger to depress the metal locking tab on the USB board cable's board connector.

    • With the metal tab depressed, place the flat end of a spudger against the insulating foam pad on the ribbon cable and pull it directly away from the connector to disconnect it.

    What happens if this cable disconnects from the front?

    Carolyn Page - crwdns2934203:0crwdne2934203:0

  37. PlayStation 5 USB Board Replacement, Remove the left faceplate: crwdns2935265:037crwdnd2935265:01crwdnd2935265:03crwdne2935265:0 PlayStation 5 USB Board Replacement, Remove the left faceplate: crwdns2935265:037crwdnd2935265:02crwdnd2935265:03crwdne2935265:0 PlayStation 5 USB Board Replacement, Remove the left faceplate: crwdns2935265:037crwdnd2935265:03crwdnd2935265:03crwdne2935265:0
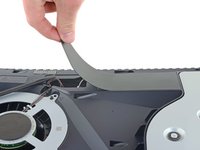
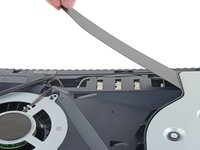
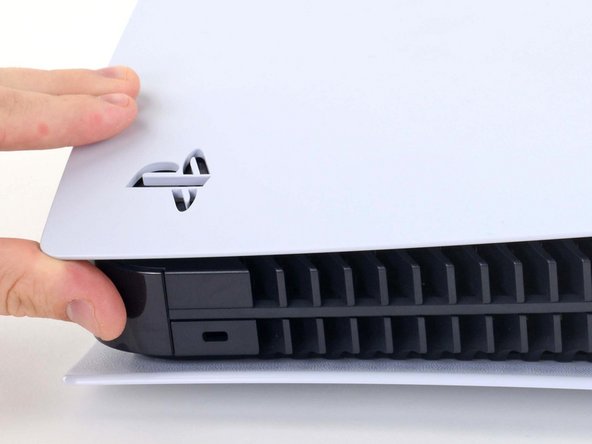
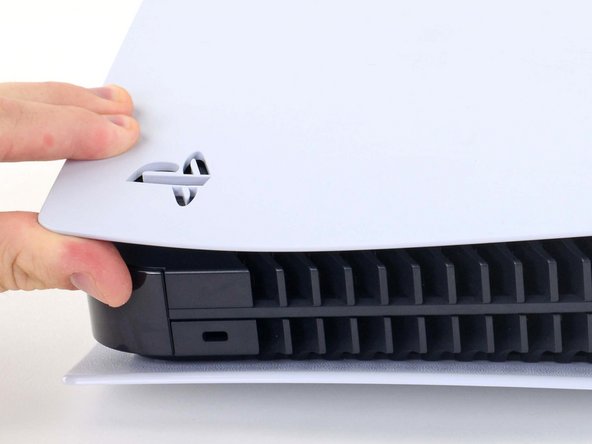
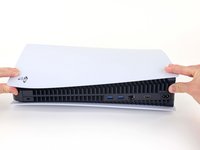
    • Lift up the corner of the faceplate with the PlayStation logo to unclip it from the case.

    Wrong picture: the other face of Playstation has already been removed at this point, while in the picture it looks as if we have just started disassembly. This note applies to all following steps.

    Ilya - crwdns2934203:0crwdne2934203:0

  38. PlayStation 5 USB Board Replacement: crwdns2935265:038crwdnd2935265:01crwdnd2935265:02crwdne2935265:0 PlayStation 5 USB Board Replacement: crwdns2935265:038crwdnd2935265:02crwdnd2935265:02crwdne2935265:0
    • While lifting up the corner, slide the faceplate towards the bottom of the device.

    • Remove the left faceplate.

  39. PlayStation 5 USB Board Replacement, Remove the screws: crwdns2935265:039crwdnd2935265:01crwdnd2935265:01crwdne2935265:0
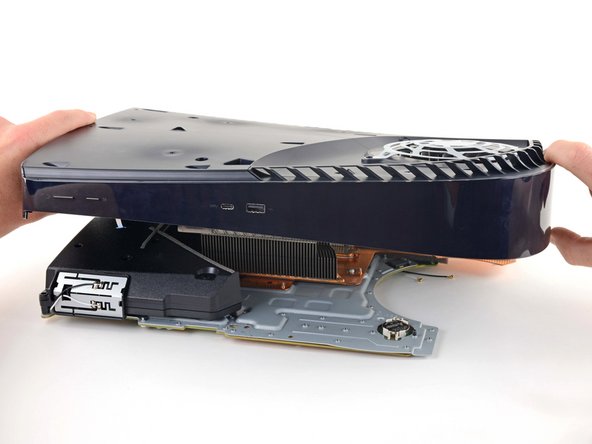
    • Use a Torx T8 driver to remove the two 29.4 mm-long screws securing the case to the motherboard and heat sink assembly.

    These screws are T9 security, or, if they are designed to be T8 security, they also accommodate T9 bits and you should definitely use T9. Source: Myself after stripping a highly torqued bolt 🤦‍♂️

    just chris... - crwdns2934203:0crwdne2934203:0

  40. PlayStation 5 USB Board Replacement, Remove the case: crwdns2935265:040crwdnd2935265:01crwdnd2935265:03crwdne2935265:0 PlayStation 5 USB Board Replacement, Remove the case: crwdns2935265:040crwdnd2935265:02crwdnd2935265:03crwdne2935265:0 PlayStation 5 USB Board Replacement, Remove the case: crwdns2935265:040crwdnd2935265:03crwdnd2935265:03crwdne2935265:0
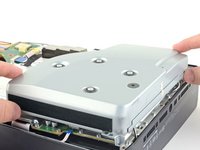
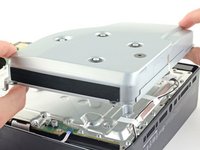
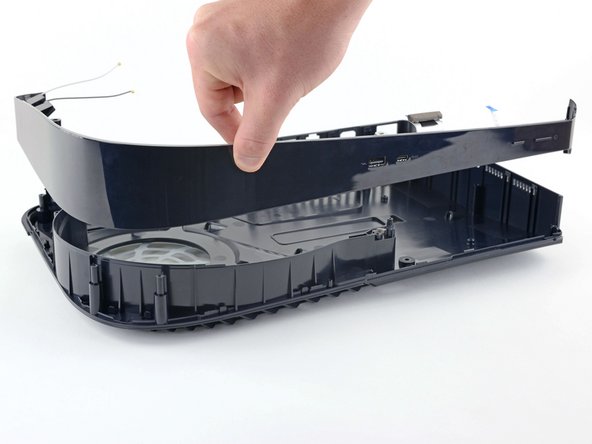
    • Lift the front edge of the case off of the motherboard and heat sink assembly.

    • With the front edge elevated, push the case back, away from the motherboard and heat sink assembly, to maneuver the charging port out of its slot in the case.

    • Remove the case.

    • The front plate may come apart from the plastic case. During reassembly, make sure the front plate is in place before reinserting the motherboard and power supply.

  41. PlayStation 5 USB Board Replacement, Remove the middle panel: crwdns2935265:041crwdnd2935265:01crwdnd2935265:02crwdne2935265:0 PlayStation 5 USB Board Replacement, Remove the middle panel: crwdns2935265:041crwdnd2935265:02crwdnd2935265:02crwdne2935265:0
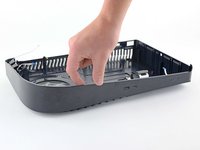
    • Lift up to remove the middle panel from the case.

  42. PlayStation 5 USB Board Replacement, Remove the screws: crwdns2935265:042crwdnd2935265:01crwdnd2935265:01crwdne2935265:0
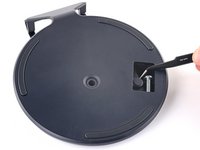
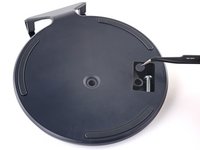
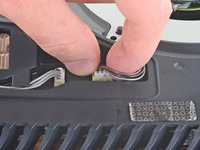
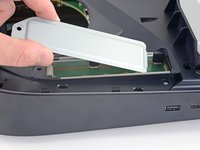
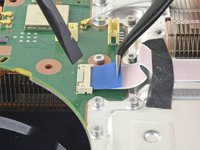
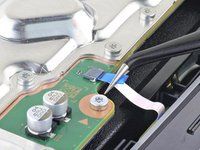
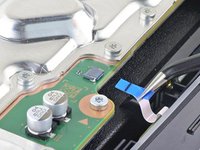
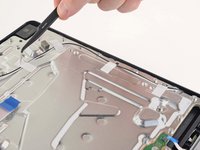
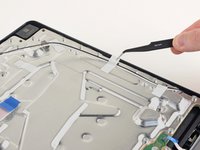
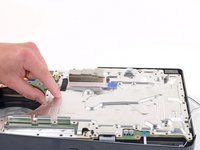
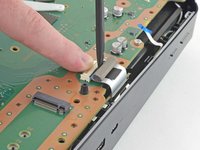
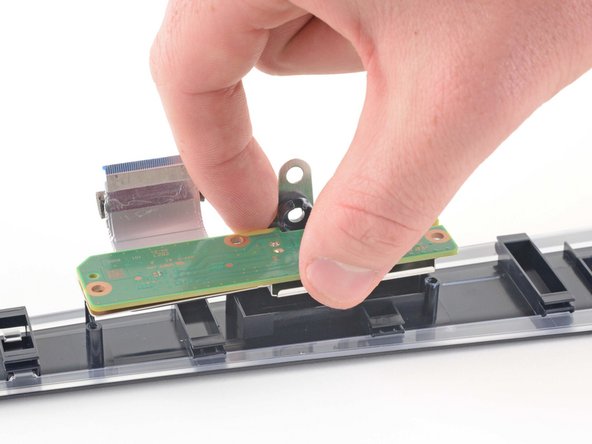
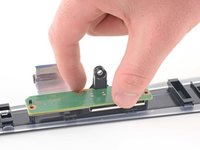
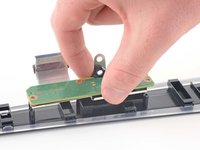
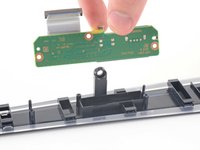
    • Use a Phillips screwdriver to remove the three 6.5 mm-long screws securing the USB board.

  43. PlayStation 5 USB Board Replacement, Remove the USB board: crwdns2935265:043crwdnd2935265:01crwdnd2935265:03crwdne2935265:0 PlayStation 5 USB Board Replacement, Remove the USB board: crwdns2935265:043crwdnd2935265:02crwdnd2935265:03crwdne2935265:0 PlayStation 5 USB Board Replacement, Remove the USB board: crwdns2935265:043crwdnd2935265:03crwdnd2935265:03crwdne2935265:0
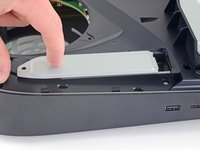
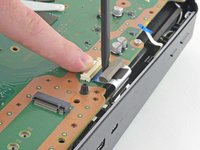
    • Lift the USB board straight up to remove it from the interactive band.

    Is this daughter flex cable 0.5mm pitch, and how long is it?

    JKYOHO - crwdns2934203:0crwdne2934203:0

crwdns2915888:0crwdne2915888:0

To reassemble your device, follow these instructions in reverse order.

Take your e-waste to an R2 or e-Stewards certified recycler.
Repair didn’t go as planned? Try some basic troubleshooting, or ask our PlayStation 5 Answers community for help.

crwdns2935229:06crwdne2935229:0

Robert Boyd

crwdns2935283:002/01/21crwdne2935283:0

29 577 crwdns2915208:0crwdne2915208:0

crwdns2935297:094crwdne2935297:0

crwdns2947412:03crwdne2947412:0

Is the USB board married to the motherboard?

Dean Groth - crwdns2934203:0crwdne2934203:0

No - the USB board is not married to the motherboard. You can use a USB board from any PS5 and it will work. Be careful that you buy the correct replacement though as there are two versions of the USB board.

James H -

Do you have guide to replacing the front USB board(EDU-030) on a CFI-1215A? From other teardown videos, it should be simpler as you don't need to remove the top shield plate to access the USB cable. Hopefully I can figure it out on my own by ignoring some of these steps. PSVR 2 uses that USB-C port and I imagine I won't be the only VR user whose usb-c port goes wonky from all the plugging in and out.

Vince Layton - crwdns2934203:0crwdne2934203:0

crwdns2917038:0crwdne2917038:0

crwdns2936625:0crwdne2936625:0:

crwdns2936751:024crwdne2936751:0 19

crwdns2936753:07crwdne2936753:0 101

crwdns2936753:030crwdne2936753:0 567

crwdns2942667:0crwdne2942667:0 22,827