crwdns2915892:0crwdne2915892:0
Um in die Geräte hineinzukommen, muss der Boden der Zahnbürste entfernt werden. Das ist schwierig und die Zahnbürste kann dabei beschädigt werden. Bei Modellen, in denen der Boden ein Loch hat solltest du immer zuerst diese alternative Methode probieren, wenn du Glück hast, funktioniert sie ohne weitere Beschädigungen.
-
-
Die Grundidee: in das Loch am Bodendeckel wird eine passende Maschinenschraube eingedreht.
-
-
-
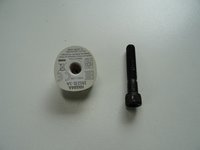
Miss zuerst den Durchmesser des Lochs, hier 5,3 mm.
-
Suche dann eine etwas größere Maschinenschraube, hier eine mit 6,2 mm Durchmesser. Eventuell findest du sie bei nicht-metrischen Schrauben.
If you have a set of screw extractors, they work very well. No measuring is required as you just keep trying larger ones until one grips. A SpeedOut #4 worked very well.
-
-
-
-
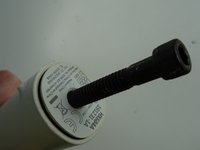
Drehe nun die Schraube in das Loch hinein. Sie schneidet sich selbst ihr Gewinde und sollte recht fest sitzen. Wenn sie zu fest sitzt, kann der Deckel eventuell kaputt gehen, also Vorsicht.
-
-
-
Dann kannst du den Deckel mit viel Kraft und Gefühl mit der Hand herausziehen. Gutes Gelingen!
-
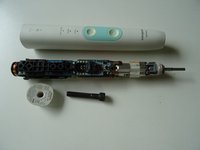
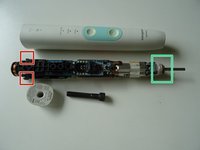
Hier sind die beiden Klammern gut zu erkennen, mit denen die Innereien festgehalten werden. Sie müssen beim Ausbau nach innen gedrückt werden.
-
Es ist empfehlenswert, auch gleich die Dichtung am Antrieb auszutauschen, wenn sie undicht ist kommt Feuchtigkeit in das Gerät. Schaue dir die Dichtung genau an, es gibt zwei unterschiedliche Typen.
while I'm still mad at Philips for making it so near impossible to open - this method worked on our HX6220 that had no screw at its base. it was useful to grip the base (over cardboard) w a monkey wrench to create a gap to put a metal crowbar spudger inside to pry the bottom out. be careful where you poke, avoid the side with the power button - there are two super thin wires connected to the PCB for the charging induction coil that are insanely fragile - we got lucky and just damaged a plastic tab next to it.
-


Arbeite die Schritte in umgekehrter Reihenfolge ab, um dein Gerät wieder zusammenzubauen.
Arbeite die Schritte in umgekehrter Reihenfolge ab, um dein Gerät wieder zusammenzubauen.
crwdns2935221:0crwdne2935221:0
crwdns2935229:015crwdne2935229:0
crwdns2947412:010crwdne2947412:0
Thank you very much! The trick with using a screw to remove the bottom lid was amazing.
Congrats! I'm glad that I could help.
VauWeh -
yes, thank you for the tip to use a screw. it was really difficult and resorted to also using some metal spudgers and lucky I didn’t jab my hands (pro tip: put some leather work gloves on!)
another pro tip I learned from a YouTube video, is to take wire cutters and snip off the 2 clips that make it so difficult to get this thing off.
there is enough friction at play that the clips are not needed and you can just pull out the assembly much easier in the future.
That worked absolutely fine for me. I used a 8 thread tap to prepare the hole and then an M8x70mm screw to pull out.
Danke, deine Anleitung hat geholfen. Jetzt vibriert die Zahnbürste wieder schön. ich hab den Spalt zwischen dem Magneten und dem Motor etwas erweitert. Leider musste ich feststellen, das die weiße Dichtung oben eingerissen ist. Kannst du mir sagen , wo ich so eine Dichtung bekommen kann?
Super, vielen Dank! Bei mir hatte sich die Schraube oben gelöst und beim Auseinanderbauen ging sie mir verloren: Es handelt sich um eine 2mm metrische Schraube, habe ich im Schraubenladen bekommen (6mm Länge), jetzt passt alles wieder.
Schade, dass man den Akku nicht auswechseln kann. Er ist blödsinnigerweise eingelötet!
@heidibarth Doch, das geht. Ist bei allen Modellen ähnlich. iFixit hat einige Anleitungen, z.B. diese hier.
VauWeh -
I've had two Philips Sonicare fail when the little screw comes loose near the tip of the device - the one that holds the little five sided counterweight / end stop in place. Now that I can disassemble the toothbrush it's a very easy fix to reset the weight and put the machine screw back in place.
Thanks for the instructions !!