crwdns2933423:0crwdne2933423:0

Petcube Play 2 Laser Replacement

crwdns2942213:0crwdne2942213:0

  1. Petcube Play 2 Laser Replacement, Motherboard: crwdns2935265:01crwdnd2935265:01crwdnd2935265:03crwdne2935265:0 Petcube Play 2 Laser Replacement, Motherboard: crwdns2935265:01crwdnd2935265:02crwdnd2935265:03crwdne2935265:0 Petcube Play 2 Laser Replacement, Motherboard: crwdns2935265:01crwdnd2935265:03crwdnd2935265:03crwdne2935265:0
    • Flip over the Petcube so the rubber bottom faces you.

    • Pull up the rubber layer with an iFixit opening pick to expose the screws underneath.

  2. Petcube Play 2 Laser Replacement: crwdns2935265:02crwdnd2935265:01crwdnd2935265:02crwdne2935265:0 Petcube Play 2 Laser Replacement: crwdns2935265:02crwdnd2935265:02crwdnd2935265:02crwdne2935265:0
    • Remove the four 3.5mm screws from under the rubber cover with a Phillips #1 screwdriver.

    • The glue may cause a bit of resistance but the screws should come up without much effort.

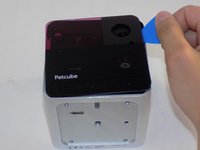
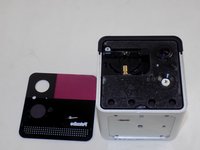
  3. Petcube Play 2 Laser Replacement: crwdns2935265:03crwdnd2935265:01crwdnd2935265:02crwdne2935265:0 Petcube Play 2 Laser Replacement: crwdns2935265:03crwdnd2935265:02crwdnd2935265:02crwdne2935265:0
    • Carefully pry off the glass front panel with an opening pick or spudger.

    • Do not force the front panel off as it may crack and break.

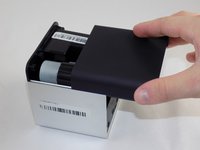
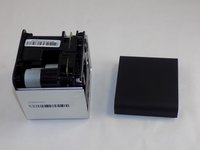
  4. Petcube Play 2 Laser Replacement: crwdns2935265:04crwdnd2935265:01crwdnd2935265:03crwdne2935265:0 Petcube Play 2 Laser Replacement: crwdns2935265:04crwdnd2935265:02crwdnd2935265:03crwdne2935265:0 Petcube Play 2 Laser Replacement: crwdns2935265:04crwdnd2935265:03crwdnd2935265:03crwdne2935265:0
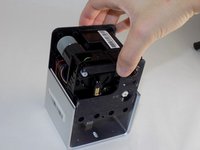
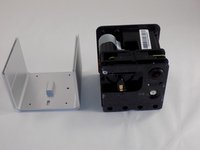
    • Slide off the two covers, starting with the top plastic cover.

    • Slide out the internal assembly from the aluminum.

  5. Petcube Play 2 Laser Replacement: crwdns2935265:05crwdnd2935265:01crwdnd2935265:03crwdne2935265:0 Petcube Play 2 Laser Replacement: crwdns2935265:05crwdnd2935265:02crwdnd2935265:03crwdne2935265:0 Petcube Play 2 Laser Replacement: crwdns2935265:05crwdnd2935265:03crwdnd2935265:03crwdne2935265:0
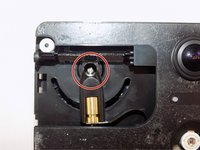
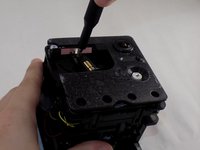
    • Once the internal assembly is removed, a brass cylinder in a corner of the front face of the cube should be visible. Connected to the cylinder is a screw.

    • Remove the screw with a Phillips #1 screwdriver.

  6. Petcube Play 2 Laser Replacement: crwdns2935265:06crwdnd2935265:01crwdnd2935265:03crwdne2935265:0 Petcube Play 2 Laser Replacement: crwdns2935265:06crwdnd2935265:02crwdnd2935265:03crwdne2935265:0 Petcube Play 2 Laser Replacement: crwdns2935265:06crwdnd2935265:03crwdnd2935265:03crwdne2935265:0
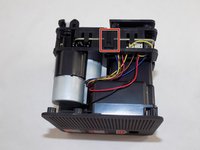
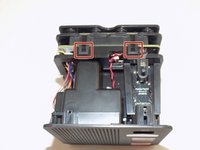
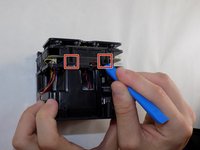
    • Flip the cube onto its side to locate the pull tab(s).

    • Flip the cube onto its side to locate the pull tab(s). Using an opening tool, lift each of the five tabs to separate the two halves of the Petcube 2.

  7. Petcube Play 2 Laser Replacement: crwdns2935265:07crwdnd2935265:01crwdnd2935265:03crwdne2935265:0 Petcube Play 2 Laser Replacement: crwdns2935265:07crwdnd2935265:02crwdnd2935265:03crwdne2935265:0 Petcube Play 2 Laser Replacement: crwdns2935265:07crwdnd2935265:03crwdnd2935265:03crwdne2935265:0
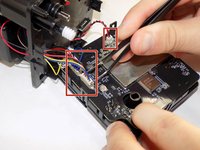
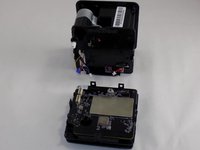
    • Gently disconnect the cable connectors to separate the two halves of the device.

    • Make sure to avoid pulling on the wires to prevent breaking them or the connectors.

  8. Petcube Play 2 Laser Replacement: crwdns2935265:08crwdnd2935265:01crwdnd2935265:03crwdne2935265:0 Petcube Play 2 Laser Replacement: crwdns2935265:08crwdnd2935265:02crwdnd2935265:03crwdne2935265:0 Petcube Play 2 Laser Replacement: crwdns2935265:08crwdnd2935265:03crwdnd2935265:03crwdne2935265:0
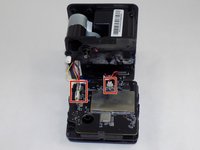
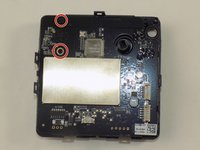
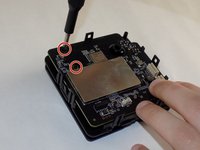
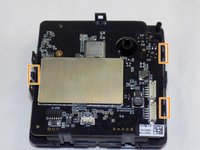
    • Use the Phillips #1 screwdriver to remove the two 1mm screws.

    • Carefully release each of the tabs located on the sides of the cube and take out the motherboard.

    • Be gentle with the tabs as they will break under too much pressure.

  9. Petcube Play 2 Laser Replacement, Laser: crwdns2935265:09crwdnd2935265:01crwdnd2935265:03crwdne2935265:0 Petcube Play 2 Laser Replacement, Laser: crwdns2935265:09crwdnd2935265:02crwdnd2935265:03crwdne2935265:0 Petcube Play 2 Laser Replacement, Laser: crwdns2935265:09crwdnd2935265:03crwdnd2935265:03crwdne2935265:0
    • Use a Phillips #1 screwdriver to remove the seven screws from the part of the cube where the motherboard was removed.

    • Remove the plastic front to expose the board with the laser.

  10. Petcube Play 2 Laser Replacement: crwdns2935265:010crwdnd2935265:01crwdnd2935265:02crwdne2935265:0 Petcube Play 2 Laser Replacement: crwdns2935265:010crwdnd2935265:02crwdnd2935265:02crwdne2935265:0
    • Once the motherboard is off and the plastic is removed, the internal circuit board is visible.

    • Remove the board from the plastic and locate the lasers ribbon connector.

  11. Petcube Play 2 Laser Replacement: crwdns2935265:011crwdnd2935265:01crwdnd2935265:02crwdne2935265:0 Petcube Play 2 Laser Replacement: crwdns2935265:011crwdnd2935265:02crwdnd2935265:02crwdne2935265:0
    • Use a spudger, or a clean fingernail to flip up the locking flap—this is the unlocked position.

    • Use the widest tool possible to avoid damaging the delicate hinge pins.

    • Use tweezers or your fingers to gently pull the cable out of its socket and remove the laser assembly from the board.

    • Be gentle and patient as the ribbon cable is delicate and can break easily.

    • To reconnect, make sure the locking flap is flipped up and gently reinsert the cable. Then, flip the locking flap down to secure the cable. The cable should slide into the socket with little to no force. If you're having trouble, remove it, check that the flap is fully unlocked, and try again.

crwdns2915888:0crwdne2915888:0

To reassemble your device, follow these instructions in reverse order. Take your e-waste to an R2 or e-Stewards certified recycler.

Christopher Pereira

crwdns2935283:003/18/24crwdne2935283:0

181 crwdns2915208:0crwdne2915208:0

crwdns2935297:02crwdne2935297:0

crwdns2915084:0crwdne2915084:0

UMass Dartmouth, Team 1-5, Konn Spring 2024 crwdns2935289:0UMass Dartmouth, Team 1-5, Konn Spring 2024crwdne2935289:0

UMASSD-KONN-S24S1G5

crwdns2931471:04crwdne2931471:0

crwdns2935297:06crwdne2935297:0

crwdns2947412:00crwdne2947412:0

crwdns2917038:0crwdne2917038:0

crwdns2936625:0crwdne2936625:0:

crwdns2936751:024crwdne2936751:0 3

crwdns2936753:07crwdne2936753:0 3

crwdns2936753:030crwdne2936753:0 7

crwdns2942667:0crwdne2942667:0 143