crwdns2915892:0crwdne2915892:0
Replacing this fuse lets the kettle heat water again.
crwdns2942213:0crwdne2942213:0
-
-
This is an Oster Digital Electric Kettle
-
-
-
Remove the three screws. They are tri-wing or triangular slotted screws. My set labeled them as number 4.
-
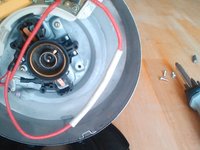
Once removed the plastic cover comes right off.
-
-
-
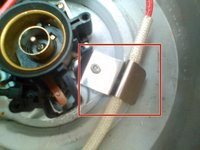
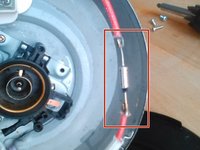
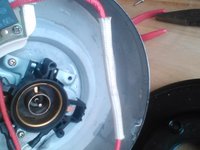
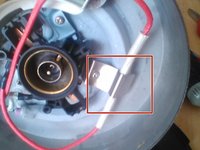
The Thermal Cutoff Fuse is pressed up against the heat element by a spring clip.
-
Remove the screw, a standard number 2 phillips head.
-
Slide the fiberglass sleeve down and off the fuse
-
-
-
-
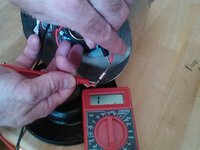
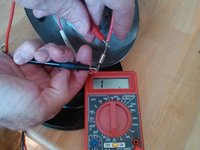
With ohm meter connected either way the fuse is open. A sure sign that the part is bad.
-
-
-
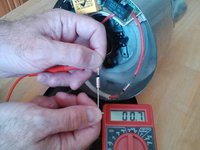
Testing the new fuse shows that electricity can flow through it.
-
I purchased 5x of SF188E 192 10A/250V SEFUSE on ebay. You can just search for whatever is written on the side of yours.
-
-
-
Replace the fuse. The black band is down in this picture.
-
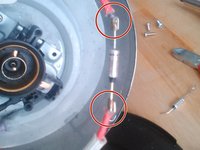
The difficult part is that this part is not soldered in, it is held together with a crimp band.
-
So one must slowly open the band and then crimp it back on the new fuse.
-
I really have no good way of doing this, and it is the most time consuming and frustrating part of the whole repair. Take your time with a pick and pliers and slowly open them and replace the fuse.
-
-
-
Now just slide the fiberglass sleeve back over the fuse.
-
Reattach the spring clip to hold the fuse on the heat element.
-
Make sure that the clip is directly over the fuse before tightening.
-
Replace the plastic cover and install the three tri-wing screws.
-
-
-
Plug it back in and see if it heats water.
Great, Scot! What an excellent tutorial! Thanks for making me a hero by following your clear instructions and great visuals. Done!
-


To reassemble your device, follow these instructions in reverse order.
To reassemble your device, follow these instructions in reverse order.
crwdns2935221:0crwdne2935221:0
crwdns2935229:022crwdne2935229:0
crwdns2947412:08crwdne2947412:0
Мне нравится этот чайник мне его подарили но проблема у нас электричество на 220 вольт. Вопрос как эго переделать на 220.
digital electronic kettle
Model: BVST-EK5967
120Vac 60HZ
я не думаю, что это будет иметь значение для предохранителя. плавкий предохранитель рассчитан на 250 в, так что это может быть тот же предохранитель в 220 чайника.
я хотел бы посмотреть на предохранитель и посмотреть, если вы можете прочитать его. тогда просто заменить с тем же.
Where is fuse in Oster electric kettle BVSTKT5970
this helped me 100 percent
These steps worked fine for me. They are clear and concise. On Step 6, rather than trying to pry the crimp bands off, I cut them off and used new bands that came with the new fuse - much quicker.
Hello,
I, on your recommendation, replaced the thermal switch and restored the operation of the kettle BVST-EK5967 . Thank you very much.
I ask you to step by step explain to me how to put in place the lid of the kettle.
Sincerely,
Sergey Petrosyan
Excellent photos and instructions! My kettle is now good as new. The only difficulties were finding a trip-wing screwdriver bit (had to buy a set of security bits from Home Depot Pro) and then (as you said) prying off the old crimp bands. Wish I had new crimp bands to install instead…I'll go for those next time!
I tested the fuse and it tested good, so I tested the element by disconnecting the fuse end that had a removable plug and it had no continuity with ohm meter, unit no good as no way to replace heating element. I was at least able to know how to test unit, good instructions though.