crwdns2915892:0crwdne2915892:0
The trigger button is the one of the most used buttons on the DJI Osmo Mobile, and this guide will serve to teach the device owner how to replace a broken or unresponsive trigger button.
crwdns2942213:0crwdne2942213:0
-
-
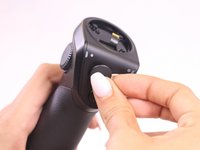
Remove gimbal from base handle by loosening round plate found at the top of the handle.
-
-
-
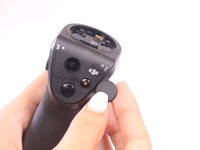
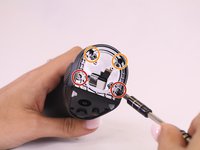
Use Phillips #00 screwdriver to remove the three screws found on the gimbal stabilizer to detach handle from gimbal.
-
Carefully detach handle from gimbal and disconnect the cable that connects the two.
-
-
-
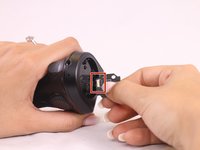
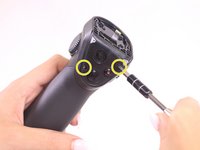
Locate the hex screws found at the top base of the handle, and unscrew using the 1.5mm hex screwdriver.
-
-
-
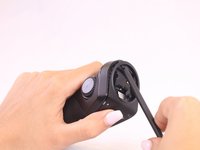
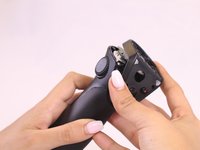
Remove joystick by gently pulling away from handle
-
-
-
crwdns2935267:0crwdne2935267:0Tweezers$4.99
-
Remove the quick release PCBA by locating the connecting wires and release the ribbon cable with tweezers.
-
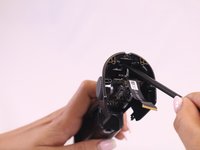
Use the spudger to pry open and remove the face plate, starting at the back of the handle.
-
-
-
Locate four screws directly on top of handle.
-
Unscrew the silver, bottom two screws, that are closest to the face plate using the 00 screwdriver.
-
Unscrew the black, top two screws, located furthest from the face plate, using the 0 screwdriver.
-
Remove the remaining two screws found on the front of the faceplate.
-
Remove the rest of the face plate shell.
hola alguien sabe donde puedo adquirir la face plate shell de refaccion?
gracias
I know. - Nowhere. You need buy another gimbal (non-working) for a parts. By the way, it will be good to make a manual for other disassembling of a gimbal - I mean rotating parts. Some info of this can be found in this video on Youtube: https://www.youtube.com/watch?v=-5Xi-b8s...
But not too much :(
-
-
-
Remove the top left screw on the joystick panel with Phillips #00 screwdriver.
-
Lift faceplate holding joystick module.
-
-
-
Remove the bottom right screw on the joystick panel with the #00 Phillips screwdriver.
-
-
-
Hold down the larger of the two ribbon cables, and pull on circuit board with a constant and careful down and out motion.
-
-
-
Remove the two screws from the green charging module and the two screws on the grey plate and remove from handle.
-
Replace charging module.
-
-
crwdns2935267:0crwdne2935267:0Tweezers$4.99
-
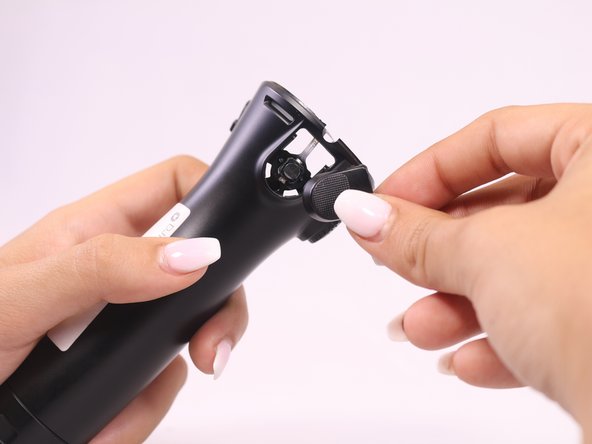
Use the tweezers to push outward on the backside of the trigger button hinges.
-
Pop out trigger button.
-
-
-
Use the tweezers to remove the underlying button that contacts with the trigger button, and replace.
-


To reassemble your device, follow these instructions in reverse order.
To reassemble your device, follow these instructions in reverse order.
crwdns2915084:0crwdne2915084:0

USF Tampa, Team S2-G1, Nance Fall 2017 crwdns2935289:0USF Tampa, Team S2-G1, Nance Fall 2017crwdne2935289:0
USFT-NANCE-F17S2G1
crwdns2931471:04crwdne2931471:0
crwdns2935297:012crwdne2935297:0
crwdns2947410:01crwdne2947410:0
How I can fix the USB port, it went inside the handle?
This step isn't clear. How is the ring removed? Twist? Pry?
Jo Dee Lee - crwdns2934203:0crwdne2934203:0
Same question for me
Guitt97ii -
Tried for hours. Seems it’s glued on?
Jo Dee Lee - crwdns2934203:0crwdne2934203:0
ok, the top cap is screwed on. I used a double sided tape around it to have a better grip and just twisted it. The cap has thread lock in it.
Jo Dee Lee - crwdns2934203:0crwdne2934203:0
You passed this step?
Guitt97ii -
U passed this step???
Guitt97ii -
No solution for this step?
Guitt97ii - crwdns2934203:0crwdne2934203:0