crwdns2915892:0crwdne2915892:0
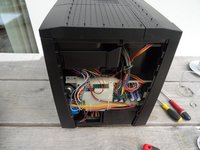
For most repairs, the case of the Jura Z must be opened, this is shown here.
For newer models, use this guide.
crwdns2942213:0crwdne2942213:0
-
-
Remove all attachments: water tank, drip tray, aroma lid
-
-
-
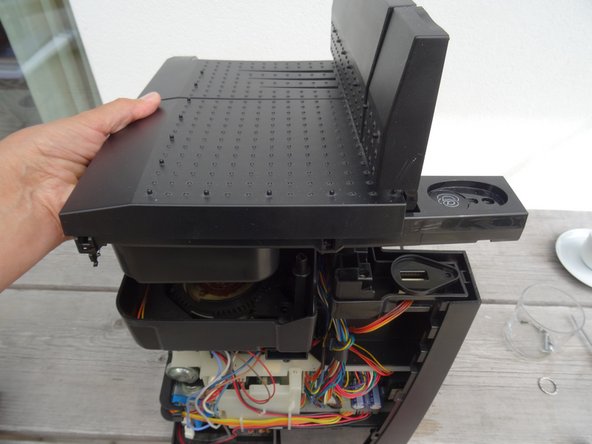
Turn the machine so the back is facing toward the front.
-
The Jura sign must be removed. Turn it a few millimeters counterclickwise.
-
Remove the Jura sign.
Ich musste bei einer Impressa Z9 das Emblem gegen den Uhrzeigersinn drehen um es zu lösen.
-
-
-
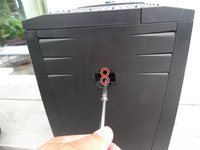
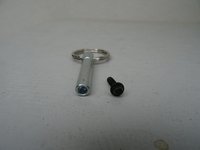
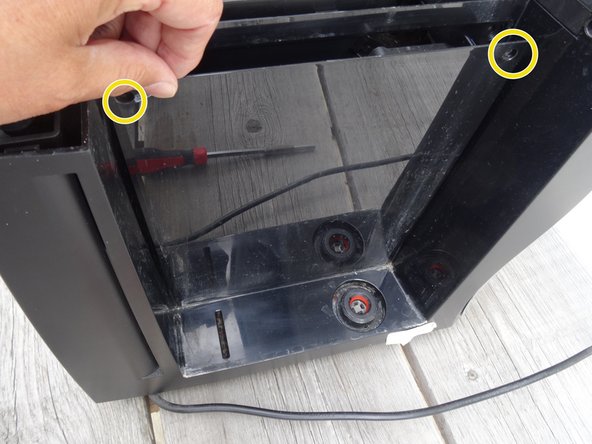
Behind the Jura sign are two screws with an oval head. They have to be removed.
-
These screws have an oval head that makes them look like rivets (picture 2). You need to use a special bit for their removal. If the right bit is not available, it could be done with a pair of needle nose pliers. Jura wants to keep us out of our own machines!!!!
Hi there - really trying to find the tool to use for this. Please advise. Is there a link to it that I can buy?
-
-
-
-
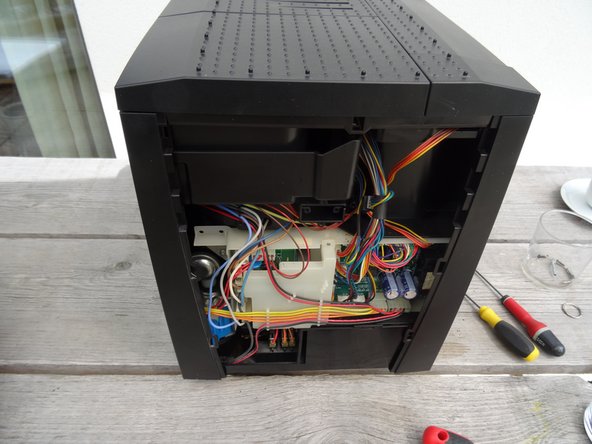
Push the back down a bit and then remove it.
-
-
-
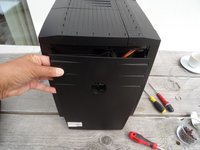
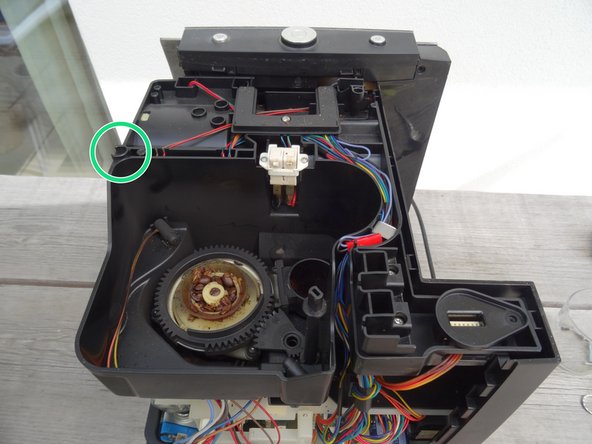
Pull the right side panel- as seen looking to the frontpanel - backwards and take it off.
In Schritt „5“ fehlt der Hinweis auf die noch zu entfernende Schraube unten am vorderen Teil der Seitenwand.
-
-
-
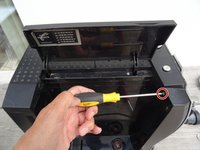
Remove the Torx T15 screw on the front wall of the side panel.
-
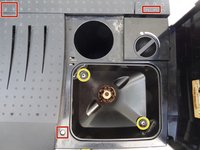
In the side part there is a lid over the brew group. The lid is fastened at the top with two oval head screws. Remove those to remove the lid.
-
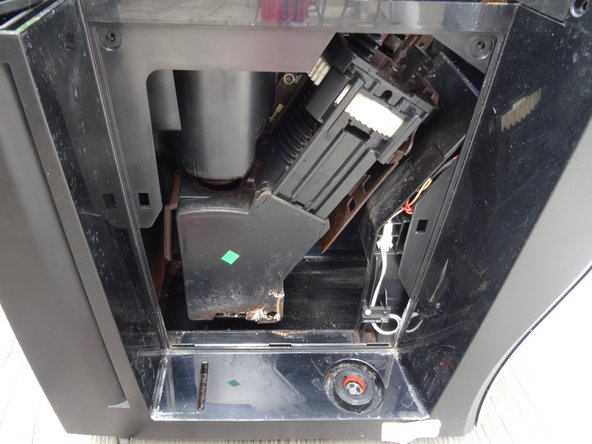
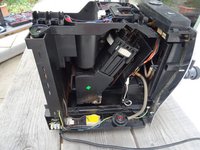
With the cover removed the brew group becomes visible
Ich verstehe nicht, wie man die beiden Linsenkopfschrauben entfernt
Man braucht halt das Ovalkopfbit, z.B. von iFixit. Eventuell geht es mit einer Zange oder einem selbstgebauten Werkzeug.
VauWeh -
-
-
-
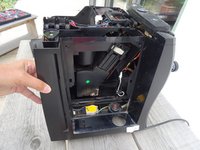
This step shows how to remove the top cover
-
Remove the powder tray and all coffee beans.
-
The cover is fastened with three Torx T15 screws. Those are easily visible under the covers as well as the small cover on the left back side.
-
Remove the two Phillips screws on the bean container and remove the bean container.
-
Lift the cover upwards.
-
-
-
Pull the left side panel backwards to take it off.
-


Repeat the steps in reverse order to reassemble your device.
Repeat the steps in reverse order to reassemble your device.
crwdns2935221:0crwdne2935221:0
crwdns2935229:03crwdne2935229:0
crwdns2934873:0crwdne2934873:0
100%

crwdns2934885:0crwdne2934885:0 crwdns2934875:0crwdne2934875:0
crwdns2934877:0crwdne2934877:0 ›
crwdns2947412:012crwdne2947412:0
Hi,
Do you also have a detailed description how to disassemble the front part?
Because I need to replace the “Outlet gate black V2”, the black plastic part behind the logo at the front panel which has the tube for tea attached to it. This black plastic cover of the tube is broken and therefore I want to replace this part.
Thank you very much for your answer!
Sorry, No. I never did this fix. Perhaps one of those videos helps: https://www.youtube-nocookie.com/embed/0... and https://www.youtube-nocookie.com/embed/P...
Great photo's and directions, couldn't be clearer or more straightforward. Thank you so much!
I had a small hole in one of the internal clear water hoses right where the clip held it in place. I cut off just slightly more than a quarter inch of the hose to get safety past where the hole in the hose was; but then had to struggle to stretch the remaining hose, just that quarter of an inch that I cut off, to remount and get the clip back on. Finally got it back in place. To say Jura is stingy with their hose lengths is putting it mildly.
I have looked everyplace for that rather specialized hose to have some on hand for my next leak. The hose seems to be medical grade. Websites that sell it have ridiculous prices for just a few inches of the stuff. I would pay it if I could get a few feet, but inches for $20 or $30 dollars is insane. Do you know of a source where it can be purchased in longer lengths? Thanks again!
Thank you.
When I opened the machine all the hoses look to be the same size and type on my Jura Z9 (clear silicone hose with crisscrossed silver lines embedded in the silicone - presumably for reinforcement), however, researching hose size online for Z9 brings up different diameter hoses for each connection. Is this right, as they all looked to be the same diameter to me (I did not think to measure at the time I had the sides off). Thanks again!
At the moment I don't know what is the inner diameter of the reinforced pressure hoses, normally it should be 4.2 mm, but it is also sold with 6.7 mm, but that is very thick. I fear, you should open the Z9 again...
They only sell 4.2 mm, clamps included, seems to be the right one.
Have sent it back for repair previously. CANNOT get the screws out this time. Tried needle nose pliers without success. Have bought the recommended tools with no success. Looking for your recommendation for which OTHER tool to buy to unscrew them. Dimension needed is less than 4MM, greater than 3.5. Please advise! TIA!
These oval head screws are really strange, but I never had difficulties to open them. I normally use iFixit's Oval Drive Bit Item # IF145-373-76.
VauWeh -
Do you know the procedure for a Z8? It died during power up and I’m wondering if it is a fuse.