crwdns2915892:0crwdne2915892:0
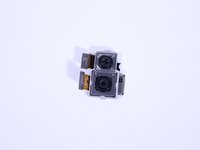
OnePlus 6T was the flagship killer launched by the Chinese brand in November 2018. One of the major upgrades from its OnePlus 6 model, was the in-screen fingerprint scanner alongside other hardware updates. 6T featured a dual-camera setup at the rear (16+20 MP) and was the best camera launched by the company until the OnePlus 7 in the following year. This post helps you replace that setup and its detailed explanation ensures that you perform this procedure in the best way possible.
crwdns2942213:0crwdne2942213:0
-
-
Make sure the phone is powered off and placed with the back cover facing towards you on a stable surface.
-
-
-
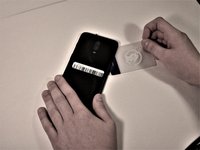
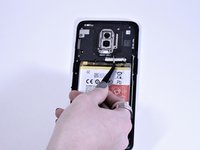
Pop open the SIM card tray by inserting a SIM card removal tool into a small hole on the upper-left side of the phone.
-
Carefully remove the SIM card from its tray.
Remove the SIM card tray from the phone. Don't need to remove the actual card from the tray, just be careful you don't lose it…
-
-
-
Loosen the binding glue within the phone using a hairdryer or an iOpener.
-
-
crwdns2935267:0crwdne2935267:0Plastic Cards$2.99
-
Insert a Jimmy under one of the heated corners of the phone to lift it slightly.
-
Insert a plastic card underneath the slightly lifted lip on the back cover and gently glide the card under the lifted phone casing.
-
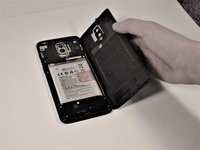
Remove the back cover from the phone.
Do you need to replace the glue when reassembling?
It was sufficient for me to re-heat the adhesive from the phone.
Also, I used a pair of tweezers to lift the initial corner, which was a breeze compared to the Jimmy’s as suggested by the guide.
The gaps were very tight. After warming the adhesive, it was helpful to have a helper use a suction cup to tug on the back to enlarge the gap for the jimmy.
Theres a big patch of glue on the right side of the camera. Be careful with this part, cuz ure proabably under the curved side trying to get inbetween and in my case this shattered the coating of the backside of my phone. It still works, but it has a spider skin on the back now.
-
-
crwdns2935267:0crwdne2935267:0Tweezers$4.99
-
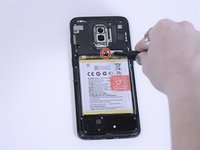
Remove the single 3mm Phillips #00 screws holding the metal battery cover on the phone.
-
Use tweezers to remove the battery cover and place it to the side.
-
-
-
-
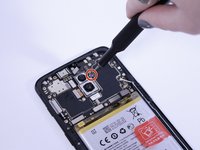
Remove eight 3mm Phillips #00 screws that connect the midframe to the phone.
-
-
-
Using a spudger, gently remove the midframe and place it to the side.
-
-
-
Using a spudger, lift the light brown tab in the middle of phone to disconnect the front camera.
-
Remove the front camera from the phone.
-
-
-
Remove the single 3mm Phillips #00 screw to the right of the top rear camera.
-
-
-
Using a spudger, disconnect the charging port flex connector, the main flex connector, and the screen flex connector at the bottom of the camera.
-
-
-
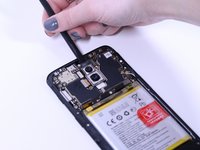
Use a spudger to disconnect the signal cables on the right side of the motherboard.
-
-
-
Disconnect the slider from the top of the phone with a spudger.
-
Gently pull the motherboard from the left side and remove it from the phone.
-
-
-
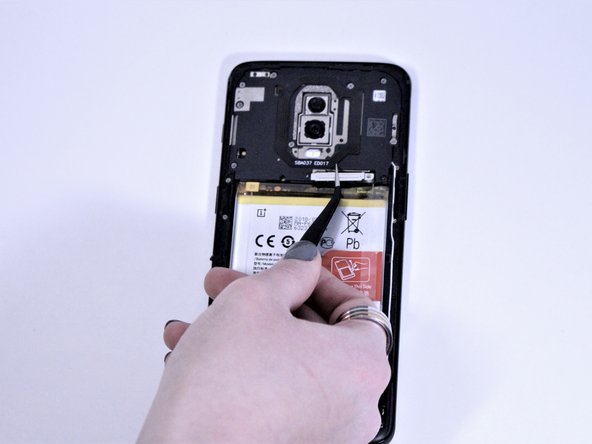
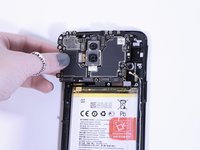
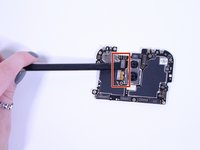
Using a spudger, disconnect the two metal rear camera tabs on the left side of the camera.
-
Remove the camera from its slot on the motherboard.
-


To reassemble your device, follow these instructions in reverse order.
To reassemble your device, follow these instructions in reverse order.
crwdns2935221:0crwdne2935221:0
crwdns2935229:03crwdne2935229:0

crwdns2915084:0crwdne2915084:0

Grand Valley State University, Team S4-G6, DeVasto Fall 2019 crwdns2935289:0Grand Valley State University, Team S4-G6, DeVasto Fall 2019crwdne2935289:0
GVSU-DEVASTO-F19S4G6
crwdns2931471:04crwdne2931471:0
crwdns2935297:021crwdne2935297:0
crwdns2947410:01crwdne2947410:0
In step 6 the screw under the humidity sensor is not shown. this needs to be removed as well