crwdns2933423:0crwdne2933423:0

OnePlus 6T Motherboard Replacement

crwdns2942213:0crwdne2942213:0

  1. OnePlus 6T Motherboard Replacement, Back Cover: crwdns2935265:01crwdnd2935265:01crwdnd2935265:01crwdne2935265:0
    • Make sure the phone is powered off and placed with the back cover facing towards you on a stable surface.

  2. OnePlus 6T Motherboard Replacement: crwdns2935265:02crwdnd2935265:01crwdnd2935265:01crwdne2935265:0
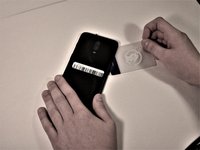
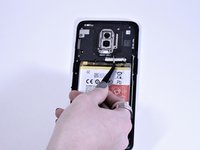
    • Pop open the SIM card tray by inserting a SIM card removal tool into a small hole on the upper-left side of the phone.

    • Carefully remove the SIM card from its tray.

  3. OnePlus 6T Motherboard Replacement: crwdns2935265:03crwdnd2935265:01crwdnd2935265:01crwdne2935265:0
    • Loosen the binding glue within the phone using a hairdryer or an iOpener.

    • If you choose to use a hairdryer, hold the dryer at least eight inches from the phone and apply heat for two minutes in a circular motion around the edges of the phone.

  4. OnePlus 6T Motherboard Replacement: crwdns2935265:04crwdnd2935265:01crwdnd2935265:03crwdne2935265:0 OnePlus 6T Motherboard Replacement: crwdns2935265:04crwdnd2935265:02crwdnd2935265:03crwdne2935265:0 OnePlus 6T Motherboard Replacement: crwdns2935265:04crwdnd2935265:03crwdnd2935265:03crwdne2935265:0
    crwdns2935267:0crwdne2935267:0
    Plastic Cards
    $2.99
    crwdns2942207:0crwdne2942207:0
    • Insert a Jimmy under one of the heated corners of the phone to lift it slightly.

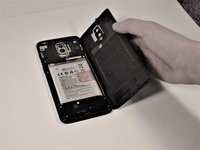
    • Insert a plastic card underneath the slightly lifted lip on the back cover and gently glide the card under the lifted phone casing.

    • There will be a small amount of tension, but this is normal as the card is removing the adhesive within the phone.

    • Remove the back cover from the phone.

    • Use high concentration (>90%) isopropyl alcohol and a lint-free cloth to remove all adhesive residue from the back cover and the frame.

  5. OnePlus 6T Motherboard Replacement, Front Camera: crwdns2935265:05crwdnd2935265:01crwdnd2935265:02crwdne2935265:0 OnePlus 6T Motherboard Replacement, Front Camera: crwdns2935265:05crwdnd2935265:02crwdnd2935265:02crwdne2935265:0
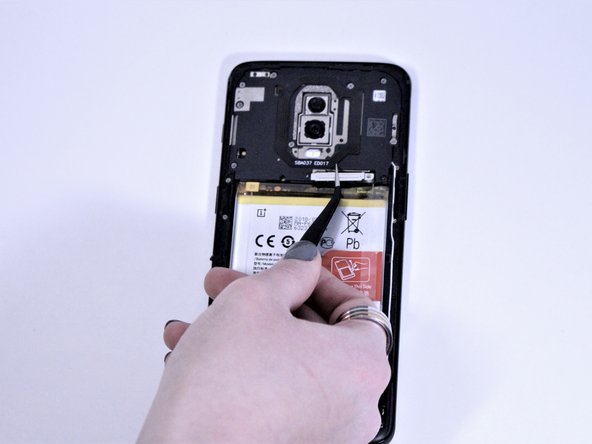
    • Remove the single 3mm Phillips #00 screws holding the metal battery cover on the phone.

    • Use tweezers to remove the battery cover and place it to the side.

  6. OnePlus 6T Motherboard Replacement: crwdns2935265:06crwdnd2935265:01crwdnd2935265:01crwdne2935265:0
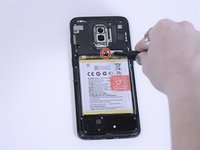
    • Remove eight 3mm Phillips #00 screws that connect the midframe to the phone.

  7. OnePlus 6T Motherboard Replacement: crwdns2935265:07crwdnd2935265:01crwdnd2935265:01crwdne2935265:0
    • Using a spudger, gently remove the midframe and place it to the side.

  8. OnePlus 6T Motherboard Replacement: crwdns2935265:08crwdnd2935265:01crwdnd2935265:01crwdne2935265:0
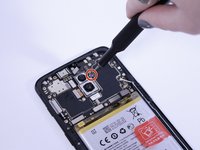
    • Using a spudger, lift the light brown tab in the middle of phone to disconnect the front camera.

    • Remove the front camera from the phone.

  9. OnePlus 6T Motherboard Replacement, Motherboard: crwdns2935265:09crwdnd2935265:01crwdnd2935265:02crwdne2935265:0 OnePlus 6T Motherboard Replacement, Motherboard: crwdns2935265:09crwdnd2935265:02crwdnd2935265:02crwdne2935265:0
    • Remove the single 3mm Phillips #00 screw to the right of the top rear camera.

  10. OnePlus 6T Motherboard Replacement: crwdns2935265:010crwdnd2935265:01crwdnd2935265:01crwdne2935265:0
    • Using a spudger, disconnect the charging port flex connector, the main flex connector, and the screen flex connector at the bottom of the camera.

  11. OnePlus 6T Motherboard Replacement: crwdns2935265:011crwdnd2935265:01crwdnd2935265:01crwdne2935265:0
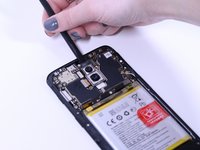
    • Use a spudger to disconnect the signal cables on the right side of the motherboard.

  12. OnePlus 6T Motherboard Replacement: crwdns2935265:012crwdnd2935265:01crwdnd2935265:02crwdne2935265:0 OnePlus 6T Motherboard Replacement: crwdns2935265:012crwdnd2935265:02crwdnd2935265:02crwdne2935265:0
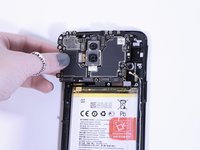
    • Disconnect the slider from the top of the phone with a spudger.

    • The slider is extremely delicate, so it is important you do not attempt to remove it from the sides.

    • Gently pull the motherboard from the left side and remove it from the phone.

crwdns2915888:0crwdne2915888:0

To reassemble your device, follow these instructions in reverse order.

crwdns2935229:03crwdne2935229:0

Kristen Gismondi

crwdns2935283:011/12/14crwdne2935283:0

81,788 crwdns2915208:0crwdne2915208:0

crwdns2935297:0200crwdne2935297:0

crwdns2915084:0crwdne2915084:0

iFixit crwdns2935289:0iFixitcrwdne2935289:0

Staff

crwdns2931471:0135crwdne2931471:0

crwdns2935297:016,817crwdne2935297:0

crwdns2944067:00crwdne2944067:0

crwdns2917038:0crwdne2917038:0

crwdns2936625:0crwdne2936625:0:

crwdns2936751:024crwdne2936751:0 1

crwdns2936753:07crwdne2936753:0 5

crwdns2936753:030crwdne2936753:0 40

crwdns2942667:0crwdne2942667:0 3,944