crwdns2915892:0crwdne2915892:0
Follow this guide to remove the OnePlus 3’s battery. The hardest part of the guide is getting the frame clips free.
If your battery is swollen, take appropriate precautions.
For your safety, discharge your battery below 25% before disassembling your phone. This reduces the risk of a dangerous thermal event if the battery is accidentally damaged during the repair.
Note: Make sure the battery is the correct model before starting this repair. OnePlus 3 (BLP613) and OnePlus 3T (BLP633) are not interchangeable.
crwdns2942213:0crwdne2942213:0
-
-
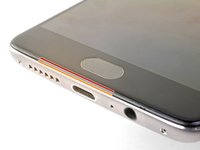
Insert a SIM eject tool, bit, or straightened paperclip into the hole located between the SIM card slot and the power button.
-
Press firmly to eject the SIM card tray.
-
-
-
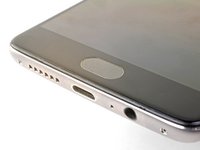
Remove the two 2.6 mm T2 screws from the bottom edge of the phone.
-
-
-
Display panel seam: This seam is part of the display assembly. Do not pry at this seam, or you will separate and damage the display panel.
-
Frame seam: This is where the plastic frame meets the back cover. It is recessed into the back cover. Only pry at this seam.
-
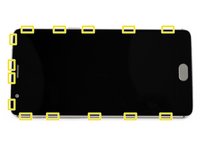
There are fourteen clips that hold the frame against the rear case. Be aware of their location as you pry the back cover off in the following steps.
This picture is a bit misleading, the frame seam is actually sunk into the metal frame, and is not visible at first.
With an older phone, it’s more likely to separate the display panel itself than to separate the displaypanel from the frame. If the top of the screen comes off first, before the part with the touch sensor, then you’re separating the wrong thing (ie displaypanel).
Mind that the displaypanel itself seems as if it has two seams (the panel itself and the board).
Thanks for the helpful tip! I re-worded the step slightly to hopefully clarify where the frame seam is.
-
-
-
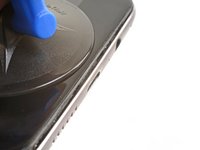
Place a suction cup near the bottom edge of the display.
-
Pull on the suction cup with strong steady force.
-
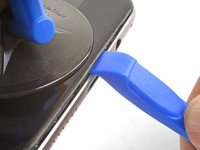
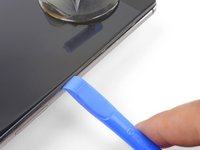
Press the edge of an opening tool straight into the frame seam near the suction cup until the edge wedges between the plastic frame and the back cover's lip.
To get maximum leverage and make this step possible with my weaker suction cup, I held down the phone with a plastic pick/tool pressed down onto the metal back. As the suction cup pulled up the plastic frame, the plastic pick holding down the metal back naturally was pushed further and further into the gap between the frame and back.
-
-
-
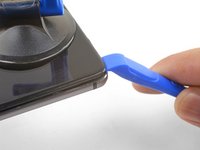
Once the opening tool's edge is wedged in position, carefully slide the tool along the bottom edge of the phone.
-
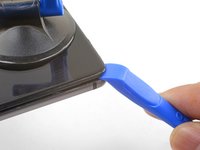
Carefully guide the opening tool around the left corner of the phone while keeping the tool's edge within the seam.
-
-
-
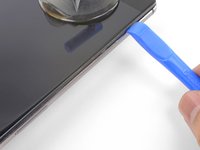
Continue sliding the opening tool along the long edge, releasing the clips along the way.
I found I had to use a couple of those “guitar picks” to get the screen off, left the first one inserted on the bottom and then went around the side of the phone with the second.
I couldn’t get the last clip easily, so I also went around the other side, and then the last two clips left and right went out togther much more easily.
Yep, thanks for your note. It was far more easy to go round the other side.
-
-
-
-
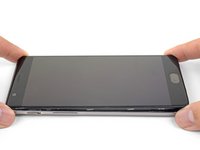
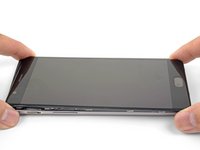
With the bottom and left edge of the phone freed, gently wiggle the frame to release the top and right edge clips.
-
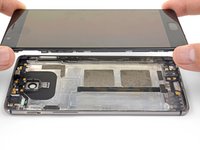
Lift the screen up and remove it.
-
Align the top edge of the frame to the back cover and ensure that the top clips slip into place.
-
Squeeze along the long edges of the phone to snap the remaining clips into place.
I’m having trouble putting on the back cover, anyone else had this issue?
Hello.
From this Step on I directly jumped to Step 13. Removing the 7 Screws. NOT removing the Mainboard. It is easy possible to remove the camera just like this if you loosen the Camera-cable and pull carefull on it. Because the 7 Screws are removed there is enough space to remove the old camera and bring the new camera in. I tried It various times to verify this.
-
-
-
Use the point of a spudger to pry up and disconnect the battery connector from its socket, located above the top right corner of the battery pack.
-
Bend the connector away from the socket to prevent accidental contact.
Why not removing the camera without removing the mainboard?
Warum wird die rückseitige Kamera nicht ausgebaut, ohne das Mainboard auszubauen?
Hello Ingo,
The rear camera is trapped under the motherboard. You must at least loosen the motherboard to remove the camera.
Die Kamera befindet sich unter dem Motherboard. Sie müssen mindestens das Motherboard lösen, um die Kamera zu entfernen.
During reassembly this part was tricky for me: the new battery couldn’t clip into place the way the old one did, resulting in a loose connection and “battery does not match “ message when trying to power the phone up. The new battery probably had a slightly different connector that than the old one. I even ordered another battery but the same thing happened. I finally managed to connect it by applying much more pressure on the press connector than needed for the other ones. it did not make any clip sound though.
-
-
-
Remove the 3 mm Phillips screw securing the cable bracket.
-
Remove the cable bracket.
-
-
-
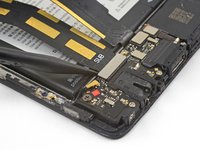
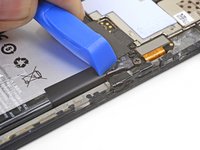
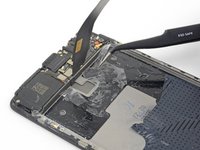
Use the point of a spudger to pry up and disconnect the interconnect flex cable from the motherboard, which is located above the battery.
-
Repeat the process to disconnect the daughterboard flex cable from the motherboard.
-
-
-
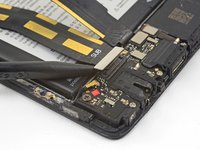
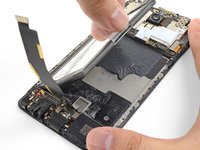
Use the point of a spudger to pry up and disconnect the interconnect flex cable from the daughterboard, which is located below the battery.
-
-
-
Remove the interconnect flex cable.
-
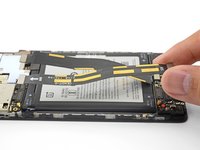
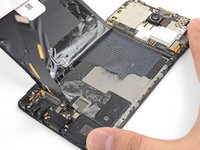
Carefully bend the still-attached daughterboard flex cable away from the battery.
Upon reassembly place the cable back correctly. Apparently, it is often overlooked, see: Replaced Battery, Now My Phone is Overheating and Won't Boot
Thanks for the tip! I’ll adjust the step add this info.
-
-
-
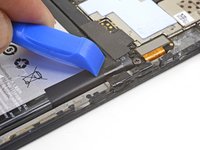
Use the opening tool to push any adhesive tape holding the battery to the edge of the plastic frame. There should be at least one on each battery side.
-
-
-
Peel the clear pull tab up from the battery.
-
-
-
Brace the phone frame against the table.
-
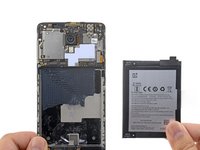
Using a strong, steady force, pull the clear pull tab upwards until the battery loosens from its recess.
-
Swing the battery completely out of its recess and pull off of any remaining adhesive.
This step was the hardest for me - my battery was really stuck in there and I didn’t have isopropyl alcolhol. The old battery came out bent.
I found (once I had bent the old battery removing it) that there is a film around the battery which would come away much more easily. I suggest this step is updated:
Peel back the four black sticky tabs which say “Position 1” (one at each corner of the battery) and the peel back the black sticky film connected to the tabs. Now pull the clear pull tab upwards and the battery should come away.
This! I did it by unpealing the “Position 1” tabs, and then pulled the battery much more easily. Thanks for the hint! Interestingly, it still came out with the black film intact and on the battery. I then put this black film and the pull tab on the new battery, which didn’t have either. I applied some double-sided tape between the black film and the phone to glue the whole thing in place.
I agreee , just peel the “position1” tabs. Plus my spare battery didn’t come with these tabs so I had to reuse the old ones anyway.
romDL -
-
-
crwdns2935267:0crwdne2935267:0Tesa 61395 Tape$5.99
-
Remove the battery and any remaining adhesive residue on the frame.
-


To reassemble your device, follow these instructions in reverse order.
For optimal performance, calibrate your newly installed battery: Charge it to 100% and keep charging it for at least 2 more hours. Then use your device until it shuts off due to low battery. Finally, charge it uninterrupted to 100%.
Take your e-waste to an R2 or e-Stewards certified recycler.
Repair didn’t go as planned? Check out our OnePlus 3 Answers community for troubleshooting help.
crwdns2935221:0crwdne2935221:0
crwdns2935229:057crwdne2935229:0


crwdns2947412:013crwdne2947412:0
This is a great run down! I am rather scared with step 3 so I think I am going to have someone else repair it for me.
Is this tutorial and the repair kit also applicable for the OnePlus 3T model? Thanks in advance for helping!
The tutorial for the 3T model would be similar, but not completely identical to this guide. Since the battery capacity is different between the 3 and 3T, the repair kit would not be applicable. However, the tools are most likely the same.
Thanks for your response Arthur! Is it planned to offer a battery kit also for the OnePlus 3T? I’d definitely appreciate it since I can’t find any trustworthy OnePlus 3T batteries so far. Best regards!
Unfortunately, I don’t think we are releasing a 3T battery kit anytime soon.
Where can I buy Oneplus 3T battery and repair kit? I can only find on ifixit for 3 only …
My One Plus 3 is A3003, is the BLP613 battery compatible with this device ? on some website they write that A3003 is One Plus 3T and not One plus 3 …
Hi Alexandre,
OnePlus seemingly used the A3003 model for both the OnePlus 3 and 3T model. You can try opening the “About Phone” page in the settings menu to see what the phone lists itself as.
The OnePlus 3T has a bigger battery (3400 mAh vs. 3000 mAh), so there is a strong chance that the two are incompatible.
exceptional! excellent! awesome! cool!
all important steps and details included,
terrific job !!!
thank you alot
Great guide, replacement went smoothly
Replaced my battery recently. It went well. Thanks for the guide!
The need for my own adhesive isn't mentioned anywhere except at the very bottom. I ended up not using any because I don't have any. It'd be nice if it were listed as a "tool" or "part" at the top.
I followed the steps to calibrate the battery, but for several days now, my phone's shutting down due to low battery (like extreeemely low, not the usual "hmmm I'm low on battery I'm gonna turn myself off" but rather instant death). Any tips? I do have LineageOS instead of Hydrogen or Oxygen.
I'm in the same situation. Is the phone ok without the adhesive on the battery?
Vorador -
I've just realized that. I have a 3T and bought from ifixit a battery replacement for a One plus 3. because it was "Global (A3003)" compatible. Which my 3T indicates on the back frame... It is misleading, don't buy this battery.