crwdns2915892:0crwdne2915892:0
Use this guide to replace the directional pad buttons on your Nintendo Wii U GamePad.
crwdns2942213:0crwdne2942213:0
-
-
Remove the ten 8.9mm Tri-wing Y1 screws hidden underneath square stickers.
-
Lift up the back plate.
-
-
-
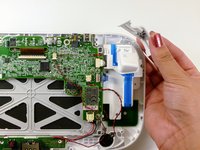
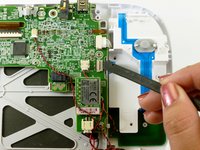
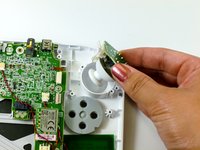
Unplug the connector that connects the back plate to the motherboard.
-
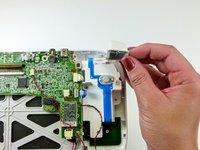
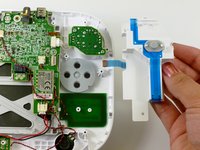
Remove the back panel.
You don't have to remove just be careful
I tried to remove like at least 6 times but I wasn’t able to. Using tweezer, my nails, long nose pliers. There could be a lock but I gave up since I’m afraid if I put more force I might accidentally pull the wires. I’m able to remove the left and right analog stick with the back plate plugged, as mentioned, just be careful.
I was stuck on this step for a while - note that you’re only removing the little white plastic bit. The beige or yellowish plastic bit is attached to the board. I needed to use pliers to carefully grab just the white plastic bit and wiggle it side to side.
-
-
-
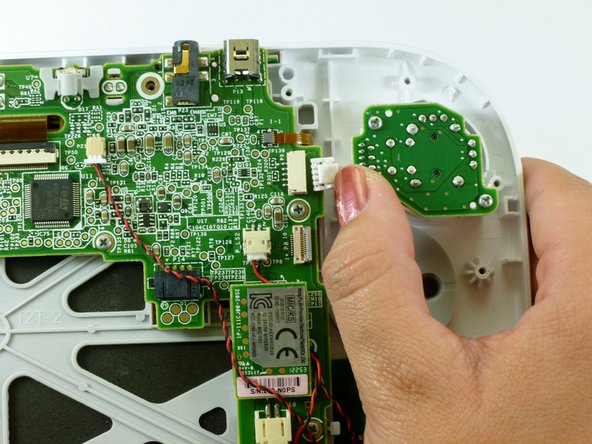
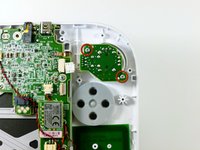
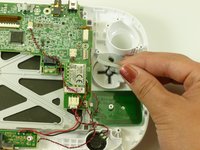
Take out the left and right shoulder buttons in the upper corners.
-
Remove the ZR and ZL trigger buttons by lifting up and sliding outward.
-
-
-
-
Remove the top rubber cover by pulling it off of its mounts to access one of the mounting screws.
-
Remove the four 5.2mm Phillips #0 screws.
-
-
-
Use a spudger to lift the tab which releases the blue ribbon cable.
-
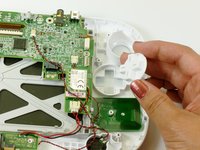
Remove the analog stick and button cover.
-
-
-
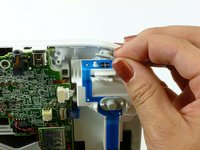
Use your thumb and push the connector towards the rightmost edge to disconnect the analog stick cable connector.
-
-
-
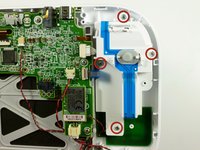
Remove the two 9.0mm Tri-wing Y0 screws.
-
Lift out the analog stick.
Easy peasy. Thanks!
Hi there, I tried to replace the joystick following these instructions but I couldn't remove the connector cable from the old joystick as it is wired into the board. Does anyone know what the connector is called so I can buy one please!
@Spider Gin The joystick and the tiny little control board (the pcb between the red circles in the picture of step 9) are purchased together (or at least that’s how I got mine). The only thing you need to disconnect on the analog stick assembly is the connector shown at the end of the thumb in the picture on step 8. If you are trying to disconnect the stick itself from the control board you are not looking at the right instructions for that.
It seems to me that Nintendo changed the design after a while some had the wires on a connector some were soldered in. I can't find much information about this. Going to have to disassemble what I have to find out what I need
The volume slider came out when I turned the assembly upside down to retrieve a dropped screw. You need to pay attention when putting it back in to make sure you line up the groove on the slider with the tiny little square bump that fits into the groove and allows you to actually control the volume. It’s easy to get it aligned if you know that’s what you trying to do, but at first I didn’t even realize what it was.
Anyway—it worked, thank you!
-
-
-
Lift up and remove the rubber cover for the directional pad.
-
Remove the directional pad buttons.
-


To reassemble your device, follow these instructions in reverse order.
To reassemble your device, follow these instructions in reverse order.
crwdns2935221:0crwdne2935221:0
crwdns2935229:011crwdne2935229:0

crwdns2915084:0crwdne2915084:0

Cal Poly, Team 17-20, Forte Winter 2013 crwdns2935289:0Cal Poly, Team 17-20, Forte Winter 2013crwdne2935289:0
CPSU-FORTE-W13S17G20
crwdns2931471:05crwdne2931471:0
crwdns2935297:040crwdne2935297:0
crwdns2947410:01crwdne2947410:0
Where can you find the blue ribbon mentioned in step 5, for the buttons at?
how do i replace the whole front and back casing?
enbodylin - crwdns2934203:0crwdne2934203:0
bruh the ifix it screwdriver dont reach down the whole way
Michael - crwdns2934203:0crwdne2934203:0
I feel like it’s important to mention how deep some of these holes are. Your screwdriver might not reach. Mine sure didn’t.
greatshadowdude - crwdns2934203:0crwdne2934203:0
I had to shove some tissue into the screwdriver bit holder to get it to reach
Andrew Walker - crwdns2934203:0crwdne2934203:0