
Nintendo Wii Fan Replacement

crwdns2944107:0crwdnd2944107:0Andrew Bookholtcrwdnd2944107:0crwdnd2944107:0crwdnd2944107:04crwdnd2944107:0crwdne2944107:0
crwdns2944111:0Yan 3, 2025crwdne2944111:0
crwdns2915892:0crwdne2915892:0
crwdns2942287:0crwdne2942287:0Use this guide to replace a worn-out fan.
crwdns2942213:0crwdne2942213:0
crwdns2943213:0crwdne2943213:0

crwdns2943215:0crwdne2943215:0


crwdns2944105:0crwdne2944105:0

-
-
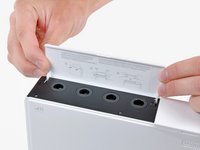
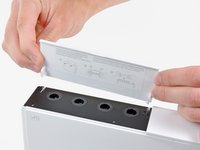
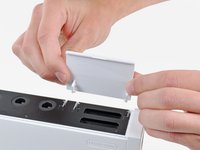
Use a metal spudger to remove the white plastic screw covers stuck to the lower case near the front of the Wii.
-
-
-
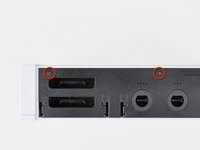
Remove the two 8.3 mm Tri-Point screws hidden under the covers you just removed.
-
-
-
Remove the single 5.9 mm Phillips screw under the controller port door nearest the faceplate.
-
-
-
Use a metal spudger to remove the rubber foot stuck to the side of the Wii near the DVD drive opening.
-
-
-
Remove the single 5.9 mm Phillips screw hidden under the foot you just removed.
-
-
crwdns2935267:0crwdne2935267:0Tweezers$4.99
-
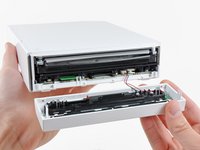
Carefully pull the faceplate away from the front of the Wii.
-
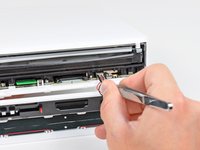
Use a pair of tweezers to disconnect the LED cable's plastic connector from the motherboard.
-
Remove the faceplate.
surprisingly, this was the trickiest step for me. I almost completely mangled the wires when my tweezers slipped as I was attempting to remove the connector.
I removed it with a spudger, gently lift from each side until it pops out.
For those reassembling
line up the pins push it in with your spudger gently until it's in. Then line up the front plate, push gently, confirm everything is where it should be and push firmly, I found it needed a strong push to sit flush with the other body panels.
I ended up using needle nose pliars on this step.
Awesome detailed guide made this very easy, thank you author!
Can someone direct me to what I need to do? My tweezers slipped and I cut one of the wires on the connector. Where can I find a new Y plug for the wii?
I also broke my wire trying to use tweezers. I should have known better. I use (normally do) a spudger on one side and my fingernail on the other to gently pry these types of connectors out. I ended up buying a replacement faceplate on ebay.
This was the hardest part for me. I tried using my fingernails, two different tweezers, and needle nose pliers, but I ended up cutting both the wires. Anyway, I put some electric tape over the exposed wires and just reassembled the system. Funny thing is that the LED still works and I have not noticed any difference. I'm not sure what those wires did, but they seem to not be important.
For people still wondering after all these years, :), The connector is for the blue leds around the dvd when loading and unloading a disk.
Niels -
I also broke off the flimsy wires at the connector. To NOT break the wires, alternate pressing on the right and left sides of the connector with a small flathead screwdriver. Be patient, it will eventually work itself free. There isn't enough to grab onto with the tweezers and you'll only succeed in having them slip off, grab the wires, and yank the wires out.
Good news is that if you do rip out the wires, no worries... I didn't reconnect them and the unit works just fine. I have no idea what those wires are even for. Power LED continues to work no problem.
I used two small flat head screw drivers, one on each side to pry out the connector. This created less pressure from me and reduced my chance of cutting the wires.
This guide is really marvellous - works a treat. But I would definitely recommend needle nose pliers for this step rather than tweezers. It's really easy if you use pliers and potentially damaging if not, and you get it wrong. I had one sniff at it with tweezers then immediate nipped out to the garage for my pliers!
Definitely a tricky step with that connector. I also cut broke the wire accidentally and was going to just give up trying to fix the Wii. However, as others stated the Wii works just fine, including the lights. I do wonder what those wire are for.
I also had a lot of trouble trying to get the connector off with tweezers. Ended up leaving it attached. It does not really get in the way of remaining steps.
Needlenose pliers did the trick for us!
Needlenose pliers did it for us!
You can save yourself some trouble at this point and skip the rest of the disassembly: See that green tab to the left of the sd card slot? THAT’S the wifi board (and that green tab, in hindsight, seems designed to make it accessible without taking apart the whole device, don’t you think?) A little careful spudging, and you’ve got it out, ready to replace! (There’s a guy who shows the process on youtube, if you want to review first)
I got the connector out ok thanks to the suggestions here, but I couldn’t figure out how to reattach it. In the end, I just kind of threw it in and it worked fine.
Very clear instructions - thanks! Faceplate needed replacing after one of my son’s friends accidentally kicked it across the room. $10 bucks to fix, thanks to ebay and these instructions. I’d never heard of a “tri-wing” screw before.
I just left the connector alone and kept it connected while working on it. There is enough wire to allow you to do what you need if you are just careful not to snag it on anything.
I, too, left the connector attached and just took care that the loose faceplate did not stretch the (not crucial) wire when moving rest of the Wii.
This was the trickiest part, I almost broke the wires using tweezers and pliers, so instead use a flat end screwdriver to pry it out, when putting it back in use needlenose pliers to start it then use your fingernail to go the rest of the way.
After I got the connector out I noticed the little locking flap on the top side of the connector. I think prying this first is the key to easier removal.
Anyone know of a method to replace the connector if you end up breaking the wires? Bits of wire are stuck in the white plastic connector, so I'm wondering if I can buy a connector online somewhere without replacing the whole face plate. Thanks :)
I severed both wires. If you want to avoid removing the connector, you can lengthen the two wires by unserpentining them from the wire holder that's in the cover.
Make sure there is no SD card in your unit before pulling this off, otherwise it'll get stuck and you could snap your sd card in half!
I was able to do it with a pair of needle nose pliers and my finger nails, just using the pliers to lift it up and my nails to grip it on both sides to slide it out.
-
-
-
Open the controller port cover until it is perpendicular to the black controller port bezel.
-
Pull the controller port cover straight up to release it from the outer case.
-
-
-
Remove the two remaining 4.1 mm Phillips screws along the top edge of the black plastic controller port bezel.
-
Lift the bezel from the long edge furthest away from the controller ports and remove it from the Wii.
-
-
-
Remove the two 5 mm Phillips screws above the controller ports.
-
-
-
Use a metal spudger to remove the three highlighted screw covers stuck to the side of the Wii.
-
-
-
Remove the following screws:
-
Two 5 mm Phillips screws
-
One 8.2 mm Tri-Point screw
-
-
-
Use a metal spudger to remove the two rubber feet stuck to the bottom face of the Wii near the rear ports.
-
-
-
Remove the two 8.2 mm Tri-Point screws hidden under the feet you just removed.
-
-
-
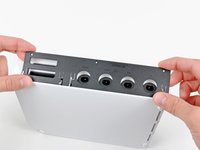
Lift the outer case straight up off the body of the Wii.
-
-
crwdns2935267:0crwdne2935267:0Tweezers$4.99
-
Grab the fan connector with a pair of tweezers and lift it straight up and out of its socket on the motherboard.
-
-
-
Remove the two 10 mm Phillips screws securing the fan to the fan shroud.
-


To reassemble your device, follow these instructions in reverse order.
To reassemble your device, follow these instructions in reverse order.
crwdns2935221:0crwdne2935221:0
crwdns2935229:033crwdne2935229:0
crwdns2947821:0crwdne2947821:0
crwdns2947823:0crwdne2947823:0


crwdns2947412:09crwdne2947412:0
Awesome guide, just replaced faulty fan unit in my 9 year old wii. Should hopefully keep it going for another 9 years :)
Super easy and great instructions! I feel a little guilty that my Wii sat in the garage for 4 years! Now it'll be a great birthday present for my 2 boys.
Does anyone have a diagram for the Wii’s airflow? I’m looking to install a booster fan at the bottom to help blow air in but I want to make sure it is effective.
nice¡¡¡¡¡¡¡¡¡¡¡¡¡¡
Thanks! Wii Quarantine’n in 2021!
Beautiful instructions. Thank you. A++. Would disassemble my Wii again.
Pls help my Wii fan came off the motherboard!
Muito obrigado!
Much appreciated