crwdns2933423:0crwdne2933423:0
crwdns2947577:0crwdnd2947577:0crwdne2947577:0

Nintendo Switch Lite Heat Sink Replacement

crwdns2942213:0crwdne2942213:0

    1. Nintendo Switch Lite Heat Sink Replacement, Remove the back panel screws: crwdns2935265:01crwdnd2935265:01crwdnd2935265:01crwdne2935265:0
      crwdns2935267:0crwdne2935267:0
      Magnetic Project Mat
      $19.95
      • Before beginning this repair, make sure that the device is completely turned off.

      • Use a Y00 screwdriver to remove the four 6.3 mm-long screws securing the back panel.

      • Throughout this repair, keep track of each screw and make sure it goes back exactly where it came from.

      crwdns2952109:0crwdne2952109:0

      crwdns2917038:0crwdne2917038:0

    2. Nintendo Switch Lite Heat Sink Replacement, Remove the top and bottom back panel screws: crwdns2935265:02crwdnd2935265:01crwdnd2935265:02crwdne2935265:0 Nintendo Switch Lite Heat Sink Replacement, Remove the top and bottom back panel screws: crwdns2935265:02crwdnd2935265:02crwdnd2935265:02crwdne2935265:0
      • Use a JIS 000 driver or an iFixit Phillips driver to remove the following screws securing the back panel:

      • Two 3.6 mm-long screws on the top of the device

      • Two 3.6 mm-long screws on the bottom of the device

      • To prevent these tight screws from stripping, apply firm downward force, work slowly and try a different screwdriver if the screws won't come out.

      crwdns2952109:0crwdne2952109:0

      crwdns2917038:0crwdne2917038:0

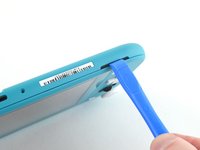
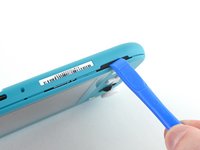
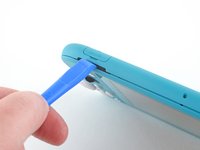
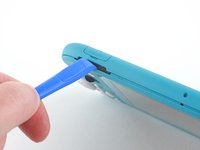
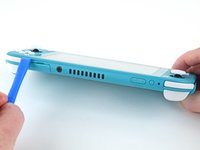
    3. Nintendo Switch Lite Heat Sink Replacement, Release the clips securing the back panel: crwdns2935265:03crwdnd2935265:01crwdnd2935265:02crwdne2935265:0 Nintendo Switch Lite Heat Sink Replacement, Release the clips securing the back panel: crwdns2935265:03crwdnd2935265:02crwdnd2935265:02crwdne2935265:0
      • Insert an opening tool into the left speaker grille on the bottom of the device.

      • Twist the opening tool to release the clips securing the back panel.

      • Avoid inserting the opening tool further than required to prevent damage to the speaker module.

      crwdns2952109:0crwdne2952109:0

      crwdns2917038:0crwdne2917038:0

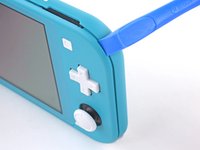
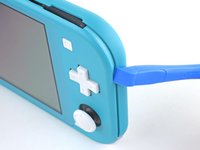
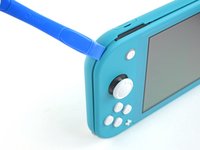
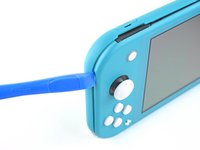
    4. Nintendo Switch Lite Heat Sink Replacement, Continue releasing the clips around the device: crwdns2935265:04crwdnd2935265:01crwdnd2935265:02crwdne2935265:0 Nintendo Switch Lite Heat Sink Replacement, Continue releasing the clips around the device: crwdns2935265:04crwdnd2935265:02crwdnd2935265:02crwdne2935265:0
      • Slide the opening tool around the bottom-left corner to release the clips on the left side of the device.

      crwdns2952109:0crwdne2952109:0

      crwdns2917038:0crwdne2917038:0

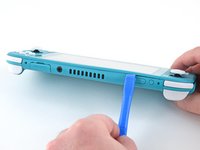
    5. Nintendo Switch Lite Heat Sink Replacement, Twist to release the clips: crwdns2935265:05crwdnd2935265:01crwdnd2935265:02crwdne2935265:0 Nintendo Switch Lite Heat Sink Replacement, Twist to release the clips: crwdns2935265:05crwdnd2935265:02crwdnd2935265:02crwdne2935265:0
      • Insert an opening tool into the right speaker grille on the bottom of the device.

      • Twist the opening tool to release the clips.

      • Avoid inserting the opening tool further than required to prevent damage to the speaker module.

      crwdns2952109:0crwdne2952109:0

      crwdns2917038:0crwdne2917038:0

    6. Nintendo Switch Lite Heat Sink Replacement, Slide and pry around the corners: crwdns2935265:06crwdnd2935265:01crwdnd2935265:02crwdne2935265:0 Nintendo Switch Lite Heat Sink Replacement, Slide and pry around the corners: crwdns2935265:06crwdnd2935265:02crwdnd2935265:02crwdne2935265:0
      • Slide and pry the opening tool around the bottom-right corner to release the clips on the right side of the device.

      crwdns2952109:0crwdne2952109:0

      crwdns2917038:0crwdne2917038:0

    7. Nintendo Switch Lite Heat Sink Replacement: crwdns2935265:07crwdnd2935265:01crwdnd2935265:02crwdne2935265:0 Nintendo Switch Lite Heat Sink Replacement: crwdns2935265:07crwdnd2935265:02crwdnd2935265:02crwdne2935265:0
      • Continue sliding and prying the opening tool along the gap on the top of the device to release the clips.

      crwdns2952109:0crwdne2952109:0

      crwdns2917038:0crwdne2917038:0

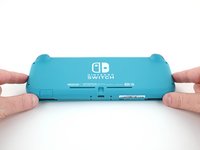
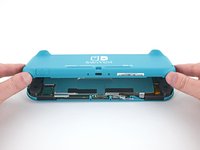
    8. Nintendo Switch Lite Heat Sink Replacement, Remove the back panel: crwdns2935265:08crwdnd2935265:01crwdnd2935265:03crwdne2935265:0 Nintendo Switch Lite Heat Sink Replacement, Remove the back panel: crwdns2935265:08crwdnd2935265:02crwdnd2935265:03crwdne2935265:0 Nintendo Switch Lite Heat Sink Replacement, Remove the back panel: crwdns2935265:08crwdnd2935265:03crwdnd2935265:03crwdne2935265:0
      • Lift the bottom edge of the back panel, opening it like a book.

      • Remove the back panel.

      crwdns2952109:0crwdne2952109:0

      crwdns2917038:0crwdne2917038:0

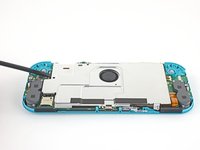
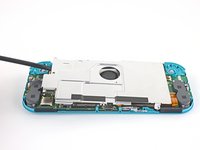
    1. Nintendo Switch Lite Heat Sink Replacement, Remove the shield plate: crwdns2935265:09crwdnd2935265:01crwdnd2935265:01crwdne2935265:0
      • Use a JIS 000 driver or an iFixit Phillips driver to remove the four screws securing the shield plate:

      • Three 3.1 mm screws

      • One 4.5 mm screw

      crwdns2952109:0crwdne2952109:0

      crwdns2917038:0crwdne2917038:0

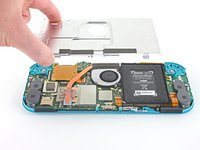
    2. Nintendo Switch Lite Heat Sink Replacement: crwdns2935265:010crwdnd2935265:01crwdnd2935265:03crwdne2935265:0 Nintendo Switch Lite Heat Sink Replacement: crwdns2935265:010crwdnd2935265:02crwdnd2935265:03crwdne2935265:0 Nintendo Switch Lite Heat Sink Replacement: crwdns2935265:010crwdnd2935265:03crwdnd2935265:03crwdne2935265:0
      • Use a spudger or your fingers to lift the shield plate up and out of the device.

      • You may feel a bit of resistance. This is normal, since the shield plate is slightly bonded to the heat sink with thermal putty.

      • Remove the shield plate.

      • Clean off the old thermal putty from the shield plate and heat sink using isopropyl alcohol and a microfiber cloth. Apply new thermal putty to the heat sink before reassembly.

      crwdns2952109:0crwdne2952109:0

      crwdns2917038:0crwdne2917038:0

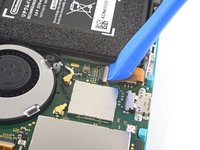
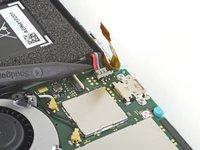
    1. Nintendo Switch Lite Heat Sink Replacement, Disconnect the interconnect cable: crwdns2935265:011crwdnd2935265:01crwdnd2935265:02crwdne2935265:0 Nintendo Switch Lite Heat Sink Replacement, Disconnect the interconnect cable: crwdns2935265:011crwdnd2935265:02crwdnd2935265:02crwdne2935265:0
      • Use an opening tool or your fingernail to flip up the small, hinged locking flap on the motherboard interconnect cable's ZIF connector.

      crwdns2952109:0crwdne2952109:0

      crwdns2917038:0crwdne2917038:0

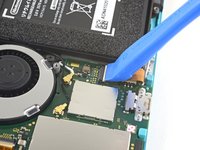
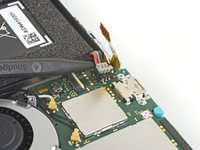
    2. Nintendo Switch Lite Heat Sink Replacement: crwdns2935265:012crwdnd2935265:01crwdnd2935265:02crwdne2935265:0 Nintendo Switch Lite Heat Sink Replacement: crwdns2935265:012crwdnd2935265:02crwdnd2935265:02crwdne2935265:0
      • Do Not Use Metal Tweezers! Metallic tweezers can short-circuit the ribbon cable/connector and damage your device.

      • Use a spudger or a pair of non-conductive (nylon or ceramic) tweezers to slide the interconnect cable out of its connector on the motherboard.

      crwdns2952109:0crwdne2952109:0

      crwdns2917038:0crwdne2917038:0

    3. Nintendo Switch Lite Heat Sink Replacement, Disconnect the battery: crwdns2935265:013crwdnd2935265:01crwdnd2935265:02crwdne2935265:0 Nintendo Switch Lite Heat Sink Replacement, Disconnect the battery: crwdns2935265:013crwdnd2935265:02crwdnd2935265:02crwdne2935265:0
      • Use the point of a spudger to pry the battery connector straight up and out of its socket on the motherboard.

      • During reassembly, wait until after you connect the interconnect cable (above) before connecting the battery.

      crwdns2952109:0crwdne2952109:0

      crwdns2917038:0crwdne2917038:0

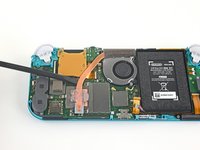
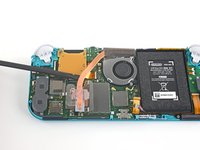
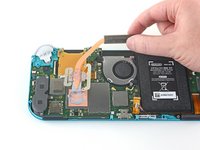
    1. Nintendo Switch Lite Heat Sink Replacement, Remove the heat sink: crwdns2935265:014crwdnd2935265:01crwdnd2935265:01crwdne2935265:0
      • Use the flat end of a spudger or your fingers to carefully peel up the foam that's lightly adhered to the fan.

      • The foam only needs to be peeled back enough to clear the fan.

      crwdns2952109:0crwdne2952109:0

      crwdns2917038:0crwdne2917038:0

    2. Nintendo Switch Lite Heat Sink Replacement: crwdns2935265:015crwdnd2935265:01crwdnd2935265:01crwdne2935265:0
      • Use a JIS 000 driver or an iFixit Phillips driver to remove the three 3 mm screws securing the heat sink to the motherboard.

      crwdns2952109:0crwdne2952109:0

      crwdns2917038:0crwdne2917038:0

    3. Nintendo Switch Lite Heat Sink Replacement: crwdns2935265:016crwdnd2935265:01crwdnd2935265:03crwdne2935265:0 Nintendo Switch Lite Heat Sink Replacement: crwdns2935265:016crwdnd2935265:02crwdnd2935265:03crwdne2935265:0 Nintendo Switch Lite Heat Sink Replacement: crwdns2935265:016crwdnd2935265:03crwdnd2935265:03crwdne2935265:0
      • Use a spudger or your fingers to lift the heatsink up and off of the motherboard to remove it.

      • You may feel a bit of resistance. This is normal, since the heat sink is slightly bonded to the CPU with thermal paste.

      • Clean off the old thermal paste from the heat sink and CPU using isopropyl alcohol and a microfiber cloth. Apply new thermal paste to the CPU before reassembly.

      crwdns2952109:0crwdne2952109:0

      crwdns2917038:0crwdne2917038:0

crwdns2915888:0crwdne2915888:0

To reassemble your device, follow these instructions in reverse order.

Take your e-waste to an R2 or e-Stewards certified recycler.

Repair didn’t go as planned? Try some basic troubleshooting, or ask our Nintendo Switch Lite Answers community for help.

crwdns2935221:0crwdne2935221:0

crwdns2935229:07crwdne2935229:0

Craig Lloyd

crwdns2935283:002/10/16crwdne2935283:0

43,097 crwdns2915208:0crwdne2915208:0

crwdns2935297:082crwdne2935297:0

crwdns2947410:01crwdne2947410:0

What kind of thermal paste should I use and should it be conductive or non conductive?

Fern - crwdns2934203:0crwdne2934203:0 crwdns2950251:0crwdne2950251:0
crwdns2917038:0crwdne2917038:0

crwdns2936625:0crwdne2936625:0:

crwdns2936751:024crwdne2936751:0 2

crwdns2936753:07crwdne2936753:0 74

crwdns2936753:030crwdne2936753:0 283

crwdns2942667:0crwdne2942667:0 17,182