crwdns2915892:0crwdne2915892:0
This guide will take you through the steps of removing the joystick. This will come in handy if you have a rogue joystick
crwdns2942213:0crwdne2942213:0
-
-
Place the controller (buttons down) on a solid surface.
-
Remove the six 9.2mm Tri-wing Y0 screws that hold the back panel in place.
-
-
-
Gently lift the back panel up, separating it from the front panel.
-
-
-
-
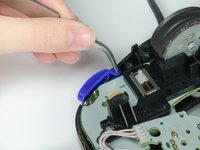
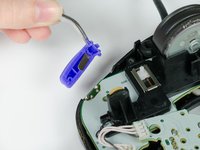
Grab the Z-button by the peg with tweezers and lift it out of the controller.
-
-
-
Carefully unhook the cable that is looped around the peg.
-
-
-
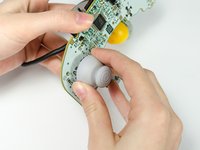
Lift the circuit board out of the controller.
-
-
-
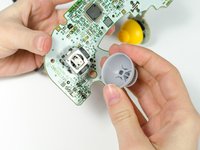
Grab the base of the grey cover and pull it off.
-


To reassemble your device, follow these instructions in reverse order.
crwdns2935221:0crwdne2935221:0
crwdns2935229:030crwdne2935229:0
crwdns2935287:0crwdne2935287:0

Cal Poly, Team 19-44, Regan Winter 2013 crwdns2935289:0Cal Poly, Team 19-44, Regan Winter 2013crwdne2935289:0
CPSU-REGAN-W13S19G44
crwdns2931471:04crwdne2931471:0
crwdns2935297:031crwdne2935297:0
crwdns2947412:013crwdne2947412:0
Great guide, but I'm looking to buy replacement joysticks and I can't find them anywhere. Where would I find those?
When I removed the joystick it would come off. The plastic was stuck too hard to the joystick so I accidentally broke it in half. Is there anyway to glue it back together?
@Tyler Lovejoy - That's already part of the controller.
@Joe Freedman - Try Amazon.com
@Mattias Wirsenius - At this point it would be best to buy a new controller.
This guide is quite unhelpful; it tells you how to remove the stick but not how to repair it. My controller's joystick has sunken into the controller and stays slightly tilted if i move it to the right. Yet when I go to the "rogue joystick" portion of the troubleshooting guide, it tells me to repair the joystick if it's not correctly attached to the motherboard. Seriously, there needs to be a more in-depth guide if such repairs are possible.
without taking the controller completely apart, pull the joystick straight up with your hand