
Nintendo 3DS Right Shoulder Button Replacement

crwdns2944107:0crwdnd2944107:0David Hodsoncrwdnd2944107:0crwdnd2944107:0crwdnd2944107:08crwdnd2944107:0crwdne2944107:0
crwdns2944111:0Mha 1, 2024crwdne2944111:0
crwdns2915892:0crwdne2915892:0
crwdns2942287:0crwdne2942287:0Get back your R button functionality with a new right shoulder button.
crwdns2942213:0crwdne2942213:0
crwdns2943213:0crwdne2943213:0

crwdns2943215:0crwdne2943215:0


crwdns2944105:0crwdne2944105:0

-
crwdns2935267:0crwdne2935267:0Phillips #00 Screwdriver$5.49
-
Use a Phillips PH00 screwdriver to loosen the four screws along the top of the back cover.
-
-
-
Grab the top edge of the back cover with your opposite hand so that the cover does not fall back into place.
-
Pull the back cover up and away from the rest of the device to remove it.
-
-
-
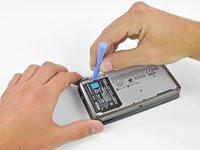
Insert a plastic opening tool into the notch in the lower case above the battery.
-
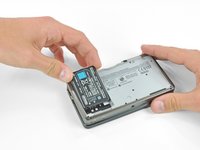
Pry the battery up with the plastic opening tool.
-
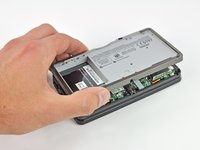
Grab the top edge of the battery and lift it out of the lower case.
-
-
-
Use a JIS #00 screwdriver to remove the nine 6.3 mm black screws from the lower case.
-
Use a JIS #00 screwdriver to remove the 2.4 mm silver screw above the game cartridge slot.
Had to give up at this point. Tried using the ifixit #00 phillips screwdriver to take out two screws and ended up stripping them.
Stuck at the same spot, those screws are in there really tight.
Ruined my screws because of incorrect head, thanks!
I had so much trouble with these screws, I gave up. Unfortunately, I can't accept failure so tried again. I figured out if you turn it right before you loosen it worked. Maybe it was just me, but I turned it right then kept pressure as I turned to loosen. I was surprised I hadn't stripped any screws out.
Does anyone have any idea of how to remove these screws. I've pretty badly stripped the screws and I've gone to 20+ pages trying to figure this. I'm considering just prying the !@#$ thing.
use a dremil and make it a flat head
ruined my screws here too...what the !@#$ nintendo?
trying to survive a nuclear meltdown inside the !@#$ thing
More like trying to subtly enforce planned obsolescence by not allowing you to make repairs to your device.
Ullyssys -
I used a #00 Philips 1/8" bit with no problem; however, the narrow diameter of the counter sunk hole can inhibit making secure contact with the screw head. You can be using the right bit (#00) but if the diameter of the bit shaft is too big you won't get proper contact.
I found this to be an excellent guide. Thanks
Unscrewed the nine 6.3 mm screws using the J000 bit from the iFixit 54 bit driver kit without much effort & without stripping the screw heads. Just gotta really position the bit correctly on the screw to have a proper fitting & not strip the screw heads.
The screws didn't strip but the philips screw driver did? @__@
These are rough either way.
I used a "Whia 273 - PH000x40" screwdriver and held it firmly pushing the palm of my hand on the yellow end of the screwdriver and rocked the screw slightly (counter clockwise and clockwise) until it started to move. Then, without letting up on the pressure I carefully backed it out. The screwdriver is excellent because it is hardened (unlike some cheapo's out there) and the very tip is blunt not sharp. If the tip is too sharp, the point will bottom out in the screw and the sides that do all the work, won't be able to fully contact the inside of the screw. This screwdriver fits so well that the screws actually stick to it once they are removed. If the screwdriver moves AT ALL when you initially try it in the screw, STOP and find a better one. Also, start with the screws in the center, somehow they seem a little easier until you get the feel for it.
Paul -
Push down hard and turn counter-clockwise, or push down and rotate 3DS counter-clockwise until screw is loose.
Had the exact same problem, even tried the #000 screw driver too. Stripped the screws due to how tightly they are screwed in there and how easy they strip. I am now unsure what to do from here or if all I can do is give up.
I second the one who suggested the Whia 273 PH000x40 screwdriver. I had a terrible time unscrewing these screws, and almost stripped them using a cheaper #000 screwdriver. Also tried a 3/16" flathead and destroyed the screwdriver. I bought the Whia and glad I did. It fit perfectly and did not slip at all. DEFINITELY recommend purchasing this high-quality screwdriver. Cost about $10 but well worth it to avoid the hassle.
The best way I found that works quite well, if you find a screwdriver or bit that is good enough: hold the screwdriver or bit with tons of pressure, and rotate the 3DS clockwise! It will come out in 5-6 rotations, you can do this step in about 10 minutes this way (put down a cloth first, don't scratch the front!)
I HAVE A WAY TO GET OUT THE STRIPED SCREW. Like you, I had screwed up and tried everything to get the screw out. Do NOT try the glue in that tiny hole, you will get the screw glued permanently in there. The rubber band doesn't work in that tight space either. As desperate as I was, I was trying anything from nail polish to cramming the screw driver in as hard as I possible could. Until I realized that I had a drill. Yes, with the smallest head, I drilled into the screw a little bit, messed with the part I was trying to get out, drilled a little more, messed around, and then finally on my last attempt, I had successfully drilled off the top of the screw rendering the part free. It doesn't matter which drill you use as long as you can fit the head into the hole. Then drill forward like you are trying to drill a hole through wood. Now the only problem is that the remainder of the screw will be stuck in its place. All you really have to do is get a set of pliers and twist that puppy out. And there you go!
Most likely though, if you have all the other screws out and only have one striped screw, the part should just pop off and you wouldn't have to drill the entire head off the screw.
Got a brand new #00 screw drive and it striped the first time used it. So now I'm using eyeglass repair kit screw driver and it lasts longer that the one I got of of eBay.
And I tried all of those tactics that people have been giving and none of them are working.
The wiha 273 PH #000×40 unsrews it easily! It has a magnet on it!
I’m cant get these %#*@ screws out i want to die…
Oh god, someone help i can’t get them out.
omg everyone is struggling in here smh. I used my PH000 screwdriver made sure it went in aligned to the screws and applied pressure while turning counterclockwise. once it started the screw started lifting i stopped applying pressure and they lifted beautifully. saved damaging my screws with this technique. I also used the same screwdriver size to remove the orange screw where the game slot is. Yall are welcome lol
USE A DIFFERENT SCREWDRIVER.
I was stuck on this for an hour. If your screwdriver is very thin, you won't get the grip necessary if your screws are on tight. I thought my screws were stripped but I switched to a bigger screwdriver and it was effortless. Just MAKE SURE IT IS A 00 PHILLIPS HEAD.
Use a JIS screwdriver, not Phillips! I bought the recommended screwdriver from this website and couldn't remove any screws. I went and purchased a J00 screwdriver and removed them quickly.
I used what I believe is a 1.5mm screwdriver which I received in one of those 60 in 1 precision screwdriver sets. It fit perfectly and much more snugly compared to any of the J0 - J000 bits.
You should change the Screwdriver Type used. A Philipshead can damage Screws and/or Console. Use JIS Type-J00, which iFixIt sells, yes.
Lmao I've been using a Philips #00 for years and not known it was the wrong type. I ended up being fine here every time, a magnetic head helps. It's actually almost satisfying getting these ones out.
using a J00 head. no luck at first (that's why i'm here lol) read one comment here saying turn a little bit clockwise and then try to unscrew and that did the trick!
also, held the console with one hand and the screwdriver with the other for applying pressure but not to much or at least to grab the other side of the pressured place instead of letting the hinge press against the table.
-
-
-
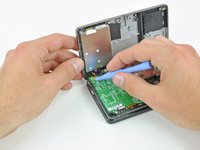
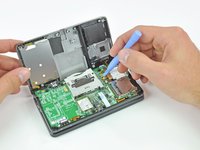
Lift the bottom edge of the lower case off the rest of the 3DS.
-
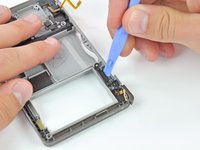
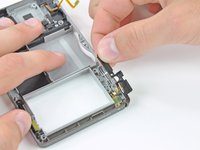
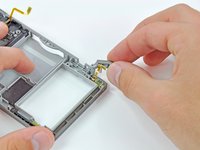
Use a plastic opening tool to pry the shoulder button ribbon cables off their sockets on the motherboard.
-
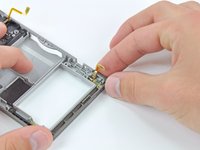
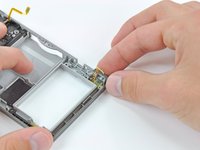
Remove the lower case from the device.
-
-
-
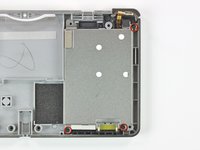
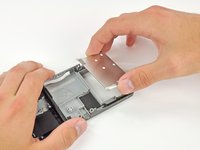
Remove the three 3.6 mm Phillips screws securing the metal battery shield to the lower case.
-
Lift the battery shield up and out of the lower case.
-
-
-
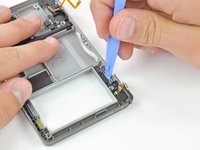
Remove the 3.6 mm Phillips screw from the right shoulder button cover.
-
-
-
Insert a plastic opening tool under the left side of the right shoulder button cover.
-
Pry the black plastic cover up from the lower case.
-
Grab the cover and lift it off of the lower case.
-
-
-
Lift the right shoulder button out of the lower case.
-


To reassemble your device, follow these instructions in reverse order.
To reassemble your device, follow these instructions in reverse order.
crwdns2935221:0crwdne2935221:0
crwdns2935229:081crwdne2935229:0
crwdns2947821:0crwdne2947821:0
crwdns2947823:0crwdne2947823:0


crwdns2947412:020crwdne2947412:0
Well done, thanks for the help, I had small problems with step 9 because of all those small parts but I managed to put everything back as it was. Thanks again :D
The ribbon came off the socket, now it is stuck and we cannot pull it out. How do you remove the socket without the ribbon. We attempted tweezers, but it did not budge. May have scratched things up a bit too. Help!! Thank you! We just want to pull it out and get another replacement right shoulder ribbon.
Did you ever figure out how to get it out? I have the same problem. I changed the ribbon with a 3rd party part and the bad solder job broke and the part is still left in the socket. My only option is to use crazy glue and a pin or something small to glue to it and then pull it out…but I don’t have any krazy glue!
Chris -
Amazing guide, thank you!!
It was great! Phenomenal! I loved it! But... What happens if I accidentally snapped the L button's ribbon cable..? Can I just replace it..? Somehow..?
Dalton,
You can order replacement L&R ribbons on Amazon, they're like $5.
Excellent guide, worked like a charm for replacing both shoulder buttons.
Where can I buy replacement shoulder buttons? Or is it enough to just clean the area and get any blockage out (like dust)?
Is this safe?
For everyone who had problems with this. After or during Step 9, it is possible that the R button will come off entirely. This will mean the spring is no longer in place, and a small metal rod might also come off. The optimal way to fix this is to place the spring back in first alongside the button (the spring rests on the plastic as seen in the photo for Step 9), and then put the metal rod through the whole. You have to be careful when putting the ribbon cable. You may also have to bend it slightly (see how Nintendo has bent it) for optimal fit. You have to be careful as these ribbons are very easy to break or cut.
Just wondering, does it still work well without the rod?
Excellent walk through, replaced both buttons and everything is working!
Managed to fix the L button (mostly), wanted a poke around the R button which had been screwed for years. Definitely time to order a replacement. It took me half an hour to comprehend how to put the R button back together because I’m an idiot and forgot what to do, but found a video guide to help me. Loved the guide either way, disassembled it down to there easily thanks to this.
I have the #00 from the store but I can’t get the screws out from for step four… Help D: They haven’t been stripped or anything I just, can’t make them budge.
I personally found that a #000 worked better, so if anyone else has this issue that could be it. Alternatively, you might just need to push down hard and turn. As a somewhat related aside, this repair made me really glad that I bought a full repair kit - I really needed the tweezers for some of the finicky parts (though it doesn’t help that my fingers are too large for their own good).
I can't get the metal pin back in on step 9, can anyone help?
This was a great guide! I have never worked on a 3DS and this guide helped a ton!
I replaced the right shoulder and it went perfectly BUT, I went to test it afterwards and it still wouldn't register the input of the button, any advice would be appreciated
Thanks for this guide and the L button one. Finally have working shoulder buttons again! Which means... I can finally play Majora's Mask 3D!!!!
So I have misplaced both the metal springs and rod. Do people sell the metal springs and rod? Or just only the buttons?