crwdns2942213:0crwdne2942213:0
-
-
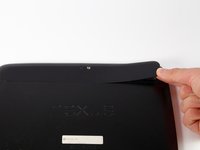
Using a plastic opening tool, remove the thin plastic cover from back of the tablet by prying up from its small tab.
-
-
-
Remove the five 2mm screws on the back of the device using a PH00 screwdriver.
-
-
-
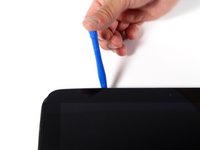
Pry the device apart by inserting a plastic opening tool in the seam between the plastic backing and display assembly. Use the tool to unclip the plastic tabs in between the backing and the display.
-
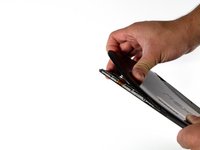
Pull the the plastic backing off the display assembly using your hands.
Be carefull with the power button cable. Don’t insert the plastic tool in this zone
Some instruction guides also suggest optional use of a suction cup with which to tug on the glass while separating the plastic backing. I found this helpful. Also, if you have a spudger of more rigid plastic, use that one here. My blue spudgers got chewed up pretty badly during this process.
I found that the top right (looking at the screen) doesn’t have any corner clips, just a metal antenna (?), so it is easiest to get this corner popped first and then work your way around. The bottom corners have clips which are tough to undo.
-
-
-
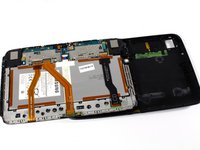
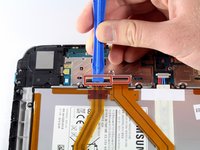
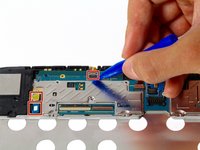
Detach the three connector ribbons passing over the battery using the plastic opening tool.
The left two connectors flip up from the cable side. The right connector flips up from opposite the cable.
Note that you don’t just pull the ribbons out. There is a clamp on each connector that needs to be prised opened, releasing the ribbon. This was helpful: https://youtu.be/yru4k62qdEU?t=302
You sir, are a true humanitarian!!!
-
-
-
Remove the twelve 2mm screws around the perimeter of the battery with a PH00 screwdriver.
-
-
-
-
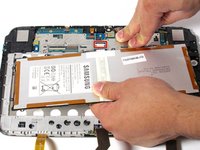
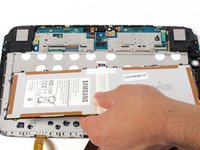
Disconnect the battery by lifting it upward and pulling it away from the connector.
When reassembling reconnect the data ribbon cables first, then connect the battery connection last so that you’re not plugging in data lines while powered. Ideally you’d disconnect the battery first but that’s a bit hard with the design so you just have to try to ensure it’s switched off first.
Excellent with video
-
-
-
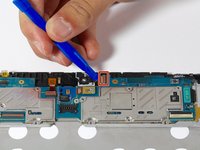
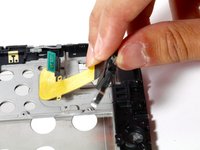
Remove one screw on the logic board with a PH00 screwdriver.
-
-
-
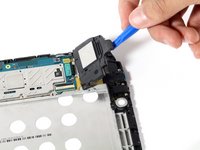
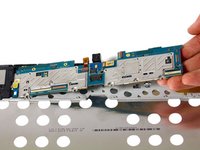
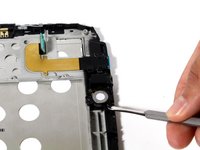
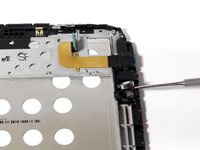
Disconnect right speaker connector ribbon from logic board.
-
Lift the speaker out by pulling up on its corner.
-
-
-
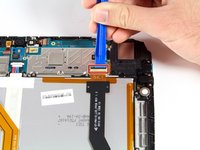
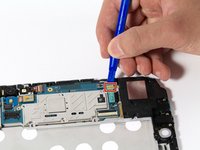
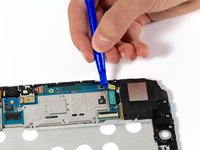
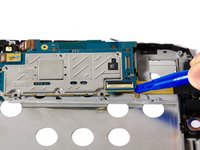
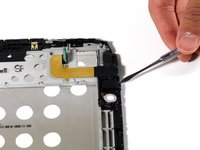
Disconnect connectors around the perimeter of the motherboard.
-
-
-
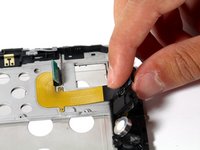
Remove motherboard by gently pulling upward under its corner.
-
-
-
Remove the three 2mm screws along the right side of the device using a PH00 screwdriver.
-
-
-
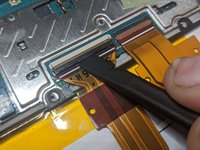
Unseat the small vibrator motor by gently applying upward pressure with a spudger.
Expect some resistance when prying up on the vibration motor. There was some aggressive double sided tape under it and it was stuck pretty firmly.
-
-
-
Lift the assembly by gently applying upward pressure with the spudger on the assembly.
-
-
-
Gently pull battery-audio jack-USB assembly upward, detaching it from its adhesive.
-


To reassemble your device, follow these instructions in reverse order.
To reassemble your device, follow these instructions in reverse order.
crwdns2935221:0crwdne2935221:0
crwdns2935229:07crwdne2935229:0
crwdns2915084:0crwdne2915084:0

Cal Poly, Team 34-18, Maness Spring 2016 crwdns2935289:0Cal Poly, Team 34-18, Maness Spring 2016crwdne2935289:0
CPSU-MANESS-S16S34G18
crwdns2931471:04crwdne2931471:0
crwdns2935297:05crwdne2935297:0
crwdns2947410:01crwdne2947410:0
Perfect guide, I managed to fix my Nexus 10 broken usb port.
It may be worth to mention after step 14 you need to gently remove the plastic connectors cover and place it on the replacement part.