crwdns2915892:0crwdne2915892:0
Your New Nintendo 2DS XL's battery may need to be replaced if the device doesn't turn on when you press the power button. The battery is directly accessible under the bottom panel. For more information, refer to our troubleshooting page.
crwdns2942213:0crwdne2942213:0
-
-
Before starting the disassembly, remove
-
The stylus
-
Any game cartridge
-
The microSD card
-
-
-
Use a tri‑point Y00 screwdriver to unscrew the four 6 mm‑long screws located at the four corners of the bottom panel.
-
-
-
-
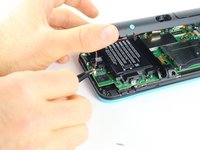
Using a spudger, separate the back panel from the front casing by gently prying around the panel.
-
There are many clips along the hinge of the case, so it is recommended to work your way along one short side and the two long sides before finishing the last short side.
-
-
crwdns2935267:0crwdne2935267:0Tweezers$4.99
-
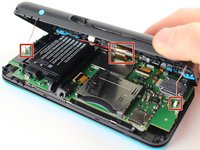
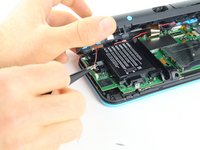
Use tweezers to disconnect the two cables that connect the rear buttons on either side to the motherboard by gently pulling them upwards.
-
-
-
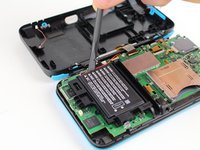
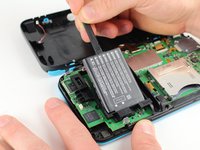
Use the flat end of a spudger to gently pry the battery out of its plastic enclosure.
-


To reassemble your device, follow these instructions in reverse order.
crwdns2935221:0crwdne2935221:0
crwdns2935229:049crwdne2935229:0

crwdns2935287:0crwdne2935287:0

Cal Poly, Team S18-G6, Forte Fall 2017 crwdns2935289:0Cal Poly, Team S18-G6, Forte Fall 2017crwdne2935289:0
CPSU-FORTE-F17S18G6
crwdns2931471:05crwdne2931471:0
crwdns2935297:024crwdne2935297:0
crwdns2947412:016crwdne2947412:0
Does the 2ds xl have the same as the new 3ds xl
Royce davenport - crwdns2934203:0crwdne2934203:0 crwdns2950251:0crwdne2950251:0
no. the 2ds shares the same battery type as the Nintendo DS and the Nintendo switch pro controller.
@avegaming Nintendo 3DS*, not DS
CTR-003 Battery
stephen cheshire - crwdns2934203:0crwdne2934203:0 crwdns2950251:0crwdne2950251:0
Do I need to put a sticky pad on the new battery?
bryan sepulveda - crwdns2934203:0crwdne2934203:0 crwdns2950251:0crwdne2950251:0