crwdns2942213:0crwdne2942213:0
-
-
Use your sim card eject tool to remove the sim card and tray.
-
-
-
Remove your stylus pen from the phone.
-
-
-
-
Using your heat gun or a hairdryer heat the back of the phone to loosen up the adhesive.
-
Now using your opening devices go along the edge of the phone slow and easy prying along the edges till they're loose.
-
As you're lifting up the back of your phone be sure you watch out for the fingerprint scanner, just keep it pushed down while you're lifting up the back of the phone .
-
-
-
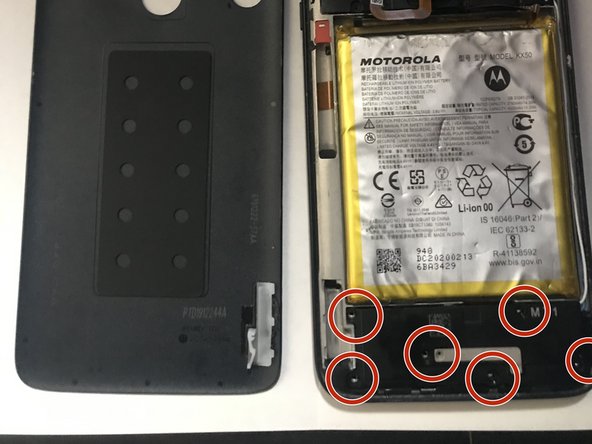
Here you will have 15 t4 screws on top and bottom to take out but be careful with the top cover because the finger sensor runs under it. You don't want to rip that
I couldn't turn any with T4 screwdriver. Guessing T3 screws
-
-
-
Here we need to be careful that we don't damage the battery, so unhook the battery and its flex cable. Then carefully get one corner of the battery lifted up to where you can get a good grip to pull on it. You will have to pull it slower so you don't damage the battery once that is done you made it.
-
New line.
Use hot air gun/ hair dryer and heat up the batteries adhesive along with isopropyl alcohol for a clean removal of the battery being replaced, the isopropyl alcohol can further remove the old adhesive which can be replaced with the new battery and it's adhesive, if the new battery does not include adhesive 3m double sided tape works very well.
This is so complex, so delicate with those tiny screws, most people should not attempt it at all. When the battery goes, take it to a professional or just get a new phone!
-


crwdns2935221:0crwdne2935221:0
crwdns2935229:05crwdne2935229:0

crwdns2947412:02crwdne2947412:0
Yessir, you the man bro
The image appears to be the Moto G Stylus 2021 model. Are the 2022, 2023, and 2024 models similar to the 2021 model?