crwdns2915892:0crwdne2915892:0
Use this guide to remove or replace the screen on your Motorola Moto Z3 Play.
Before you begin, download the Rescue and Smart Assistant app to backup your device and diagnose whether your problem is software or hardware related.
Warning: Because of the strong adhesive securing the display, minimal clearance for inserting your tools, and high heat required, there's a good chance of accidentally damaging the display when removing it. If you're replacing the display anyway, then you don't have to worry—but if you intend to re-use the display, take serious care when heating and inserting tools to separate the display from the rest of the device.
crwdns2942213:0crwdne2942213:0
-
-
Power off your phone before you complete any replacement steps.
-
-
-
Heat the edges of your Motorola Moto Z2 Play screen for two to three minutes with a heat gun. You adjust the heat gun to 85 degrees centigrade, and be careful not to hold the heat gun on one position for too long; to avoid damaging, or "hotspotting" the LCD. The screen should be very warm, but not painful, to the touch. Reheat as necessary.
-
-
-
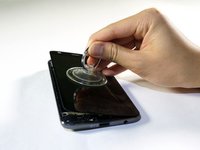
Place suction cup in the middle of the screen and press down.
-
-
-
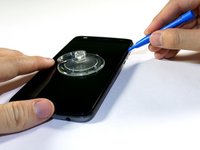
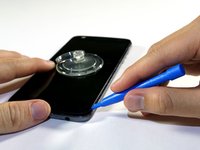
Pry the screen by wedging the plastic opening tool under the screen at the charging port.
-
Work your way around the screen with the plastic opening tool.
-
-
-
crwdns2935267:0crwdne2935267:0Plastic Cards$2.99
-
Use a suction cup to lift up screen from left to right.
-
-
-
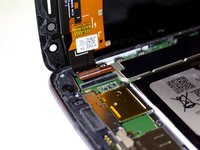
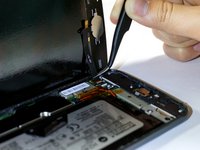
Identify ribbon connector at the top right of the phone.
-
Pry the black locking bar up gently with a plastic opening tool.
-
Remove the ribbon wires by pulling them out of the connector with a tweezer.
-
-
crwdns2935267:0crwdne2935267:0Tweezers$4.99
-
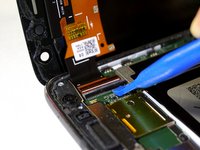
Identify the ribbon cable, located at the bottom right of the phone.
-
If present, remove kapton (orange) tape covering the cable connector.
-
Flip up the small locking flap on the ZIF connector and use tweezers to slide the cable straight out of its socket.
-
-
-
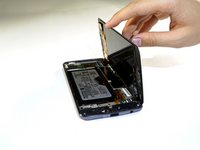
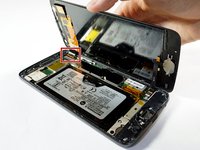
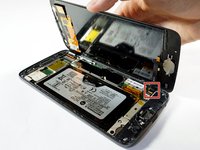
Lift the screen from the phone to completely detach.
-
-
-
Apply an iOpener to the bottom edge of the display assembly for about a minute to loosen the adhesive beneath the fingerprint sensor.
-
-
-
Carefully pry off the fingerprint sensor by lifting it with the edge of an opening pick.
-
-
crwdns2935267:0crwdne2935267:0Tweezers$4.99
-
Remove the fingerprint sensor with a pair of tweezers.
Thanks for the great guide. I had to use my low watt heat gun, sparingly. Also lots of glue to remove and then re-apply. Really good pictures helped.
-


Compare your new replacement part to the original part—you may need to transfer any remaining components or remove adhesive backings from the new part before installing.
To reassemble your device, follow the above steps in reverse order.
Take your e-waste to an R2 or e-Stewards certified recycler.
Repair didn’t go as planned? Check out our Answers community for troubleshooting help.
crwdns2935221:0crwdne2935221:0
crwdns2935229:027crwdne2935229:0

crwdns2915084:0crwdne2915084:0

Cal Poly, Team S19-G5, Livingston Winter 2018 crwdns2935289:0Cal Poly, Team S19-G5, Livingston Winter 2018crwdne2935289:0
CPSU-LIVINGSTON-W18S19G5
crwdns2931471:04crwdne2931471:0
crwdns2935297:030crwdne2935297:0
crwdns2947412:09crwdne2947412:0
This is a guide for disassembly only. There are a few further steps required to replace front,,,
The locking bar came completly off the phone. Is there a way to attach it back? I sure hope so or I’m screwed. Thanks
nice man! i did this as well, i used paper card out of a deck of cards. works well BUT! look at where the cables run from your home botton/ fingerprint button and from you screen. i think i dammaged my home button by forcing my card pas the cable ripping it out of the motherboard.
Anyone have a link to a suitable stand alone fingerprint/home button adhesive? Maybe the adhesive pack sold here has it included but not sure. Ordered from another site and it wasn’t included. Can somebody confirm or provide another compatible adhesive/seal substitute?
anyone else having a problem with the replacement screen not fitting? it seems like there is a bulge in the middle preventing the adhesive from keeping the screen attached to the frame on either side (top and bottom seals fine)
I have the same problem with mine……does anyone have a solution , that doesn't involve buying another screen
It is the battery ! Replace it before you assemble it. I made that mistake and it wasn't good. The battery swells with age as it wears out . It will keep the screen from being level and it will crack it .
Completed a screen replacement, but I have the same problem mentioned above. The left side of the screen doesn’t want to stay down and attached. I’m suspecting maybe the battery is slightly swollen. Only way to know for sure is to take it back apart and try to replace the battery as well (high risk).
Hi. I have a question. I have broken LCD on my MOTO Z2 play. Now I bought a new LCD and the LCD doesn´t work properly. Can be a problem with different model of LCD? The screen lights up but touching is not working? I noticed that there are different channels on the flex cable: Can be a different flex cable problem with working of touchscreen? Thanks for reply. David.