crwdns2933423:0crwdne2933423:0

Motorola Moto Z Play Screen Replacement

crwdns2942213:0crwdne2942213:0

  1. Motorola Moto Z Play Screen Replacement, Display Assembly: crwdns2935265:01crwdnd2935265:01crwdnd2935265:01crwdne2935265:0
    • Power your phone off before you begin.

    • If possible, drain the battery before disassembly. When the battery is charged, there's increased risk of a dangerous thermal event if the battery is overheated or damaged during repairs.

    • If your display is cracked, completely cover it with packing tape to contain the glass shards and avoid injury.

  2. Motorola Moto Z Play Screen Replacement: crwdns2935265:02crwdnd2935265:01crwdnd2935265:01crwdne2935265:0
    • Prepare an iOpener and heat the front of the phone along its left edge for about two minutes, or until it's slightly too hot to touch. This will help soften the adhesive securing the display.

    • You may need to reheat and reapply the iOpener several times to get the phone warm enough. Follow the iOpener instructions to avoid overheating.

    • A hair dryer, heat gun, or hot plate may also be used, but be careful not to overheat the phone—the display and internal battery are both susceptible to heat damage.

  3. Motorola Moto Z Play Screen Replacement: crwdns2935265:03crwdnd2935265:01crwdnd2935265:03crwdne2935265:0 Motorola Moto Z Play Screen Replacement: crwdns2935265:03crwdnd2935265:02crwdnd2935265:03crwdne2935265:0 Motorola Moto Z Play Screen Replacement: crwdns2935265:03crwdnd2935265:03crwdnd2935265:03crwdne2935265:0
    • In the following steps, you will separate the display assembly from the Moto Z Play's chassis.

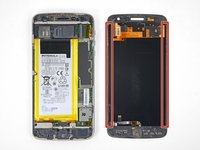
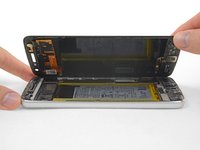
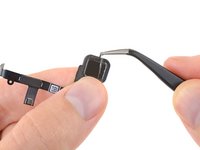
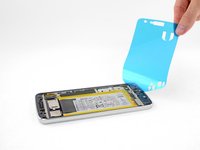
    • For reference, refer to the first image, showing the back of the display assembly (right) after it has been removed from the phone (left).

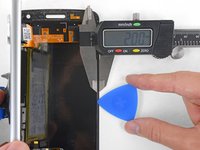
    • If you plan to re-use the display assembly, pay particular attention to the side edges. When slicing through the glue in this area, you must be careful to insert your tool less than 2 mm, or your tool will come in contact with the display panel and damage it.

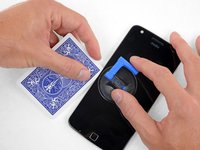
    • Playing cards are a safer, but much slower, prying tool. The soft paper cards are less likely to damage the display panel, which is good news if you plan to reuse it.

  4. Motorola Moto Z Play Screen Replacement: crwdns2935265:04crwdnd2935265:01crwdnd2935265:03crwdne2935265:0 Motorola Moto Z Play Screen Replacement: crwdns2935265:04crwdnd2935265:02crwdnd2935265:03crwdne2935265:0 Motorola Moto Z Play Screen Replacement: crwdns2935265:04crwdnd2935265:03crwdnd2935265:03crwdne2935265:0
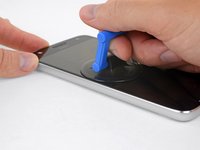
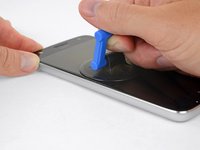
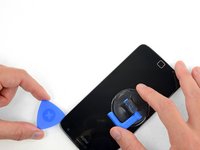
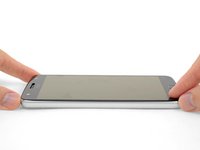
    • Apply a suction cup to the display, near the middle of the left edge.

    • Pull up on the suction cup with firm, constant pressure to create a slight gap between the front panel and rear case.

    • If the screen is cracked, the suction cup may not stick. Try lifting it with strong tape, or superglue the suction cup in place and allow it to cure so you can proceed.

    • This may require a significant amount of force, but you only need to open a very slight gap with the suction cup to insert your tool.

    • If you have trouble, apply more heat to further soften the adhesive, and try again. The adhesive cools very fast, so you may need to heat it repeatedly.

  5. Motorola Moto Z Play Screen Replacement: crwdns2935265:05crwdnd2935265:01crwdnd2935265:01crwdne2935265:0
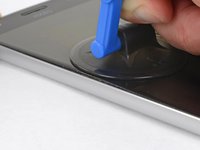
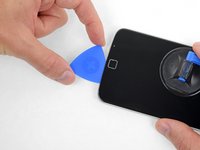
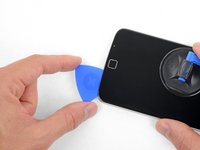
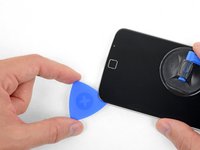
    • Insert an opening pick (or playing card) into the gap you opened behind the display.

  6. Motorola Moto Z Play Screen Replacement: crwdns2935265:06crwdnd2935265:01crwdnd2935265:03crwdne2935265:0 Motorola Moto Z Play Screen Replacement: crwdns2935265:06crwdnd2935265:02crwdnd2935265:03crwdne2935265:0 Motorola Moto Z Play Screen Replacement: crwdns2935265:06crwdnd2935265:03crwdnd2935265:03crwdne2935265:0
    • Slide the tool all along the left edge of the phone to slice through the adhesive securing the display.

  7. Motorola Moto Z Play Screen Replacement: crwdns2935265:07crwdnd2935265:01crwdnd2935265:01crwdne2935265:0
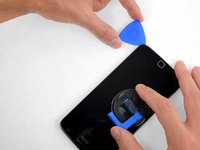
    • Heat the front of the phone between the display and the lower edge to soften the adhesive underneath.

  8. Motorola Moto Z Play Screen Replacement: crwdns2935265:08crwdnd2935265:01crwdnd2935265:03crwdne2935265:0 Motorola Moto Z Play Screen Replacement: crwdns2935265:08crwdnd2935265:02crwdnd2935265:03crwdne2935265:0 Motorola Moto Z Play Screen Replacement: crwdns2935265:08crwdnd2935265:03crwdnd2935265:03crwdne2935265:0
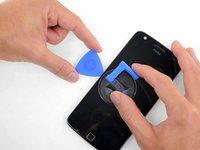
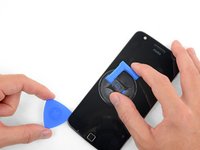
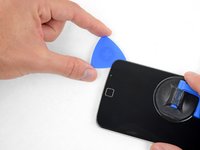
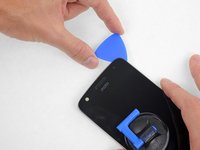
    • Slice through the glue under the lower bezel, being careful not to damage the fingerprint sensor.

    • Slide or roll your tool past the lower edge of the fingerprint sensor and continue to the other side. Do not pry directly underneath the sensor.

    • If you plan to re-use the display, be careful not to slice or pry at the display panel. Refer to this image to help identify the glued areas while avoiding the display panel (highlighted in red).

  9. Motorola Moto Z Play Screen Replacement: crwdns2935265:09crwdnd2935265:01crwdnd2935265:03crwdne2935265:0 Motorola Moto Z Play Screen Replacement: crwdns2935265:09crwdnd2935265:02crwdnd2935265:03crwdne2935265:0 Motorola Moto Z Play Screen Replacement: crwdns2935265:09crwdnd2935265:03crwdnd2935265:03crwdne2935265:0
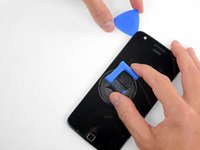
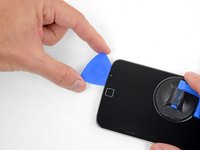
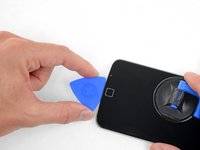
    • Continue separating the glue underneath the rest of the lower bezel.

  10. Motorola Moto Z Play Screen Replacement: crwdns2935265:010crwdnd2935265:01crwdnd2935265:01crwdne2935265:0
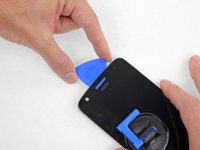
    • Heat the right edge of the phone to soften the adhesive securing the right edge of the display.

  11. Motorola Moto Z Play Screen Replacement: crwdns2935265:011crwdnd2935265:01crwdnd2935265:02crwdne2935265:0 Motorola Moto Z Play Screen Replacement: crwdns2935265:011crwdnd2935265:02crwdnd2935265:02crwdne2935265:0
    • Slide your tool along the right edge of the phone to separate the glue securing the display.

  12. Motorola Moto Z Play Screen Replacement: crwdns2935265:012crwdnd2935265:01crwdnd2935265:01crwdne2935265:0
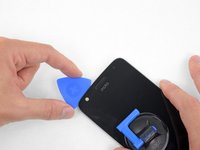
    • Heat the front of the phone between the display and the top edge.

  13. Motorola Moto Z Play Screen Replacement: crwdns2935265:013crwdnd2935265:01crwdnd2935265:03crwdne2935265:0 Motorola Moto Z Play Screen Replacement: crwdns2935265:013crwdnd2935265:02crwdnd2935265:03crwdne2935265:0 Motorola Moto Z Play Screen Replacement: crwdns2935265:013crwdnd2935265:03crwdnd2935265:03crwdne2935265:0
    • Insert your tool at the top right corner of the phone, and begin to slide it underneath the top bezel to separate the glue.

    • As before, if you want to re-use the display, don't insert the tool far enough to touch the display panel.

    • When your tool just passes the left edge of the earpiece speaker, stop.

    • Slide or roll your tool over the top of the flash module for the selfie camera to avoid damaging it.

  14. Motorola Moto Z Play Screen Replacement: crwdns2935265:014crwdnd2935265:01crwdnd2935265:02crwdne2935265:0 Motorola Moto Z Play Screen Replacement: crwdns2935265:014crwdnd2935265:02crwdnd2935265:02crwdne2935265:0
    • If the display remains stuck, re-heat and slice the adhesive repeatedly as needed.

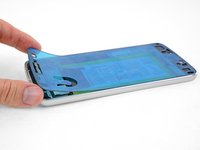
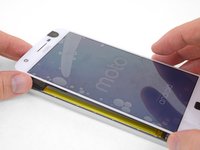
    • Lift the display from the left edge and swing it open, away from the phone.

  15. Motorola Moto Z Play Screen Replacement: crwdns2935265:015crwdnd2935265:01crwdnd2935265:02crwdne2935265:0 Motorola Moto Z Play Screen Replacement: crwdns2935265:015crwdnd2935265:02crwdnd2935265:02crwdne2935265:0
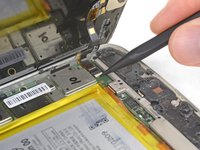
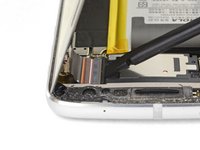
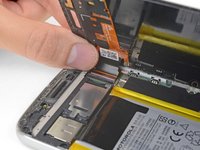
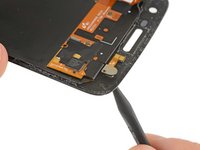
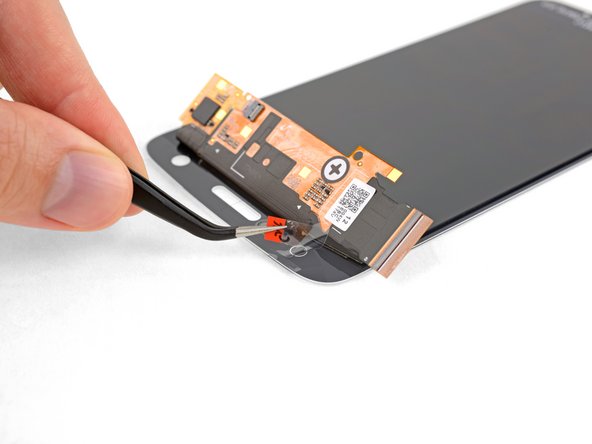
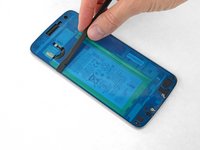
    • While holding the display open, use the point of a spudger to pry up the locking tab on the fingerprint sensor cable's ZIF connector.

  16. Motorola Moto Z Play Screen Replacement: crwdns2935265:016crwdnd2935265:01crwdnd2935265:02crwdne2935265:0 Motorola Moto Z Play Screen Replacement: crwdns2935265:016crwdnd2935265:02crwdnd2935265:02crwdne2935265:0
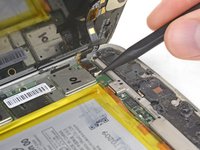
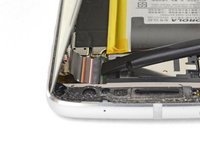
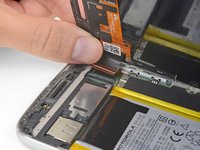
    • At the opposite end of the phone, use your spudger to flip open the locking tab on the display cable connector.

  17. Motorola Moto Z Play Screen Replacement: crwdns2935265:017crwdnd2935265:01crwdnd2935265:02crwdne2935265:0 Motorola Moto Z Play Screen Replacement: crwdns2935265:017crwdnd2935265:02crwdnd2935265:02crwdne2935265:0
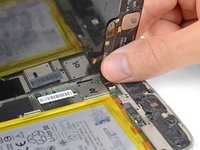
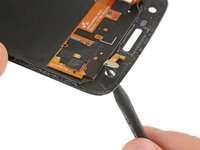
    • Gently pull the fingerprint sensor cable to slide it out of its socket, disconnecting it from the motherboard.

  18. Motorola Moto Z Play Screen Replacement: crwdns2935265:018crwdnd2935265:01crwdnd2935265:02crwdne2935265:0 Motorola Moto Z Play Screen Replacement: crwdns2935265:018crwdnd2935265:02crwdnd2935265:02crwdne2935265:0
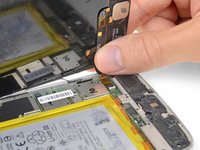
    • Gently pull the display cable to slide it out of its socket on the motherboard.

  19. Motorola Moto Z Play Screen Replacement: crwdns2935265:019crwdnd2935265:01crwdnd2935265:01crwdne2935265:0
    • Remove the display assembly.

  20. Motorola Moto Z Play Screen Replacement, Display Components: crwdns2935265:020crwdnd2935265:01crwdnd2935265:01crwdne2935265:0
    • If your replacement display does not already include a flash assembly and fingerprint sensor, complete the following steps to transfer those components from your old display to your new display.

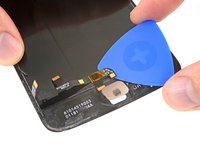
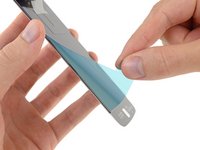
    • Apply heat for 2-3 minutes to the bezel area below the display on your old display assembly, in order to soften the adhesive securing the fingerprint sensor.

  21. Motorola Moto Z Play Screen Replacement: crwdns2935265:021crwdnd2935265:01crwdnd2935265:02crwdne2935265:0 Motorola Moto Z Play Screen Replacement: crwdns2935265:021crwdnd2935265:02crwdnd2935265:02crwdne2935265:0
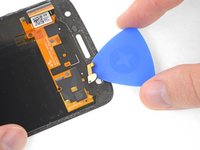
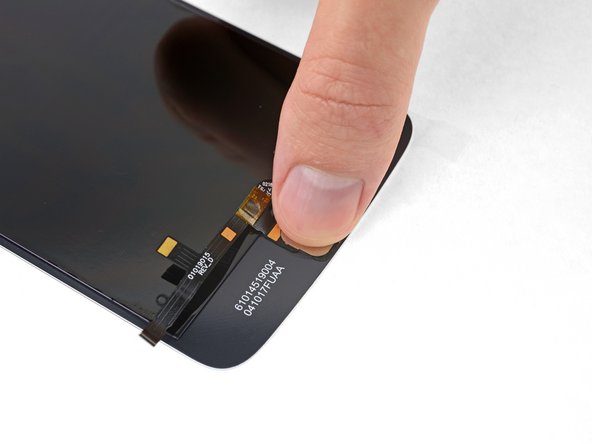
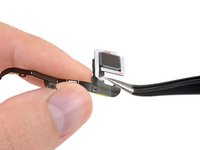
    • Using your finger, press firmly on the outward-facing side of the fingerprint sensor until it separates from the display assembly.

  22. Motorola Moto Z Play Screen Replacement: crwdns2935265:022crwdnd2935265:01crwdnd2935265:02crwdne2935265:0 Motorola Moto Z Play Screen Replacement: crwdns2935265:022crwdnd2935265:02crwdnd2935265:02crwdne2935265:0
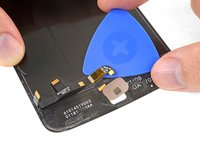
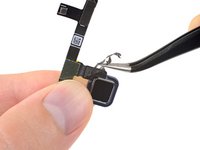
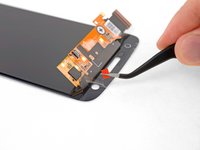
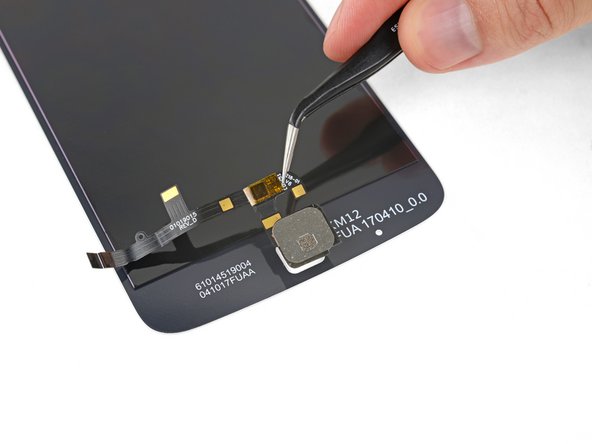
    • Slide an opening pick underneath the fingerprint sensor's flex cable, and carefully cut through the adhesive securing it in place.

    • Be careful not to damage the flex cable. If necessary, apply more heat to further soften the adhesive.

  23. Motorola Moto Z Play Screen Replacement: crwdns2935265:023crwdnd2935265:01crwdnd2935265:01crwdne2935265:0
    • Remove the fingerprint sensor from the old display and set it aside.

  24. Motorola Moto Z Play Screen Replacement: crwdns2935265:024crwdnd2935265:01crwdnd2935265:01crwdne2935265:0
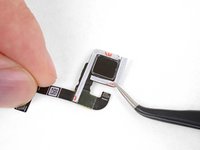
    • Apply heat for 2-3 minutes to the top bezel area above the display on your old display assembly, in order to soften the adhesive securing the front camera flash.

  25. Motorola Moto Z Play Screen Replacement: crwdns2935265:025crwdnd2935265:01crwdnd2935265:02crwdne2935265:0 Motorola Moto Z Play Screen Replacement: crwdns2935265:025crwdnd2935265:02crwdnd2935265:02crwdne2935265:0
    • Use the point of a spudger to push the outward-facing side of the camera flash until it separates from the display assembly.

  26. Motorola Moto Z Play Screen Replacement: crwdns2935265:026crwdnd2935265:01crwdnd2935265:02crwdne2935265:0 Motorola Moto Z Play Screen Replacement: crwdns2935265:026crwdnd2935265:02crwdnd2935265:02crwdne2935265:0
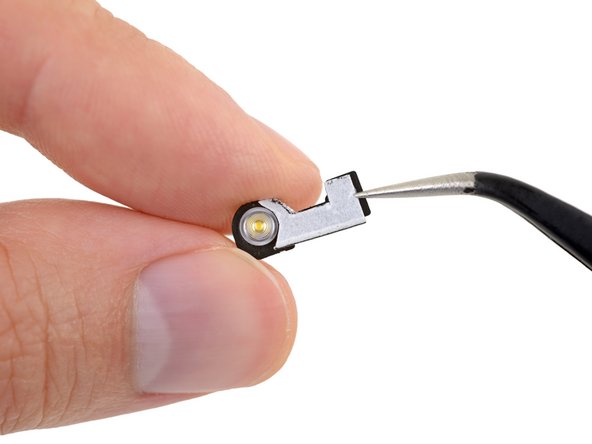
    • Slide an opening pick underneath the flash flex cable, and carefully cut through the adhesive securing it in place.

    • Remove the front camera flash and set it aside.

  27. Motorola Moto Z Play Screen Replacement: crwdns2935265:027crwdnd2935265:01crwdnd2935265:03crwdne2935265:0 Motorola Moto Z Play Screen Replacement: crwdns2935265:027crwdnd2935265:02crwdnd2935265:03crwdne2935265:0 Motorola Moto Z Play Screen Replacement: crwdns2935265:027crwdnd2935265:03crwdnd2935265:03crwdne2935265:0
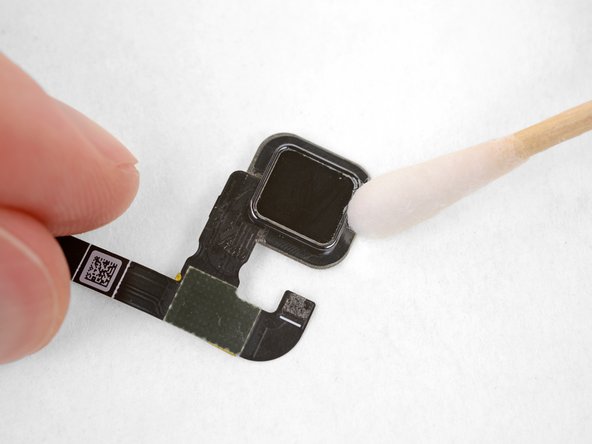
    • Carefully peel away and remove any remaining old adhesive from the fingerprint sensor.

    • For best results, clean the adhered areas with isopropyl alcohol to help prep the surface for the new adhesive.

  28. Motorola Moto Z Play Screen Replacement: crwdns2935265:028crwdnd2935265:01crwdnd2935265:01crwdne2935265:0
    • Remove any remaining adhesive from the flash assembly as well. If desired, clean it thoroughly with isopropyl alcohol.

  29. Motorola Moto Z Play Screen Replacement: crwdns2935265:029crwdnd2935265:01crwdnd2935265:03crwdne2935265:0 Motorola Moto Z Play Screen Replacement: crwdns2935265:029crwdnd2935265:02crwdnd2935265:03crwdne2935265:0 Motorola Moto Z Play Screen Replacement: crwdns2935265:029crwdnd2935265:03crwdnd2935265:03crwdne2935265:0
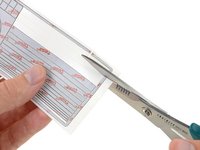
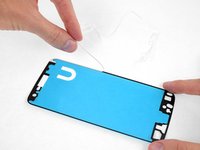
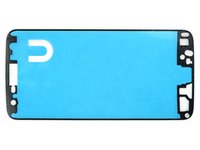
    • Cut two pieces of L-shaped double-sided adhesive tape, and stick them firmly to the perimeter of the fingerprint sensor as shown.

  30. Motorola Moto Z Play Screen Replacement: crwdns2935265:030crwdnd2935265:01crwdnd2935265:02crwdne2935265:0 Motorola Moto Z Play Screen Replacement: crwdns2935265:030crwdnd2935265:02crwdnd2935265:02crwdne2935265:0
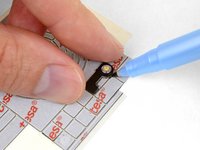
    • Use the flash assembly and a fine-point pen or marker to trace out an appropriately-sized piece of double-sided adhesive tape.

    • Cut the tape to about the right size and shape and apply it to the front-facing side of the flash assembly.

  31. Motorola Moto Z Play Screen Replacement: crwdns2935265:031crwdnd2935265:01crwdnd2935265:03crwdne2935265:0 Motorola Moto Z Play Screen Replacement: crwdns2935265:031crwdnd2935265:02crwdnd2935265:03crwdne2935265:0 Motorola Moto Z Play Screen Replacement: crwdns2935265:031crwdnd2935265:03crwdnd2935265:03crwdne2935265:0
    • Remove any protective tapes or films from the back of your new display assembly.

  32. Motorola Moto Z Play Screen Replacement: crwdns2935265:032crwdnd2935265:01crwdnd2935265:03crwdne2935265:0 Motorola Moto Z Play Screen Replacement: crwdns2935265:032crwdnd2935265:02crwdnd2935265:03crwdne2935265:0 Motorola Moto Z Play Screen Replacement: crwdns2935265:032crwdnd2935265:03crwdnd2935265:03crwdne2935265:0
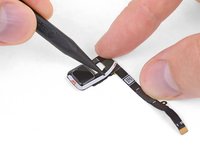
    • Peel off and remove the liner from the adhesive tape on the fingerprint sensor.

    • Place your new display face-down, and carefully lower the fingerprint sensor into position on the back.

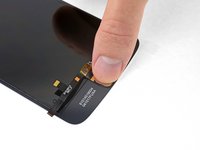
    • Press firmly on the back of the fingerprint sensor for several seconds to allow the adhesive to bond and secure it in place.

  33. Motorola Moto Z Play Screen Replacement: crwdns2935265:033crwdnd2935265:01crwdnd2935265:01crwdne2935265:0
    • Peel away the liner from the adhesive tape on the flash assembly, and press the flash into place on the back of the new display.

    • Be sure to install the flash assembly in its original, horizontal alignment, or the copper pads on the back won't line up with the spring contacts in the phone, and your flash won't work.

  34. Motorola Moto Z Play Screen Replacement, Display Installation: crwdns2935265:034crwdnd2935265:01crwdnd2935265:03crwdne2935265:0 Motorola Moto Z Play Screen Replacement, Display Installation: crwdns2935265:034crwdnd2935265:02crwdnd2935265:03crwdne2935265:0 Motorola Moto Z Play Screen Replacement, Display Installation: crwdns2935265:034crwdnd2935265:03crwdnd2935265:03crwdne2935265:0
    • Peel away and remove all the old display adhesive from the body of your phone.

    • If you're reinstalling your existing display, remove all the old adhesive from that as well.

    • Use the point of your spudger to scour away and remove any smaller bits of adhesive that remain stuck.

    • Be extremely careful not to accidentally puncture the battery with your spudger.

    • For best results, clean the area underneath the removed adhesive with isopropyl alcohol to help prep the surface so the new adhesive bonds more strongly.

  35. Motorola Moto Z Play Screen Replacement: crwdns2935265:035crwdnd2935265:01crwdnd2935265:02crwdne2935265:0 Motorola Moto Z Play Screen Replacement: crwdns2935265:035crwdnd2935265:02crwdnd2935265:02crwdne2935265:0
    • Some pre-cut adhesive sheets for the display contain up to three layers: a plastic liner (usually blue), an adhesive layer in the middle (black), and a wax paper liner (white).

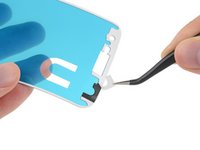
    • If yours came with a paper liner, peel it away and remove it.

  36. Motorola Moto Z Play Screen Replacement: crwdns2935265:036crwdnd2935265:01crwdnd2935265:03crwdne2935265:0 Motorola Moto Z Play Screen Replacement: crwdns2935265:036crwdnd2935265:02crwdnd2935265:03crwdne2935265:0 Motorola Moto Z Play Screen Replacement: crwdns2935265:036crwdnd2935265:03crwdnd2935265:03crwdne2935265:0
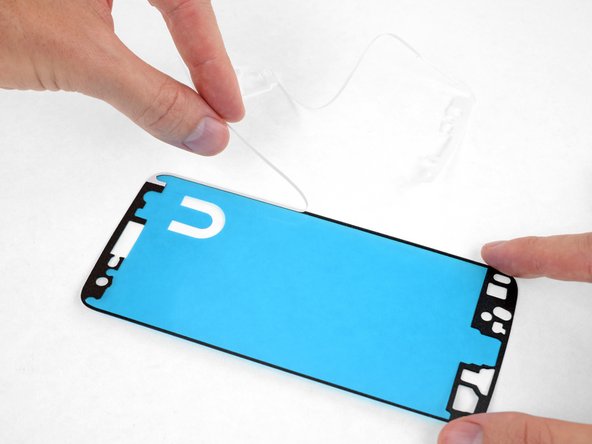
    • Peel off and discard any remaining paper liner, exposing the adhesive on one side.

    • Before you continue, the adhesive sheet should look like the third image.

  37. Motorola Moto Z Play Screen Replacement: crwdns2935265:037crwdnd2935265:01crwdnd2935265:02crwdne2935265:0 Motorola Moto Z Play Screen Replacement: crwdns2935265:037crwdnd2935265:02crwdnd2935265:02crwdne2935265:0
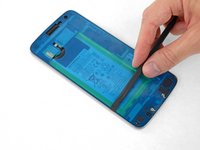
    • Hold the adhesive sheet with the exposed adhesive facing down, and carefully align it into the lower edge of the phone.

    • Make sure the adhesive sheet is oriented correctly—the edge with multiple holes lines up with the bottom edge, and the rectangular cutout for the earpiece speaker lines up at the top.

    • When it's correctly aligned, lower the rest of the adhesive sheet into the phone.

  38. Motorola Moto Z Play Screen Replacement: crwdns2935265:038crwdnd2935265:01crwdnd2935265:03crwdne2935265:0 Motorola Moto Z Play Screen Replacement: crwdns2935265:038crwdnd2935265:02crwdnd2935265:03crwdne2935265:0 Motorola Moto Z Play Screen Replacement: crwdns2935265:038crwdnd2935265:03crwdnd2935265:03crwdne2935265:0
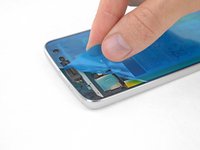
    • Firmly press the adhesive into place.

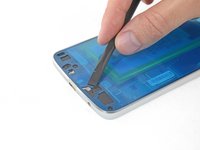
    • Use the flat edge of your spudger to press along the edges and hard-to-reach areas.

    • Be very careful not to accidentally puncture the battery with your spudger.

  39. Motorola Moto Z Play Screen Replacement: crwdns2935265:039crwdnd2935265:01crwdnd2935265:02crwdne2935265:0 Motorola Moto Z Play Screen Replacement: crwdns2935265:039crwdnd2935265:02crwdnd2935265:02crwdne2935265:0
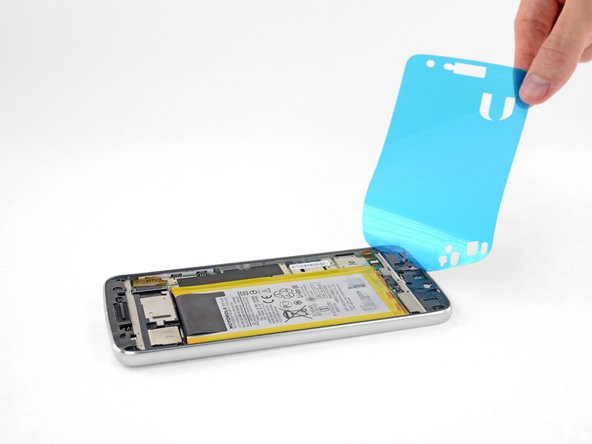
    • Peel off and discard the plastic liner, exposing the display adhesive.

  40. Motorola Moto Z Play Screen Replacement: crwdns2935265:040crwdnd2935265:01crwdnd2935265:02crwdne2935265:0 Motorola Moto Z Play Screen Replacement: crwdns2935265:040crwdnd2935265:02crwdnd2935265:02crwdne2935265:0
    • Before sealing the display in place, connect the flex cables for the display and fingerprint sensor, and then power your phone on.

    • Test all functions to make sure your repair was successful before sealing up the display.

    • When fully inserted, the white line across each flex cable should be even with the markings on the motherboard on each side of the cable.

    • Do not remove, insert, or adjust the cables while the phone is powered on.

    • The cables can be tricky to align and install. Be sure not to touch the gold contacts on the back, or your finger oils may cause a malfunction. If you do accidentally touch them, wipe them gently with isopropyl alcohol.

  41. Motorola Moto Z Play Screen Replacement: crwdns2935265:041crwdnd2935265:01crwdnd2935265:01crwdne2935265:0
    • When your repair is tested and complete, press the display firmly into place and remove any plastic liners from the screen.

    • To help the display adhesive bond more securely, heat the perimeter of the display and then place the phone face-up under a heavy stack of books for 30 minutes.

    • Don't rest the phone on its camera bump while doing this, or the uneven pressure may prevent your display from adhering correctly. Place a couple thin books under the phone on either side of the camera bump to elevate it and keep the pressure in the right place.

crwdns2915888:0crwdne2915888:0

Take your e-waste to an R2 or e-Stewards certified recycler.

Repair didn’t go as planned? Check out our Answers community for troubleshooting help.

crwdns2935229:054crwdne2935229:0

Jeff Suovanen

crwdns2935283:008/06/13crwdne2935283:0

427,889 crwdns2915208:0crwdne2915208:0

crwdns2935297:0259crwdne2935297:0

crwdns2915084:0crwdne2915084:0

iFixit crwdns2935289:0iFixitcrwdne2935289:0

Staff

crwdns2931471:0135crwdne2931471:0

crwdns2935297:016,734crwdne2935297:0

crwdns2944067:013crwdne2944067:0

What kind of “3M VHB Double Sided Tape” is needed?

Could you link to the specific one in the parts list?

Emil Co - crwdns2934203:0crwdne2934203:0

I am also confused about the Double Sided Tape. My kit seems to have come with everything I need except for this double sided tape!

Thomas Trahey - crwdns2934203:0crwdne2934203:0

i with that i had seen this before i let some third party company ruin my otherwise perfectly good phone

Christopher MacDonald - crwdns2934203:0crwdne2934203:0

Followed exactly as written and successfully replaced screen on my water damaged Moto Z Play. Be sure to test everything before sealing the screen to adhesive. I didn’t test the camera prior to sealing the screen and don’t feel like opening it back up! Purchased the $99 kit with screen and tools. Unfortunately, the iOpener didn’t last second time in the microwave and leaked even after waiting 10 minutes per directions.

Alan Ferguson - crwdns2934203:0crwdne2934203:0

Screen successfully replaced. I managed to crack the plastic backing plate of the front-facing LED, but that doesn’t matter. The last bit about the heavy stack of books was rather silly in my opinion. I heated the screen with a hairdryer and pressed the phone screen down on a soft mouse mat. I don’t a have microwave, so I couldn’t use the provided iOpener at all.

Jyrki Partanen - crwdns2934203:0crwdne2934203:0

crwdns2917038:0crwdne2917038:0

crwdns2936625:0crwdne2936625:0:

crwdns2936751:024crwdne2936751:0 0

crwdns2936753:07crwdne2936753:0 21

crwdns2936753:030crwdne2936753:0 95

crwdns2942667:0crwdne2942667:0 40,531