crwdns2915892:0crwdne2915892:0
Full Device Name: Motorola Moto Stylus 4G (2023)
Model Number: XT2317
Alternate Name: Moto Stylus 4G (2023)
Objective: This guide aims to provide step-by-step instructions for replacing the battery in the Motorola Moto Stylus 4G (2023).
About the Battery: This device sports a model PG50 lithium ion battery (XT 2317) with a 5000 mAh capacity.
Device Symptoms: If the device begins to show a low battery life, longer charge times, or overheats, then use this guide to replace the battery.
crwdns2942213:0crwdne2942213:0
-
-
Insert an opening pick under the edge of the case and slide it around the edges.
-
Separate the back panel from the rest of the phone.
-
-
-
Remove the seven 4 mm screws from the phone’s top with a Torx T5 screwdriver.
I have a 5G, 2023 model, and that model actually has 8 phillips screws - 2 of which are partially blocked by the back camera. If you have the 5G, you'll need to do Step 3 here before you can get to those two screws.
p.s. For the 5G 2023 model, once you remove the camera lense glass, you'll see 2 additional phillips screws that will aslo need to be removed to remove the midframe. Be very gentle when removing the camera lense glass with the opening pick to avoid breaking, especially for the thin portions around the lenses. I used the pick mostly for picking up the perimeter of the lense glass, then gently pulled up to get it all the way off of the rest of the adhesive. For the screws that were only partially blocked by the lense glass, my phone had some adhesive that was also slightly covering the screws. Rather than remove it, I just peeled it back enough to remove the screws so I wouldn't need to replace the adhesive.
p.p.s. There are 10 phillips screws in total for the 5G 2023 model - 6 that you can access once the back cover/top portion of the yellow battery adhesive is removed and 4 more that you can access once you remove the camera lense glass.
-
-
-
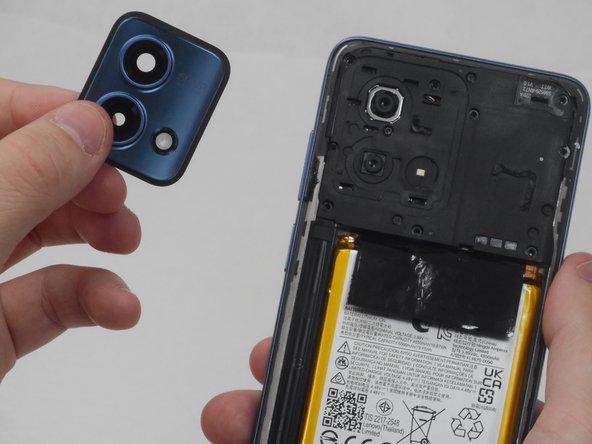
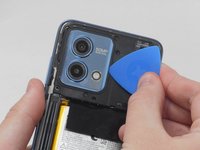
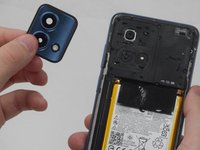
Use the opening pick along the edges to separate the camera lens glass from the board.
-
-
-
-
Remove three 4 mm screws with a Torx T5 screwdriver.
-
-
-
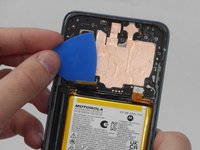
Pry off the top perimeter with an ESD-safe spudger and set it aside.
For the 5G 2023 model, when replacing this piece, there are three very tiny male parts that 'click' into respective tiny female slots in the body of the phone. One is on the left side of the camera lenses, another is at the top in the middle, and the last one is on the far right side. This makes it a bit tricky to replace/you can't just pop it back on. I found it best to align/click in the left side part first and then, carefully, do the same with the top middle one in order to press down on the rest of it and settle it into place for screwing back down. For the 5G model, remember to replace the 4 screws for the camera lense area as well before replacing the camera lense glass!
-
-
-
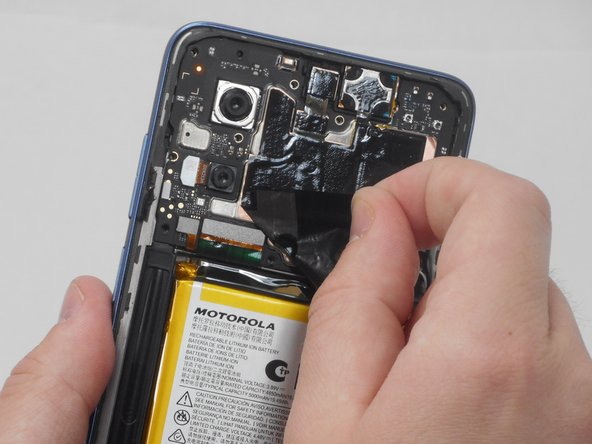
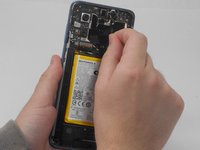
Pull the black tab off of the battery gently with your hand.
For the 5G 2023 model, these black tabs may run down the length of the battery (my phone had two seperate ones) and there is also a tab at the very bottom of the battery. You can lift the top tab(s) from the bottom, just enough to expose the battery. My phone had one of the tabs slightly obscured by the stylus flap guard (long, thin plastic piece to the left of the battery). I used my finger nails to gently lift the guard up a bit, just enough to pull up the tab, but I was careful not to fully remove the stylus guard. Once the battery tab was pulled up, I pressed the stylus guard back into place & did not need to do anything else to it to install the new battery.
-
-
-
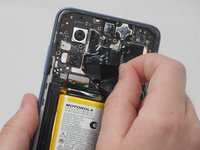
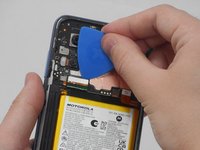
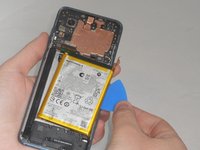
Disconnect the four cables by inserting the opening pick beneath the edge of each.
Important: only 1 of the 4 cables is actually connected to the battery! It should be the cable furthest to the right. Be careful when prying up the battery to avoid damaging the other 3 cables, especially the tiny one on the far left - it's not attached to the battery, although it does look alot like the one that is.
Notes about using ifixit's double-sided adhesive: I don't think it's necessary to use much additional adhesive to secure the battery, unless the adhesive was significantly damaged upon removal/does not keep the battery in place if you turn it over with the back off. That said, I chose to remove the adhesive that was below the old battery & replace it with the fresh set that came with my ifixit replacement battery. For the back cover, which is the most important as it needs adhesive to remain in place, I would recommend not removing any residual adhesive that remains after intially removing the cover. The battery replacement I ordered from ifixit came with a pretty good back cover adhesive, however, it's very easy to mess up the application. The clear blue sheild should be placed on the inside of the back cover with the the sticky side down in order to properly remove the shield once it's in place. Be careful not to let it stick to any other surface, like plastic, before applying or it could get stuck!
-
-
-
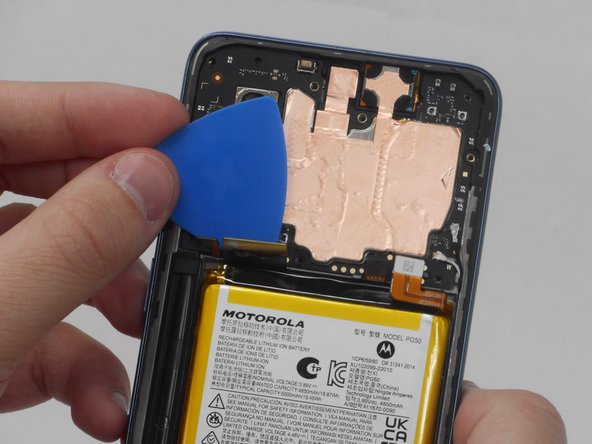
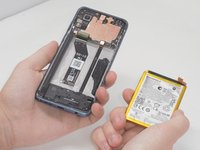
Together with the opening pick and an ESD-safe spudger, remove the old battery.
Okay, this was definitely the most tedious part. For the 5G 2023 model, if you've never had the battery replaced/the adhesive is strong go very slowly here.
It's a bit tough to get the spudger under the battery, but once it's about 1/4 inch under you should have enough leverage to wiggle the battery up enough to wedge the opening pick in along the side of the battery to use both tools and get the battery all the way out. I used the spudger mostly along the very top of the battery (careful to not damage the cables) and then a bit further toward the center since there was a lot of adhesive in the middle.
-


To reassemble your device, follow these instructions in reverse order.
To reassemble your device, follow these instructions in reverse order.
crwdns2935221:0crwdne2935221:0
crwdns2935227:0crwdne2935227:0

crwdns2915084:0crwdne2915084:0

University of Memphis, Team 3-2, Sneed Spring 2024 crwdns2935289:0University of Memphis, Team 3-2, Sneed Spring 2024crwdne2935289:0
UM-SNEED-S24S3G2
crwdns2931471:04crwdne2931471:0
crwdns2935297:06crwdne2935297:0
crwdns2947410:01crwdne2947410:0
Thank you for this guide @camilleholley , it was extrememly helpful. Thankfully, the problem charging my phone (Moto G Stylus 5G, 2023) seems to be resolved with a fresh battery replacement.
>>>For anyone with this phone having problems charging, here's what I was experiencing: (a) battery would charge only with one cable (it was a USB-A to USB-C) (b) battery would drain extremely quickly once charged (c) battery would only charge to about 20% and then lasted for less than 1 hour with minimal to no usage.<<<
Also, for anyone reading this who's about to replace the battery - I recommend getting the battery & a magnetic dry-erase board project mat (~$20 USD) from ifixit. The battery I got came with a repair tool kit, and it had everything I needed to use to remove the back. The magnetic project mat was perfect for keeping the tiny screws in one place, and it even came with a really nice dry erase marker to take notes with (like how many screws go to a certain area or what the name of the removed part is/where it goes).
- You can do this! This was my first time taking this phone apart, and I'm not a professional phone repair person. While it took me a few hours to do (mostly because I was messing around with figuring out adhesives) I'm glad that I decided to save the additional money it would have cost to have someone replace it for me.
I recommend following the first 2 steps for the Moto G Stylus 2021 model FIRST before starting this guide: Motorola Moto G Stylus (2021) Battery Replacement - I left comments for those first 2 steps with some notes about removing, but you will need to use a focused heat tool (iOpener works great) and an opening tool (different from an opening pick) to get the back cover loose before you can insert an opening pick if you've never removed the back before/the adheasive is strong.
M. F. Espinoza - crwdns2934203:0crwdne2934203:0