crwdns2942213:0crwdne2942213:0
-
-
Take the plastic back cover off by either using a plastic Pry tool or simply using your hands. Start from the bottom by the charging port
-
Remove any installed SIM card and memory microSD cards.
-
Push the SIM card into the phone, and the spring eject mechanism should release the card.
-
The microSD memory card(s) may not have an eject mechanism. If so, they must be removed carefully by pushing on the raised edge/bump that is built onto the card. Use your fingernail or a plastic or rubber tool, but not one that will scratch and damage the delicate card.
-
-
-
Unscrew the 3.5mm screws, total of 14, located on the back protective cover by using a T5 Torx screwdriver.
Warning: The SIM card and microSD memory cards MUST BE REMOVED to complete the next step (Step 3 Battery Cover).
If they are not removed before prying away the battery cover, they may be damaged, and important data may be destroyed (cannot be recovered)!!
Failure to remove them will also make removing the battery cover in Step 3 difficult, if not impossible.
-
-
-
-
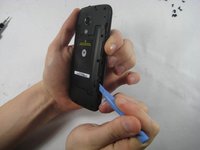
Use a plastic opening tool to remove the protective cover.
-
-
-
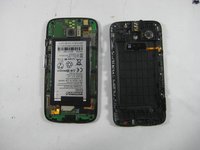
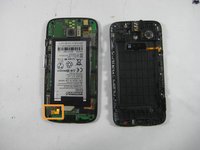
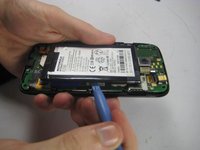
Disconnect the connection between the Battery and the Mother Board by using the Pry tool.
-
-
-
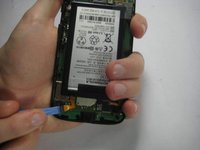
With the battery already disconnected,work around its edge with the pry tool to remove it from the assembly.
-


To reassemble your device, follow these instructions in reverse order.
To reassemble your device, follow these instructions in reverse order.
crwdns2935221:0crwdne2935221:0
crwdns2935229:04crwdne2935229:0
crwdns2915084:0crwdne2915084:0

UMass Dartmouth, Team 5-7, Vijaybhaskar Fall 2014 crwdns2935289:0UMass Dartmouth, Team 5-7, Vijaybhaskar Fall 2014crwdne2935289:0
UMASSD-VIJAYBHASKAR-F14S5G7
crwdns2931471:03crwdne2931471:0
crwdns2935297:08crwdne2935297:0
crwdns2947410:01crwdne2947410:0
Hello!
I have just completed this operation. I would like you to know that my Moto G 1st Generation needed a T4 Torx screwdriver.
Other than that, everything went fine!
Best Wishes,
Bubba G