crwdns2915892:0crwdne2915892:0
The battery on this phone is under the motherboard and will require the removal of the display, few screws, connectors and plastic parts.
Before you begin, download the Rescue and Smart Assistant app to backup your device and diagnose whether your problem is software or hardware related.
If your battery is swollen, take appropriate precautions.
crwdns2942213:0crwdne2942213:0
-
-
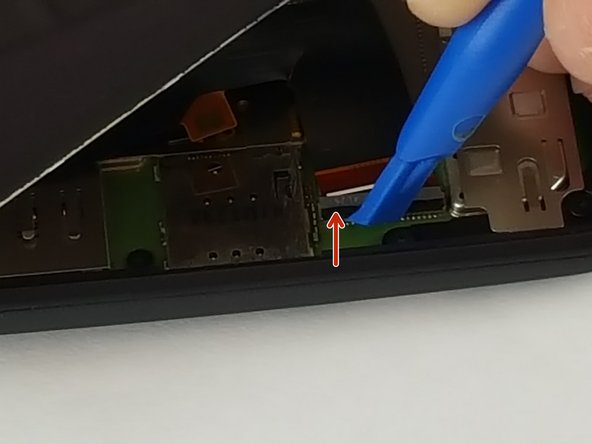
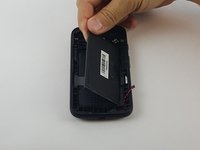
Using the small plastic opening tool, pry and slide all the way around the phone while carefully lifting up on the display.
Do not lift the screen too far or you may tear the LCD connection flexi. Check next images to see where it is, bottom and opposing side to the buttons
-
-
-
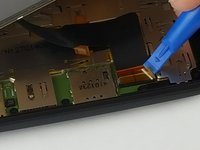
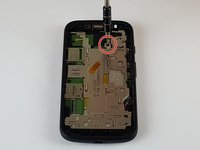
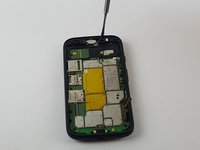
Once display is fully unglued from the frame, carefully lift it up and locate the display connector.
-
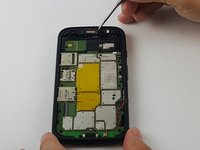
Using the same small plastic tool, carefully remove the yellow tape off the connector.
-
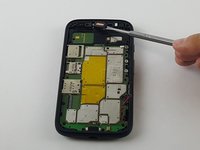
Now carefully undo the black connector lock by lifting it up in the direction of the red arrow.
-
Lastly slide the display cable off the connector. It should easily slide off, if not make sure the black lock is fully unlatched.
Very well put together. Worked fine for me.
A guitar pick will work as well as the plastic tool, but it might be a little harder to work with.
-
-
-
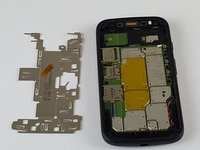
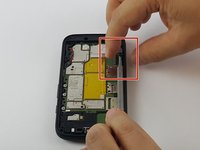
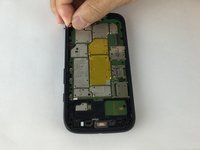
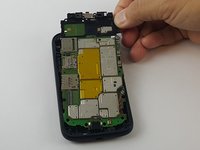
Now that the display is out, remove the aluminum shield off the motherboard.
-
Unscrew the single 4mm screw located on the top using a T4 Torx bit.
-
After screw is out, gently remove the aluminum shield off the motherboard.
-
-
-
-
Using the metal spudger tool, very carefully remove the speaker by first gently prying up on the right side and then the bottom.
You can see a plastic clip on the right, so I understand the justification for prying on the right first. However, when I tried prying on the right, it separated the two halves of the speaker, ruining it. There was also a pad of foam, double sided tape under mine.
If you see in the other side the plastic clip is smaller , I was able to release this clip (the left side one) and in the bottom part of the speaker you can see a little gap when i put my pointy metal spudger and help the speaker slowging going up, it fells a little hard to push because of the magnet in it.
I found I did not need to remove the speaker. I was able to (just barely) reach the screw behind it without removing it. After removing all of the other screws, I loosened that one a little bit at a time while gently prying the motherboard out of the case. Eventually it was all the way removed and I was able to take out the motherboard.
Great tip about not removing the speaker. I, too, managed to remove that screw behind the speaker. I didn’t even need to pry out the motherboard while doing it.
Keith R -
Is the T4 Torx bit the one with the hole in it?
I think you may be referring to a security torx bit. These screws just need standard torx bits, although a security one should work too. Lookup torx on Wikipedia and impress/bore your friends for evermore.
Keith R -
Sir need track diagram for this………… speakers track might be cut….
-
-
-
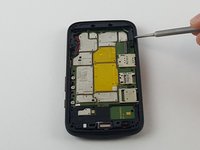
Unscrew the remaining 16- 4mm screws using a T4 Torx bit.
-
-
-
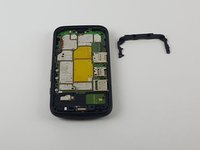
Next remove the plastic C-shaped black plastic frame.
-
Using the metal spudger tool, gently pull up the right corner as indicated and work your way around until it's off the motherboard.
-
-
-
Gently lift up the battery cable connector, it should come out very easy.
-
-
-
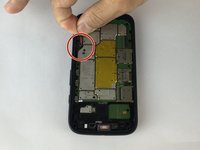
After the battery cable is disconnected from the motherboard, use the metal spudger tool and carefully insert it in the small opening by the speaker and pry the motherboard up enough to fit your finger in between the motherboard and the phone frame.
-
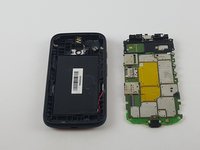
Now just pull the motherboard starting from the top to bottom off the phone case.
-
-
-
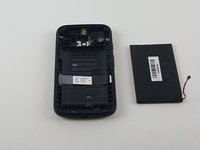
Use a spudger to gently pry up the battery.
-
Obtain a new battery and place it into the plastic casing using double sided tape or whatever is provided with the new battery.
Where did you get a replacement battery? i can't seem to find a retailer that has them
I found it helpful to heat the phone for this step, similar to when removing the display.
-


To reassemble your device, follow these instructions in reverse order.
To reassemble your device, follow these instructions in reverse order.
crwdns2935221:0crwdne2935221:0
crwdns2935229:039crwdne2935229:0
crwdns2915084:0crwdne2915084:0

USF Tampa, Team 12-3, Eyestone Spring 2016 crwdns2935289:0USF Tampa, Team 12-3, Eyestone Spring 2016crwdne2935289:0
USFT-EYESTONE-S16S12G3
crwdns2931471:03crwdne2931471:0
crwdns2935297:014crwdne2935297:0
crwdns2947412:09crwdne2947412:0
Has anyone tried to Dremel it open from the backside? It's a cheap phone and I'd almost rather possibly ruin it than spend 30+ minutes tearing it apart.
My phone came with the display falling out and flopping around. Videos only say how to take it apart. How do I fasten the display back on?
My bettri chanj
My bettri chanj ani problam
my mobile auto shutdown currunt working
Thank you for excellent instructions, especially the photographs.
My screen was already mostly detached due to a ‘puffed’ battery. Where unaffected by dust the original tape secured the screen. I think I will be adding some super glue.
I found a T5 was a snug fit in the screws, snug enough that the screw could be offered up without falling off of the bit.
Step 9: Note the small metal tab that latches under the case - pry this towards the bottom end of the ‘phone and the motherboard falls out.
I spudged my screen off without heating. To reassemble, peel all the old double sided tape off the frame/screen and clean with alcohol. I used B7000 glue to fix the screen back. Great guide! Thanks.
I am having trouble removing the speaker/earpiece. I am concerned about how much pressure to apply with the spud. Any suggestions?
The information is quite good overall. I am disappointed with how difficult Motorola made it to remove a battery that only lasted three years. Throwing the phone away does not encourage me to buy another Motorola product.
Thanks for any help. C. Finch gpcoffg@gmail.com
Dumbest phone design. Battery replacement should always be easy. Good instructions. However, step 5 needs better photos to describe the delicate step. Pretty sure I tore up the speaker. Closer detail on where to pry is needed.