crwdns2915892:0crwdne2915892:0
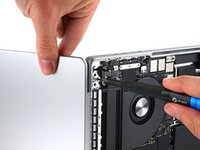
Use this guide to replace the screen in your MacBook Pro 16" 2021.
For your safety, discharge the battery below 25% before disassembling your MacBook. This reduces the risk of fire if the battery is accidentally damaged during the repair. If your battery is swollen, take appropriate precautions.
Note: Replacing your screen disables its True Tone functionality.
crwdns2942213:0crwdne2942213:0
-
crwdns2935267:0crwdne2935267:0Magnetic Project Mat$19.95
-
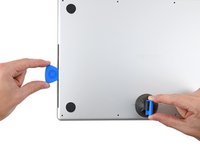
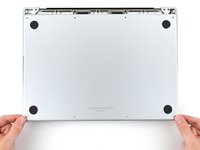
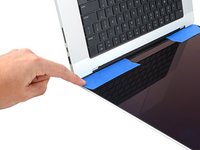
Use a P5 Pentalobe driver to remove eight screws securing the lower case:
-
Four 9.1 mm screws
-
Four 5 mm screws
-
-
-
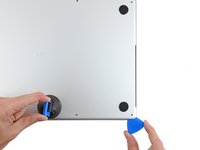
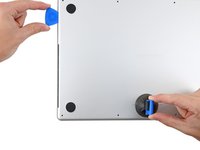
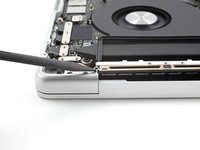
Press a suction handle into place near the front edge of the lower case, between the screw holes.
-
Pull up on the suction handle to create a small gap under the lower case.
-
-
-
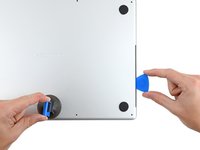
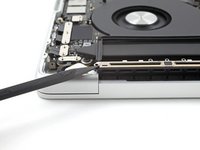
Insert an opening pick into the gap you just created.
-
Slide the opening pick around the nearest corner and then halfway up the side of the MacBook Pro.
-
-
-
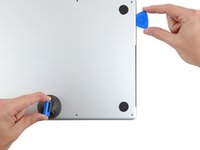
Repeat the previous step on the other side, using an opening pick to to release the second clip.
Terrifying, don't be afraid, give it a good pull, the description above is exactly right.
-
-
-
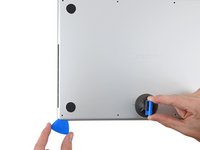
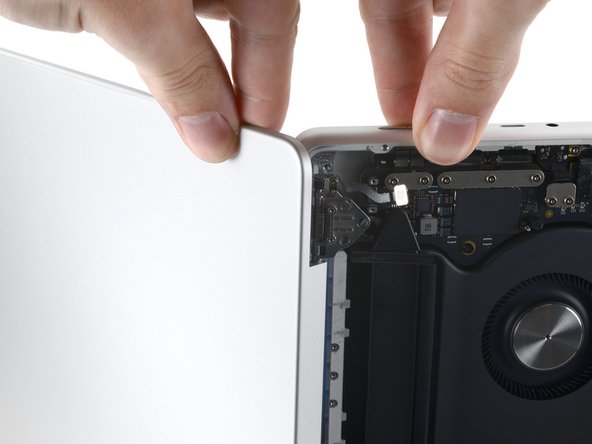
Pull firmly to slide the lower case towards the front edge of the MacBook (away from the hinge area) to separate the last of the clips securing the lower case.
-
Pull first at one corner, then the other.
-
-
-
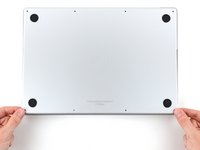
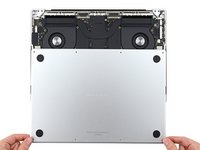
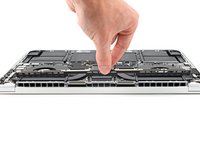
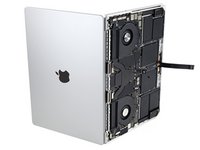
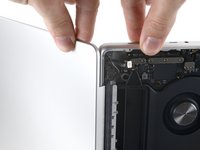
Remove the lower case.
-
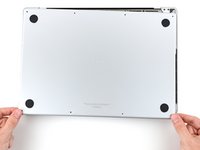
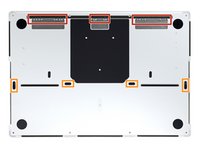
Set it in place and align the sliding clips near the display hinge. Press down and slide the cover toward the hinge. It should stop sliding as the clips engage.
-
When the sliding clips are fully engaged and the lower case looks correctly aligned, press down firmly on the lower case to engage the four hidden clips underneath. You should feel and hear them snap into place.
-
-
-
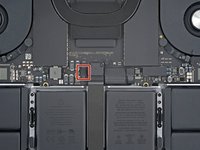
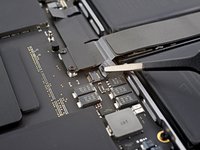
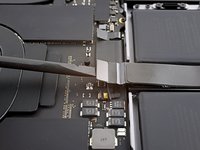
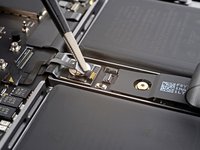
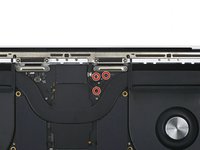
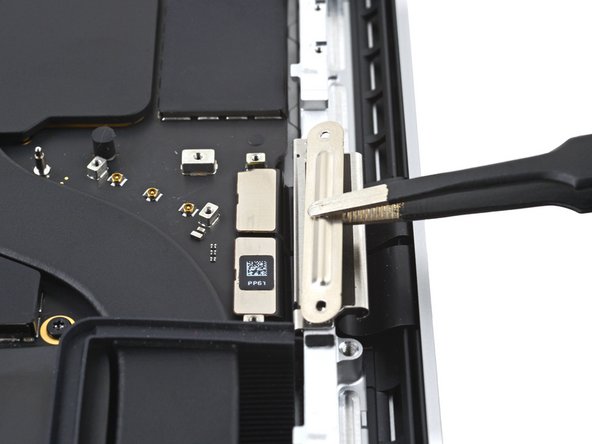
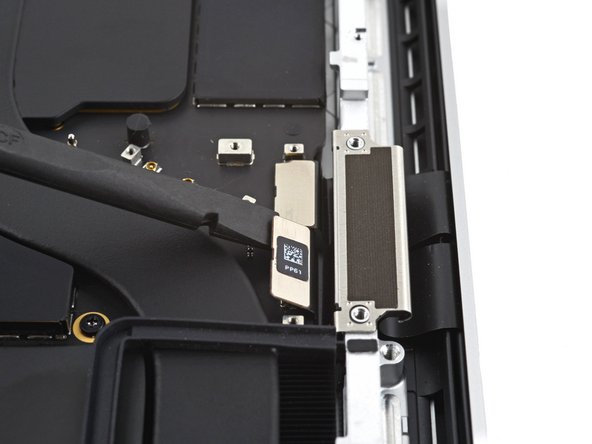
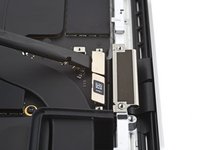
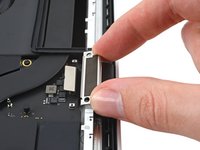
Peel back any tape covering the battery board data cable connector on the logic board.
This photograph does not match my 2021 Macbook Pro. Fortunately the differences do not impact the removal operation.⏎
There is a different arrangement and number and type of chips to the left of the image.One square grey thing nad five rectangular black things ...
Mine does not have the rows of test points above the track pad cable. -
-
-
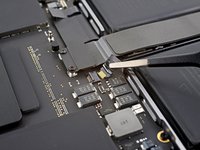
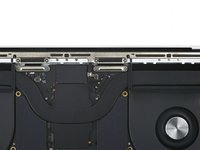
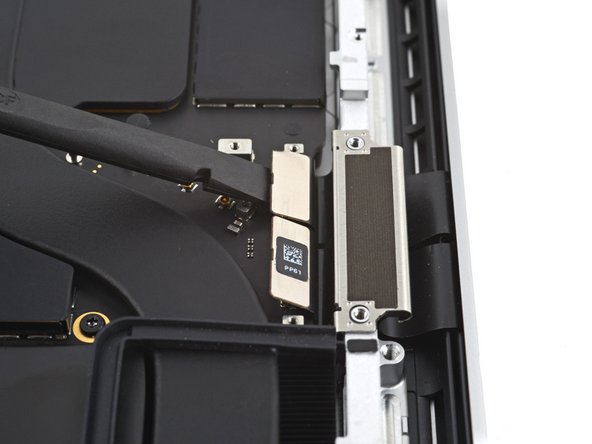
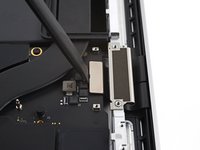
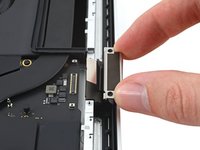
Use a spudger to gently pry up the locking flap on the ZIF connector for the battery board data cable.
This photograph does not match my 2021 Macbook Pro. Fortunately the differences do not impact the removal operation.⏎
There is a different arrangement and number and type of chips to the left of the image.One square grey thing nad five rectangular black things ...
Mine does not have the rows of test points above the track pad cable. -
-
-
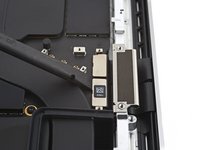
Disconnect the battery board data cable by sliding it out from its socket on the logic board.
-
-
-
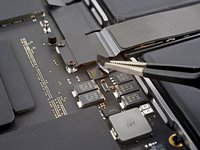
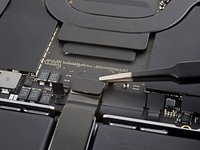
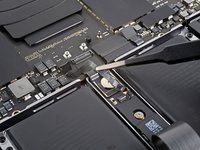
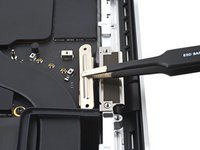
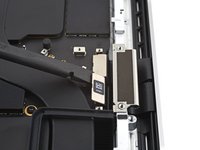
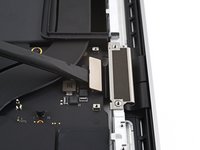
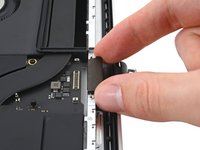
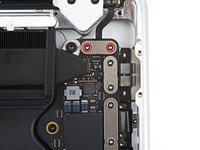
Use a T3 Torx driver to remove the two 2.1 mm‑long screws securing the trackpad cable bracket to the logic board.
Das sind T4 Schrauben bei mir
This photograph does not match my 2021 Macbook Pro. Fortunately the differences do not impact the removal operation.⏎
There is a different arrangement and number and type of chips to the left of the image.One square grey thing nad five rectangular black things ...
Mine does not have the rows of test points above the track pad cable. -
-
crwdns2935267:0crwdne2935267:0Tweezers$4.99
-
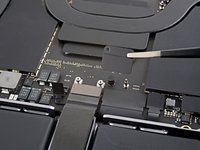
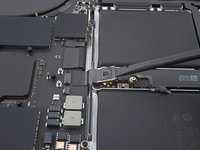
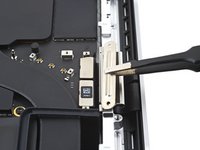
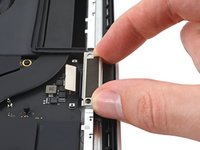
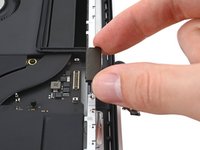
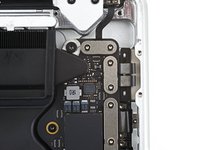
Use tweezers, or your fingers, to remove the trackpad cable bracket.
This photograph does not match my 2021 Macbook Pro. Fortunately the differences do not impact the removal operation.⏎
There is a different arrangement and number and type of chips to the left of the image.One square grey thing nad five rectangular black things ...
Mine does not have the rows of test points above the track pad cable. -
-
-
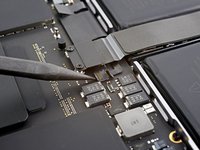
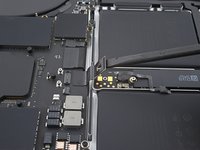
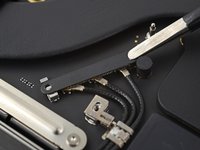
Use the flat end of a spudger to pry up and disconnect the trackpad cable's press connector from the logic board.
This photograph does not match my 2021 Macbook Pro. Fortunately the differences do not impact the removal operation.⏎
There is a different arrangement and number and type of chips to the top/left of the red circle.One square grey thing nad five rectangular black things ...
Mine does not have the rows of test points to the left of the track pad cable. -
-
-
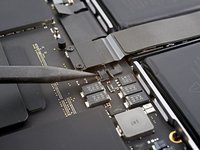
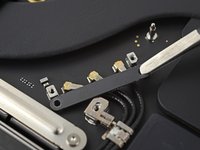
Peel the trackpad cable away from the device, making sure to separate the adhesive.
This photograph does not match my 2021 Macbook Pro. Fortunately the differences do not impact the removal operation.⏎
There is a different arrangement and number and type of chips to the top/left of the red circle.One square grey thing nad five rectangular black things ...
Mine does not have the rows of test points to the left of the track pad cable. -
-
-
Peel back any tape covering the battery board data cable connector under the large pancake screw.
-
-
-
-
Use a spudger to gently pry up the locking flap on the ZIF connector for the battery board data cable.
-
-
-
Disconnect the battery board data cable by sliding it out from its socket on the battery board.
This is SO small - I used a very fine guitar pick to get it to release, none of my tools were small enough.
-
-
-
Slide blunt nose tweezers under areas with adhesive to separate the cable from the device.
-
Remove the battery board data cable.
This photograph does not match my 2021 Macbook Pro. Fortunately the differences do not impact the removal operation.⏎
There is a different arrangement and number and type of chips to the left of the tweezers.One square grey thing nad five rectangular black things ...
-
-
-
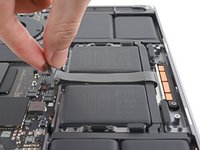
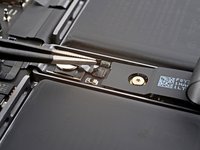
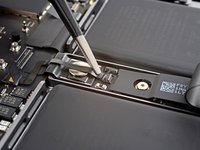
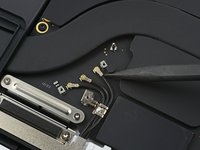
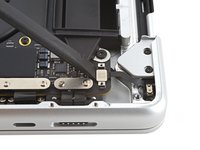
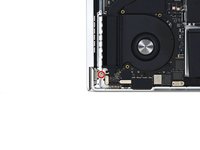
Use a T5 Torx driver to remove the 3.9 mm pancake screw securing the battery power connector.
This photograph does not match my 2021 Macbook Pro. Fortunately the differences do not impact the removal operation.
There is a different arrangement and number and type of chips to the top/left of the red circle.One square grey thing nad five rectangular black things ...
-
-
-
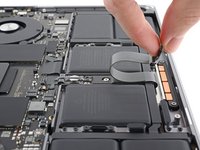
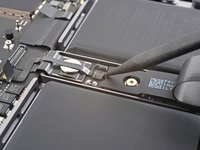
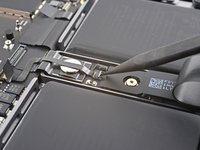
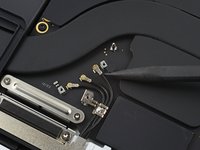
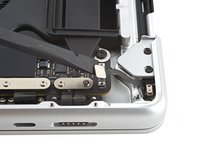
Use a spudger to lift the battery power connector, disconnecting the battery.
is it possible to buy/replace this battery power connector? I broke mine on the logic board side and they are impossible to find. Ofc apple want $900 because the laptop is "modified" after replacing the keyboard :|
The previous image did not match my Macbook Pro, this one does.
Two square grey things, three rectangular smaller black things. :-) -
-
-
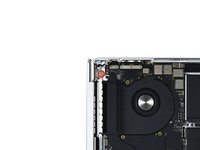
Use a T3 Torx screwdriver to remove the three 2.1 mm screws securing the antenna board bracket and coaxial cable cover to the frame.
-
-
crwdns2935267:0crwdne2935267:0Tweezers$4.99
-
Use tweezers, or your fingers, to remove the cover on top of the antenna bar's coaxial cables.
-
-
-
Use the tip of a spudger to pry up and disconnect the antenna bar's coaxial cable.
-
Repeat for the two other cables.
-
-
-
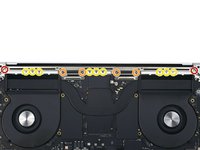
Use a T5 Torx screwdriver to remove the six screws securing the antenna bar to the frame:
-
Two 7.5 mm screws
-
Four 3 mm screws
-
Use a P2 Pentalobe driver to remove the nine 1.5 mm screws securing the antenna bar to the frame.
You should update all your guides that include these instructions. At least in my 2021 16" MBP, the screws described here as P2 Pentalobe ARE NOT P2 Pentalobe. P2 tools strip out the heads on these. Per the Apple manual, the actual drive type is 1 IPR. Wera makes one.
On my 2021 16" the P2 worked great for these screws. No stripping. I'm sorry that happened to yours, Felix! Seems there might be some variants in the screws used.
I had also P2 and T5.
-
-
-
Insert the tip of a spudger between the antenna bar and the frame.
-
Pry up with the spudger to separate the antenna bar from the frame.
-
-
-
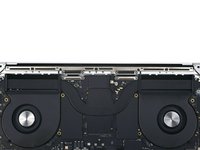
Pull the antenna bar straight up and out of the frame to remove it.
-
-
-
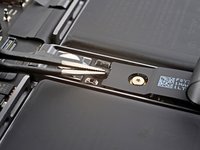
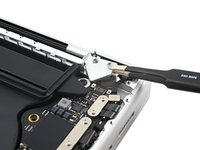
Use a T3 Torx driver to remove the four 2.1 mm screws securing the display cable covers.
Hi there, the display cover screws use a T3 Torx not a T5
Right you are Brandon! Thank you for the comment, and I have changed the guide accordingly.
-
-
crwdns2935267:0crwdne2935267:0Tweezers$4.99
-
Use tweezers, or your fingers, to remove the two display cable covers from the logic board.
-
-
-
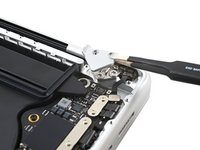
Use the flat end of a spudger to pry up and disconnect the right-most display cable press connectors secured to the logic board.
-
-
-
Repeat the previous step for the left-most press connector.
This is not the same Mac as the pic above this one...???
When replacing, these are hard to connect while the cable brackets are attached, because the ribbons were too stiff. I skipped Step 30, did Step 29-26, then replaced the brackets.
-
-
-
Pull up on the back of the display cable bracket to release the clips securing it to the frame.
-
Remove the display cable bracket.
-
Repeat for the other display cable bracket.
Replacement screen might not come with these brackets, so be sure to save them from the original.
-
-
-
Pull the two display cable bracket buffers straight up and out of the frame to remove them.
-
-
-
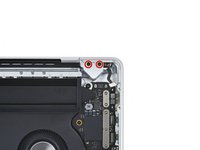
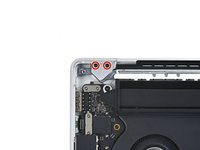
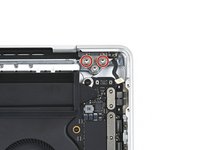
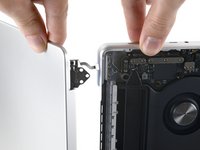
Use a T3 Torx driver to remove the two 2.1 mm screws securing the lid angle sensor cover near the right hinge.
-
-
-
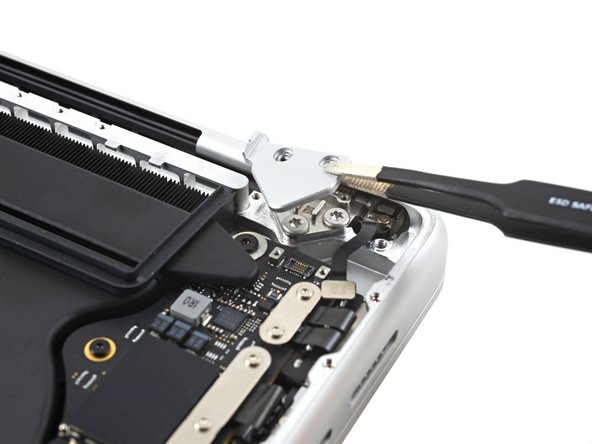
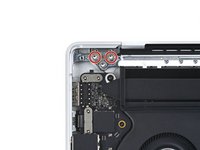
Use tweezers, or your fingers, to remove the lid angle sensor cover.
-
-
-
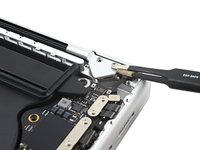
Use the flat of a spudger to pry up and disconnect the lid angle sensor's press connector.
-
-
-
Use a T5 Torx driver to remove the four 2.5 mm screws securing the hinge covers (two screws on each side).
-
-
-
Use tweezers to pull the hinge covers horizontally away from the hinge to separate it from the frame.
-
Remove the hinge covers.
-
-
-
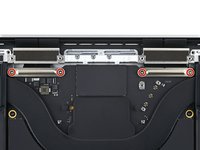
Use a T8 Torx driver to remove two 6.4 mm screws from each hinge (four screws total).
Both this guide and Apple's official repair manual state that these are T8 Torx screws... I found the T8 to bee too small for this, and instead used a T9, which fit perfectly.
These screws were in very tight. The dinky driver that came with the replacement screen was insufficient. I had to use a more substantial bit driver. T8 worked fine for getting them loose. Then used the T9 that came with the replacement to get them all the way out.
Mine was also T9 and you should also lose a little bit the 3rd screw on every side.
I used the “TR9” in the iFixit kit
-
-
-
If you plan to re-use your screen, open it and apply a piece of tape to the glass directly above each hinge. This helps protect the glass from getting scratched in the following step.
-
Fully open the screen and stand your MacBook Pro up on one side.
This should be step 1. A whole lot easier to put the tape on before taking the back off and undoing all the screws.
-
-
-
Use a T8 Torx driver to remove the two remaining 6.4 mm screws (one from each hinge).
-
Remove the topmost screw last, using one hand to steady both halves of the MacBook Pro to make sure they don't separate and fall over unexpectedly.
Both this guide and Apple's official repair manual state that these are T8 Torx screws... I found the T8 to bee too small for this, and instead used a T9, which fit perfectly.
Also, loosen both screws (but not remove) before opening the lid, since they are installed tightly.
-
-
-
Push both halves of the MacBook Pro together so that the hinges can be lifted clear of their recesses in the chassis.
-
Push the main body of the MacBook Pro away from you while pulling the screen toward you to separate it.
Ich fand es deutlich leichter, das Gerät mit der Tastatur auf den Tisch zu legen, das Display an der Tischkante herunterragen zu lassen und die Display Oberkante mit den Oberschenkeln zu stabilisieren.
-
-
The track pad cable bracket screws take a T4 not a T3, and the 6 main hinge screws take a T9 not a T8.
Beim Zusammenbau daran denken, die Display Kabel zuerst auf die Innenseite zu führen


To reassemble your device, follow these instructions in reverse order.
Compare your new replacement part to the original part—you may need to transfer remaining components or remove adhesive backings from the new part before you install it.
Repair didn’t go as planned? Try some basic troubleshooting, or ask our MacBook Pro 16" 2021 Answers community for help.
crwdns2935221:0crwdne2935221:0
crwdns2935229:018crwdne2935229:0


crwdns2947412:011crwdne2947412:0
Will I lose True Tone functionality even though I use an original Apple screen that has True Tone for the repair?
If you don't break the entire lcd, but only some part of it, the True Tone will still there. I have mine fixed because of the liquid damage. I only replace the LCD, not the fullset with the case. I have some locals to help me fixed it for me. So I don't know the details how they repair my macbook.
They gave me 2 options,
first told me that I will lose true tone feature if I replace it with the fullset lcd,
the 2nd option, If I replace the LCD only, the true tone still there because they can move the "ic" to the lcd replacement. But the disadvantage for the 2nd option that I will got some defect on my screen not much and not really visible if I don't really look at it. Please note that this options is possible because I didn't break the entire lcd.
I chose the 2nd option and it's work. The defect caused by my liquid damage is not really visible
ghiffari -
I had purchased my part from Apple directly, so when I was doing the system configuration at the end, they asked for my order number and my serial number, which I assume were used on their end to mark parts as genuine and restore TrueTone. If you purchased your part from apple and have the order number, then restoring TrueTone should not be a problem. If you got a part from elsewhere, then I don't how the service people on Apple's end would identify it to be able to mark it as genuine in their system, and to associate it with your machine. Perhaps you can contact them and ask..
I hope this has a video demonstration too
In case you are not aware: you can get a genuine replacement screen directly from Apple. This machine is one of the first to be a part of their new repair program. If you get the screen from them, you will not lose the TrueTone functionality! After completing the repair, you will have to contact heir online support, who will guide you through system configuration steps to mark installed parts as genuine, thereby restoring TrueTone. You will also be able to send in your old screen to get some money back. Cheers!
I successfully did the repair with a used Screen unit that was pulled from another MacBook. I don’t see any issues with True Tone or the blurred behavior of the screen. Still I am facing an ALS001 error which relates to the ambient light sensor. This causes the fan to run on high speed. But the sensor seems to work… at least it is adjusting brightness of screen and keyboard backlight. Any ideas how to fix this?
The new display screen cables have no brackets. How to remove them from the old display cables? It seems glued on the cables firmly and hard to pull off.
Buongiorno, ho letto che un chip T1 riconosce il monitor di concorrenza ed impedisce l avvio. E' Possibile?
I got a used lid assembly from laptopscreen because iFixit was out of stock, but I used this guide and it was spot on.
Just for awareness though: the screen I received had a different lid position sensor on it than the original screen for this computer. The connector on both sensors was the same, but the bends in the flat cable didn't allow it to line up to the main board connector properly. It wasn't difficult to swap the position sensor from the original screen. There's one P2x1.5mm screw attaching it to the side of the hinge and it comes off. So, if you're thinking of doing this replacement, don't be too eager to dispose of that old screen.
Laptopscreen listed the lid assembly as fitting both A2485 and A2780 models, and I installed it on an A2485.
I just replaced my cracked screen with a pre owned one, on the new screen there was no screen angle sensor, I moved it from the old screen to new, will this work or does it still need calibration from Apple.
I have now had the laptop on charge for about 30 min and it does not startup, the screen seems to work now as it displays a battery symbol showing low battery (red) and a lightning symbol suggesting it is taking charge but it does not start; could it be I did not get the battery datat cable connected properly
An update, I had not connected the battery data cable properly redid and now it works