crwdns2915892:0crwdne2915892:0
Use this guide to replace the battery in your MacBook Pro 16" 2021.
The MacBook Pro uses stretch-release adhesives to secure the battery. Some of the strips are hidden underneath the trackpad, so you’ll need to remove it first to access the strips.
For your safety, discharge the battery below 25% before disassembling your MacBook. This reduces the risk of fire if the battery is accidentally damaged during the repair. If your battery is swollen, take appropriate precautions.
You'll need replacement adhesive in order to complete this repair.
crwdns2942213:0crwdne2942213:0
-
crwdns2935267:0crwdne2935267:0Magnetic Project Mat$19.95
-
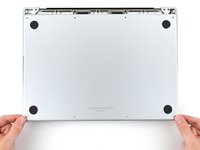
Use a P5 Pentalobe driver to remove eight screws securing the lower case:
-
Four 9.1 mm screws
-
Four 5 mm screws
-
-
-
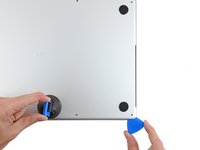
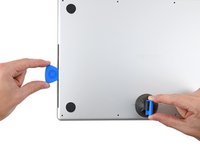
Press a suction handle into place near the front edge of the lower case, between the screw holes.
-
Pull up on the suction handle to create a small gap under the lower case.
-
-
-
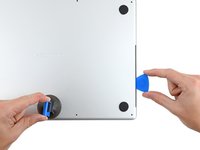
Insert an opening pick into the gap you just created.
-
Slide the opening pick around the nearest corner and then halfway up the side of the MacBook Pro.
-
-
-
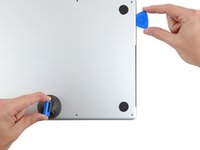
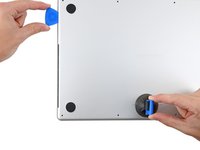
Repeat the previous step on the other side, using an opening pick to to release the second clip.
Terrifying, don't be afraid, give it a good pull, the description above is exactly right.
-
-
-
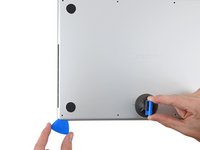
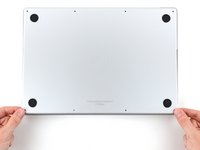
Pull firmly to slide the lower case towards the front edge of the MacBook (away from the hinge area) to separate the last of the clips securing the lower case.
-
Pull first at one corner, then the other.
-
-
-
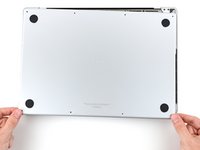
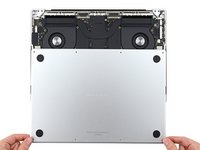
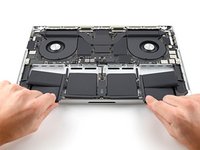
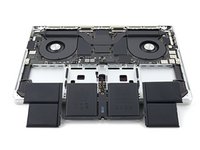
Remove the lower case.
-
Set it in place and align the sliding clips near the display hinge. Press down and slide the cover toward the hinge. It should stop sliding as the clips engage.
-
When the sliding clips are fully engaged and the lower case looks correctly aligned, press down firmly on the lower case to engage the four hidden clips underneath. You should feel and hear them snap into place.
-
-
-
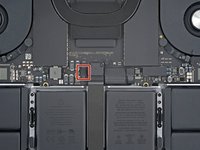
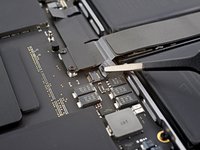
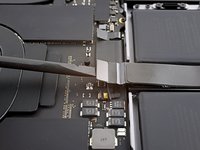
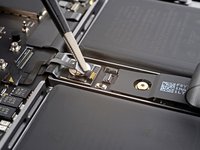
Peel back any tape covering the battery board data cable connector on the logic board.
This photograph does not match my 2021 Macbook Pro. Fortunately the differences do not impact the removal operation.⏎
There is a different arrangement and number and type of chips to the left of the image.One square grey thing nad five rectangular black things ...
Mine does not have the rows of test points above the track pad cable. -
-
-
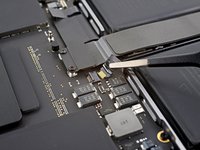
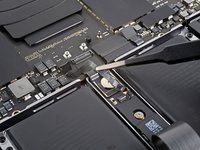
Use a spudger to gently pry up the locking flap on the ZIF connector for the battery board data cable.
This photograph does not match my 2021 Macbook Pro. Fortunately the differences do not impact the removal operation.⏎
There is a different arrangement and number and type of chips to the left of the image.One square grey thing nad five rectangular black things ...
Mine does not have the rows of test points above the track pad cable. -
-
-
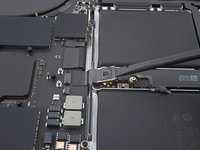
Disconnect the battery board data cable by sliding it out from its socket on the logic board.
-
-
-
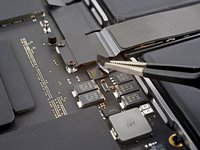
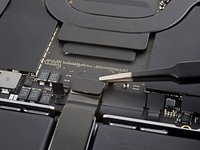
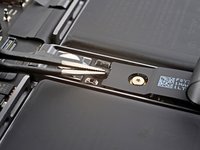
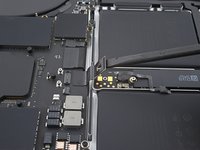
Use a T3 Torx driver to remove the two 2.1 mm‑long screws securing the trackpad cable bracket to the logic board.
Das sind T4 Schrauben bei mir
This photograph does not match my 2021 Macbook Pro. Fortunately the differences do not impact the removal operation.⏎
There is a different arrangement and number and type of chips to the left of the image.One square grey thing nad five rectangular black things ...
Mine does not have the rows of test points above the track pad cable. -
-
-
crwdns2935267:0crwdne2935267:0Tweezers$4.99
-
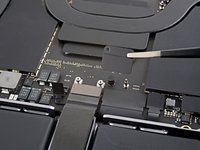
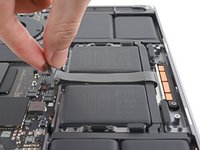
Use tweezers, or your fingers, to remove the trackpad cable bracket.
This photograph does not match my 2021 Macbook Pro. Fortunately the differences do not impact the removal operation.⏎
There is a different arrangement and number and type of chips to the left of the image.One square grey thing nad five rectangular black things ...
Mine does not have the rows of test points above the track pad cable. -
-
-
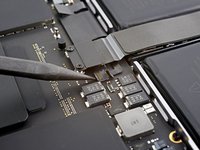
Use the flat end of a spudger to pry up and disconnect the trackpad cable's press connector from the logic board.
This photograph does not match my 2021 Macbook Pro. Fortunately the differences do not impact the removal operation.⏎
There is a different arrangement and number and type of chips to the top/left of the red circle.One square grey thing nad five rectangular black things ...
Mine does not have the rows of test points to the left of the track pad cable. -
-
-
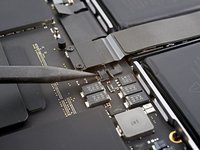
Peel the trackpad cable away from the device, making sure to separate the adhesive.
This photograph does not match my 2021 Macbook Pro. Fortunately the differences do not impact the removal operation.⏎
There is a different arrangement and number and type of chips to the top/left of the red circle.One square grey thing nad five rectangular black things ...
Mine does not have the rows of test points to the left of the track pad cable. -
-
-
Peel back any tape covering the battery board data cable connector under the large pancake screw.
-
-
-
Use a spudger to gently pry up the locking flap on the ZIF connector for the battery board data cable.
-
-
-
Disconnect the battery board data cable by sliding it out from its socket on the battery board.
This is SO small - I used a very fine guitar pick to get it to release, none of my tools were small enough.
-
-
-
Slide blunt nose tweezers under areas with adhesive to separate the cable from the device.
-
Remove the battery board data cable.
This photograph does not match my 2021 Macbook Pro. Fortunately the differences do not impact the removal operation.⏎
There is a different arrangement and number and type of chips to the left of the tweezers.One square grey thing nad five rectangular black things ...
-
-
-
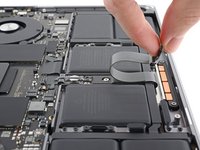
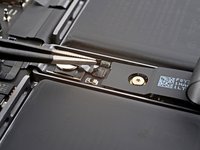
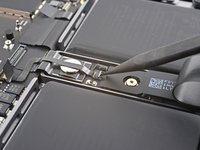
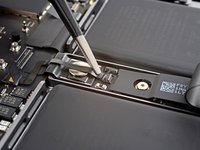
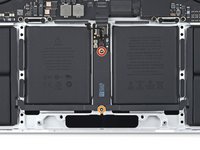
Use a T5 Torx driver to remove the 3.9 mm pancake screw securing the battery power connector.
This photograph does not match my 2021 Macbook Pro. Fortunately the differences do not impact the removal operation.
There is a different arrangement and number and type of chips to the top/left of the red circle.One square grey thing nad five rectangular black things ...
-
-
-
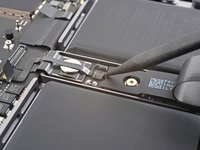
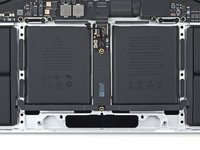
Use a spudger to lift the battery power connector, disconnecting the battery.
is it possible to buy/replace this battery power connector? I broke mine on the logic board side and they are impossible to find. Ofc apple want $900 because the laptop is "modified" after replacing the keyboard :|
The previous image did not match my Macbook Pro, this one does.
Two square grey things, three rectangular smaller black things. :-) -
-
-
Use a T5 Torx driver to remove the 13 screws securing the trackpad assembly:
-
Ten 5 mm screws
-
Three 5.8 mm screws
-
-
-
Swing the display open slightly, but keep the MacBook upside-down. The trackpad assembly should separate and lay flat on the display.
-
Carefully feed the trackpad's ribbon cable through its slot in the frame.
-
-
-
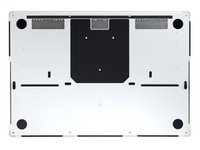
Use a T5 Torx driver to remove the two screws securing the battery board:
-
One 4.4 mm screw
-
One 3.8 mm screw
-
-
-
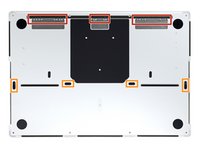
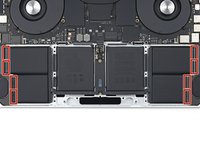
There are eight adhesive strips that are accessed from the bottom of the device.
-
There are six more adhesive strips accessed from the trackpad's location on the frame.
-
-
crwdns2935267:0crwdne2935267:0Tweezers$4.99
-
Use tweezers, or your fingers, to grasp the black pull-tab on one of the adhesive strips.
-
-
-
Pull the strip out slowly and steadily at a low angle. Give it plenty of time to stretch and un-stick from under the battery.
-
If the adhesive strip breaks off, try to retrieve it using your fingers or blunt tweezers, and continue pulling—but do not pry under the battery.
-
Repeat the process for all 14 stretch release adhesive strips.
-
-
-
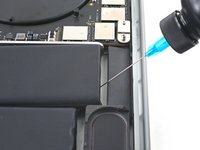
Apply a few drops of high concentration (over 90%) isopropyl alcohol to the gaps surrounding the affected area of the battery.
-
Wait between one to two minutes for the adhesive to loosen.
-
-
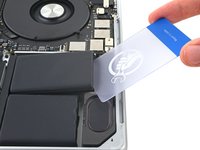
crwdns2935267:0crwdne2935267:0Plastic Cards$2.99
-
Insert a plastic card between the battery and the frame.
-
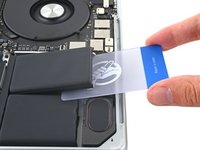
Pry up with the card while slicing the adhesive to separate the battery from the frame.
-
-
-
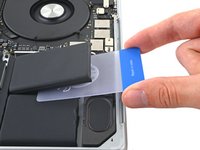
Slide the battery out of the frame to remove it.
-


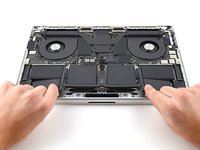
To reassemble your device, follow these instructions in reverse order.
For optimal performance, calibrate your newly installed battery after completing this guide.
Compare your new replacement part to the original part—you may need to transfer remaining components or remove adhesive backings from the new part before you install it.
Take your e-waste to an R2 or e-Stewards certified recycler.
Repair didn’t go as planned? Try some basic troubleshooting, or ask our MacBook Pro 16" 2021 Answers community for help.
crwdns2935221:0crwdne2935221:0
crwdns2935229:020crwdne2935229:0


crwdns2947412:016crwdne2947412:0
This is what I search for! Such a great guide!
Where can I purchase a new battery for my MacBook Pro 16" 2021 laptop?
Hi there!
Unfortunately, we are not currently selling MacBook Pro 16" 2021 batteries. We are hoping to sell them sometime soon. You may want to consider checking with other retailers or online sources for the specific battery you need.
Has anyone figured out where we can purchase new replacement batteries for this computer (MacBook Pro 16" 2021 Model # MK193LL/A)?
Why does step 22 talk about installing a new trackpad? That part left me confused.
Hi Ted!
Great question...and I don't have a great answer in return. So, I have changed the step accordingly!
Where can I buy a new battery for my MacBook Pro m1 16 2021?
Months of searching..finally have an answer to my own question having found a battery on my own.
This one fits my Macbook Pro M1 2021 16" model.
https://www.amazon.com/Battery-Replaceme...
Hello, I have received shaking after completing all the steps. Is there an adhesive applyer?
Where are the replacement adhesive pull strips? It's odd they are not part of the iFixit kit.
The kit I received had adhesive already on the back of the battery. It made it easy to place battery in laptop and press down to secure it.
Der Austausch der Battery brachte mir überraschend nichts, bei eingeschaltetem Bildschirm (ohne Tätigkeit) entladete sich die Batterie in kürzester Zeit. Zufällig sah ich aber beim Verkäufer, dass die meisten Käufer auch ein neues Ladegerät mitbestellten: nun habe ich ein Zweifel, ob man nicht etwa genauso ein neues Ladegerät braucht, um die Batterie "richtig" aufzuladen? Finde ich auch seltsam, dass hier im iFixit darüber nichts gesagt wird.........2)meine Frage ist auch, ob man eine Neu- "Kalibrierung" nach der Installation machen muss?
3.) bei der Neuinstallation der SSD NVMe Speicher wird das Volumen erst gar nicht erkannt, "Time Machine" mit Backup ist leer......wo könnte ich eine Anleitung für die Installation bekommen? MacBook Air (13-inch, Early 2015)
Prozessor 1,6 GHz Dual-Core Intel Core i5
Speicher 8 GB 1600 MHz DDR3
I completed this replacement using the battery and tools from iFixit for $150. The replacement process worked well, and my comments for others is to be careful when taking old battery out not to damage the screen. I had to pry the battery out of the case and noticed that I was lucky I didn’t damage the screen when doing this. You can’t see under the battery when you’re prying it, and there are places you could damage screen if you pried in the wrong spot.
The other comment is that my laptop wouldn’t recognize the new battery once I installed it. Perhaps there was something else wrong with my laptop. I paid $850 for Apple do the replacement. The Apple repair site has instructions https://support.apple.com/en-us/100585 Apple sells only the battery, keyboard and top case as one unit for $615 plus $88 credit if you return your parts so about $530.
This looks like one of the most unpleasant mac repairs since I cracked open a PowerMac 6500. How difficult/frustrating is the stretch adhesive?
It'd be frustrating if I'd cracked my screen so be careful of that. The adhesive didn't release with the rubbing alcohol so I just had to pry and pull hard on the battery to get it out. It wasn't pretty, but I didn't care that I was wrecking the battery I was removing. The new battery had the adhesive already applied to it, so it was easy to install.
It'd be frustrating if I'd cracked my screen so be careful of that. The adhesive didn't release with the rubbing alcohol so I just had to pry and pull hard on the battery to get it out. It wasn't pretty, but I didn't care that I was wrecking the battery I was removing. The new battery had the adhesive already applied to it, so it was easy to install