crwdns2915892:0crwdne2915892:0
Upgrade your hard drive for more storage space.
crwdns2942213:0crwdne2942213:0
-
-
Remove the following ten screws securing the lower case to the upper case:
-
Seven 3 mm Phillips screws.
-
Three 13.5 mm Phillips screws.
-
-
-
Using both hands, lift the lower case near the vent to pop it off two clips securing it to the upper case.
-
Remove the lower case and set it aside.
-
-
crwdns2935267:0crwdne2935267:0P6 Pentalobe Screwdriver 2009 15" MacBook Pro Battery$5.49
-
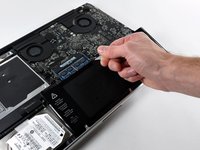
Remove the two 5-Point Pentalobe screws along the top edge of the battery.
Question: why do you remove the battery? According to Apple's official manual, this is not required (not for the mid-2009 and not for the mid-2010 15-inch MacBook Pro) - see pages 37 ff:
crwdns2936937:0alexklicrwdne2936937:0
Question: why do you remove the battery? According to Apple's official manual, this is not required (not for the mid-2009 and not for the mid-2010 15-inch MacBook Pro) - see pages 37 ff:
I'm interested by your experience.
Did you have removed the optical drive without removing the battery ?
I'm just in this step now and if it is possible I would proceed like you because removing the battery void the warranty (and there is a sticker).
Thanks in advance.
Looks like my note to step 3 appears on all repair guides that have the same step. I meant that in the context of the hard drive replacement only.
Did you have removed the optical drive without removing the battery ?
I haven't yet done anything, waiting for my MacBook Pro 15 inch mid-2010 to arrive.
I missed the notes and went ahead and purchased the 5 point driver for the battery before I realized it was not necessary.
I've edited the repair guide to remove the section on the battery, but I don't have the points to approve the changes.
Please note - the step about removing the battery is part of a pre-requisite guide, that is used for many of the guides, most that do require removal of the battery. Also, working inside a disassembled laptop with the battery still connected risks damaging/shorting out very expensive parts.
Absolutely. To be clear -- ALL of the above discussion is ONLY in reference to replacing the hard drive.
I replaced a hard drive in a MacBook Pro of an earlier model than this without removing the battery. The hard drive wasn't right. It only worked at about half speed, and I had to replace it once more. The second time I removed the battery and all went well. The recommendation by the iFixit staff to remove the battery before working on electronic equipment is a good one.
What is the size of those screws... I have rounded off the socket on mine and would like to replace them.
I measured the screw size, using a micrometer, its about 1.523mm in diameter and 3.186mm in length. Not sure what screw size that is. They are not easily available I guess, unless someone is selling used ones on ebay
In my case the three pentalobe screws were 3 point.
-
-
-
Use the tip of a spudger to bend back the finger of the "Warning: Do not remove the battery" sticker while you remove third five-point Pentalobe screw hidden underneath.
-
-
-
-
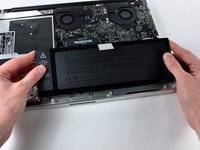
Lift the battery by its plastic pull tab and slide it away from the long edge of the upper case.
Removing the battery is not necessary for the hard drive removal/replacement procedures.
My T6 (appears to be same screw driver you have - $6 on amazon for 20piece set) did NOT fit int he battery screws...not sure if I had the wrong screws or what, but I went ahead w/o battery steps and it was pretty easy.
I also noticed that the new SDD (from crucial) didn't have the 4 screws, so I had to move those off the old HD and onto the new one.
Just had the same issue: T6 does not fit the battery screws ;-( ... but with a little bit more preassure it was possible to remove the screws.
Please help!! I m unable to remove the ld battery out it feels glued in or affixed with two sided tape.
-
-
-
Tilt the battery back enough to access the battery cable connector.
-
Pull the battery cable connector away from its socket on the logic board and remove the battery from the upper case.
Excellent guide
I don’t think this room needs a sticker as a Penoalope. It looks more like a trip-point. I’ve been failing over
Living it for over a year.
-
-
-
Remove the two Phillips screws securing the hard drive bracket to the upper case.
-
Lift the the retaining bracket out of the upper case.
-
-
-
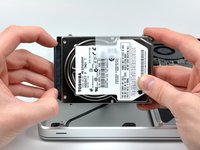
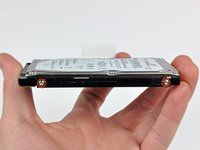
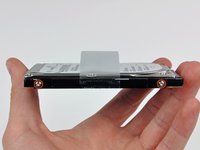
Lift the hard drive by its pull tab and pull it out of the chassis, minding the cable attaching it to the computer.
-
-
-
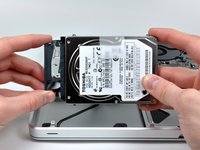
Remove the hard drive cable by pulling the hard drive straight away from the connector. Keep the connector steady. If pulled by the connector, it can be pulled too far and accidentally tear the hard drive cable.
-
-
-
Remove two T6 Torx screws from each side of the hard drive (four screws total).
Can "Torx Security - TR6" screws be used here instead of T6 Torx screws?
-


To reassemble your device, follow these instructions in reverse order.
To reassemble your device, follow these instructions in reverse order.
crwdns2935221:0crwdne2935221:0
crwdns2935229:0209crwdne2935229:0

crwdns2947412:013crwdne2947412:0
Piece of cake! Didn't have the 5-point, so I left the battery alone. Finder says I have 550G of free space!
Very Easy. Don't need to remove the battery.
seriously the easiest repair I have done on one of my computers. My biggest worry was getting OS X reinstalled, but iFixIt made that easy as well. Can't believe a local shop wanted $300+ to do this. I spend just over $100 and got my computer back up and running myself.
Hi. Does myy macBook Pro (15" Mid 2009) support Solid State Drive? I upgraded the memory with 8 gigabites, but it´s still a bit slow. I hope someone can answer soon.
Yes you can. Look up crucial.com
kris -
It's worth mentioning whether HDD bay supports any 2.5-inch hard drives (including SSDs) or just Toshiba hard drives.
Simple repair — same here, left the battery alone. Just a couple FYI's for your next steps after the new hard drive is in. (This might be obvious, but I overlooked it.) I forgot to format my new drive and I wasted a few hours accidentally installing OS X on a different partition of my boot drive.
—
1. Once the new drive is in and your OS X boot drive presents you with installation instructions, go to "Disk Utility" first.
2. You'll see a list of drives: your new drive (congrats you installed it correctly!) as well as your boot drive
3. Select your new drive (top-most level) and click into the "Erase" options
4. Make sure you select "Mac OS X Journaled" and leave the name "Untitled" (I think these are the defaults)
5. Click "Erase"
6. Exit "Disk Utility" and install as normal. Make you select your new drive "Untitled" to install to :)
—
Good luck!
Works! Thank you, James Collins! Since I had already been keeping a TimeMachine backup, it is so far easy to do a restore. Sill about 4 hours (over wired connection) to complete the data transfer, but I am optimistic.
Thanks to the author! Just changed HD in a 2009 MB Pro and it lives again!
I didn’t have the p6 driver so I didn’t remove the battery. On start up my screen is just grey and has a circle with I line through it, sort of like the no smoking sign. Have I fried my transplanted Ssd?
Hey Jason, did you format your new drive, or clone the old one onto it? You might check out this post Seeing a No Entry sign after a New Crucial M500 installation
Just finished replacing the hard drive on my mid-2009 MacBook Pro, and replaced the battery at the same time. It went as well as I could have hoped! I now have a 1TB solid state drive and a new battery, and my clunky old laptop is now perky and peppy—almost as fast as my wife’s brand-new MacBook Pro. I have to say I was not expecting it to work so well, very pleasantly surprised.
In addition to the instructions here on Ifixit.com, I also found this article and video from cnet.com extremely helpful in making the whole procedure go smoothly; it gives you more information on how to format your replacement drive and copy your current hard drive prior to doing the install:
https://www.cnet.com/how-to/upgrade-your...
Looks like I will be getting a couple more years out of this laptop!
My 2015 hard-drive was showing signs of imminent failure (grinding noise) so I ordered a 1TB SSD and carried out the cloning of the original drive. The cloning part took some 13 hours, so I left it unteil next day.
I check that I could boot from the clone installed as an external drive. Everything was OK
Then I did proceed with the replacement, based on this tutorial
I did a fair bit of dusting, including the fans
I did not bother to diconnect the battery.
Replacement went smoothly and as soon as the power was turned on it started (much faster that the hard drive)
Now, I shall consider replacing a fan that is getting noisy and upgrade the OS to the latest available for thet old machine
May be helpful to have more distinct colors to identify the different screws.
Victor Caamano - crwdns2934203:0crwdne2934203:0