crwdns2915892:0crwdne2915892:0
Use this guide to replace a blown subwoofer or right speaker.
crwdns2942213:0crwdne2942213:0
-
-
Remove the following ten screws:
-
Three 14.4 mm Phillips #00 screws
-
Three 3.5 mm Phillips #00 screws
-
Four 3.5 mm shouldered Phillips #00 screws
-
-
-
Use your fingers to pry the lower case away from the body of the MacBook near the vent.
-
Remove the lower case.
-
-
-
Use the edge of a spudger to pry the battery connector upwards from its socket on the logic board.
-
-
-
Bend the battery cable slightly away from its socket on the logic board so it does not accidentally connect itself while you work.
-
-
-
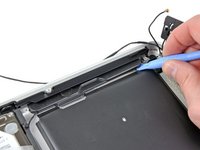
Use the flat end of a spudger to pry the AirPort/Bluetooth ribbon cable connector up from its socket on the logic board.
-
-
-
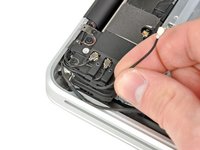
Carefully pull the camera cable out of its socket on the logic board.
-
-
-
-
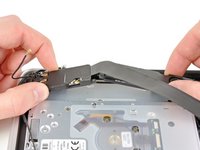
Carefully move the AirPort/Bluetooth ribbon cable out of the way as you peel the camera cable off the adhesive securing it to the subwoofer and the AirPort/Bluetooth bracket.
-
De-route the camera cable out from under the retaining finger molded into the AirPort/Bluetooth bracket.
-
-
-
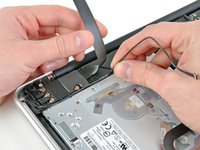
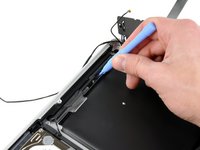
Use the tip of a spudger to pry the antenna connector closest to the logic board up from its socket on the AirPort/Bluetooth board.
-
De-route the antenna cable from under the finger molded into the AirPort/Bluetooth bracket.
-
-
-
Use a Phillips #00 screwdriver to remove the following five screws:
-
Two 10.3 mm screws
-
Two 3.1 mm screws
-
One 5 mm screw
-
-
-
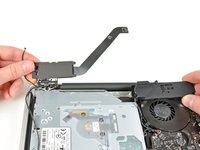
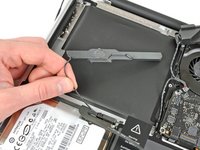
Pull the AirPort/Bluetooth assembly and the Subwoofer upward near the center of the side of the optical drive until they clear each other.
-
Move the AirPort/Bluetooth assembly and the subwoofer away from the top of the optical drive.
-
-
-
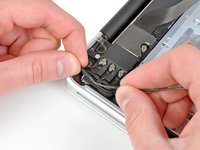
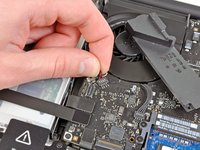
Pull the right speaker/subwoofer cable out from under the retaining finger near the side of the optical drive.
-
Pull the right speaker/subwoofer cable upward to disconnect it from the logic board.
-
-
-
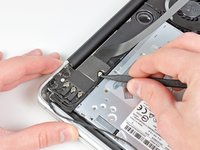
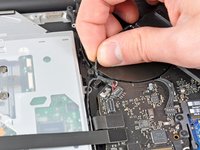
Use the flat end of a spudger to pry the hard drive cable connector up from its socket on the logic board.
-
Bend the hard drive cable away from the optical drive.
-
-
-
Use the flat end of a spudger to pry the optical drive connector up from its socket on the logic board.
-
-
-
Remove the three 2.7 mm Phillips screws securing the optical drive to the upper case.
-
-
-
Pull the optical drive upward from its edge closest to the display and remove it from the upper case.
-
-
-
Use a plastic opening tool or another thin prying object to carefully pry the right speaker up from the adhesive securing it to the upper case.
-
Pry up along the edge of the right speaker until it is separated from the upper case.
-
-
-
Pull the right speaker away from the optical drive opening.
-
-
-
Peel up the right speaker cable along the edge of the optical drive opening.
-
De-route the cable from the clips near the edge of the logic board.
-
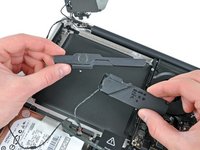
Remove the right speaker/subwoofer assembly from the upper case.
-


To reassemble your device, follow these instructions in reverse order.
To reassemble your device, follow these instructions in reverse order.
crwdns2935221:0crwdne2935221:0
crwdns2935229:062crwdne2935229:0

crwdns2947412:05crwdne2947412:0
Do you recommend any brand of speakers for macbook pro replacement ?
Our parts are tested by our parts testing department and come with a warranty. If anything you buy from us does not work, customer service will make it right.
MacBook Pro 13" Unibody (Early 2011-Mid 2012) Subwoofer and Right Speaker
Is there no left speaker? I can only find purchase for right speaker. Sorry I'm a newbie lol. Thank you!
Yep! It is there, but under the logical board. Has another guide here only about left speaker’s replacement to this MacBook model. MacBook Pro 13" Unibody Mid 2012 Left Speaker Replacement
Hello I succeeded to replace the right speaker but now my optical driver don't recognize the CD and I can't put them out.. the button does not work anymore, the only way is th restart the mac and press the mouse and the eject button...
there is an unusual noise at the opening from the optical driver, do you think I put the 3 screws of the optical driver in a wrong way ? I looked at it already and I don't find the solution..