crwdns2915892:0crwdne2915892:0
Replace the cable on your MacBook Core Duo that connects the upper case to the logic board.
crwdns2942213:0crwdne2942213:0
-
-
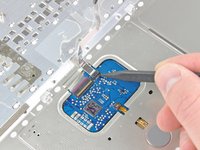
Use a coin or spudger to rotate the battery-locking screw 90 degrees clockwise.
 crwdns2952109:0crwdne2952109:0
-
-
-
Lift the battery out of the computer.
-
-
-
Remove the three evenly-spaced Phillips screws from along the rear wall of the battery compartment.
-
-
-
Lift up on L-shaped memory cover, slide it to the right, and lift it out of the computer.
-
-
-
Remove the following 3 screws:
-
One 11 mm Phillips #00 in the middle of the case.
-
Two 14.5 mm Phillips #00.
-
-
-
Remove the following 3 screws from the rear wall of the battery compartment:
-
Two 3 mm Phillips #00. (A1181 has three 3 mm screws and one 4 mm.)
-
One 4 mm Phillips #00 on the right side.
-
-
-
Remove the two 6 mm Phillips #00 screws from either side of the right wall of the battery compartment (not the ones closest to the battery connector).
-
-
-
Remove the four 3 mm indicated Phillips #00 screws from the front wall of the battery compartment. When working from the left, remove the 2nd, 4th, 7th and 9th screw.
-
-
-
Remove the following 4 screws from the back of the computer:
-
Two 7 mm shouldered Phillips on the far sides.
-
Two 10.5 mm Phillips toward the center.
-
-
-
-
Remove the two 5.2 mm shouldered Phillips #00 screws from the optical side of the computer.
-
-
-
Starting near the display and working around to the front of the computer, pry up on the upper case. It is held with clips on the right above the optical drive. These will release with some firm lifting pressure.
-
Be careful when prying up the upper case. It's very easy to slice open a fingertip and thus provide the blood sacrifice the Mac gods sometimes require of those who insist on doing their own repairs.
-
-
-
While holding up the upper case (from the bottom or the top), use a spudger to pry up the orange trackpad and keyboard cable from its connector.
-
-
-
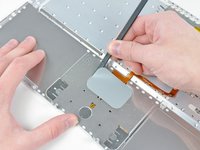
Carefully peel the upper case cable off the adhesive securing it to the upper case.
-
-
-
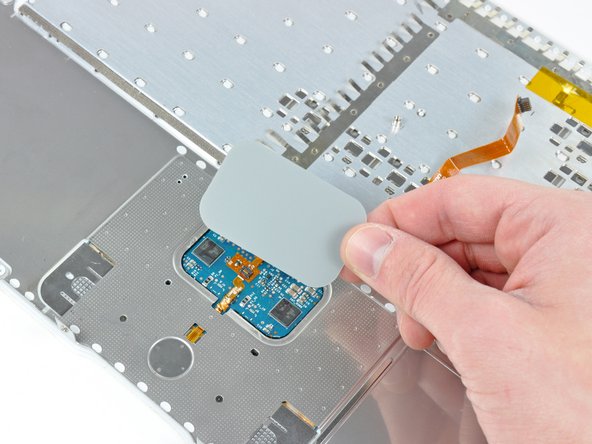
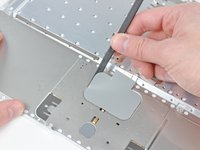
Use the flat end of a spudger to carefully peel up the adhesive around the perimeter of the plastic panel stuck to the underside of the trackpad.
-
Remove the panel from the upper case.
-
-
-
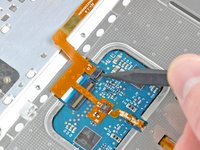
Use the tip of a spudger or your fingernail to flip up the retaining flap on the upper case cable ZIF socket near the keyboard cable.
-
-
-
Gently peel up the section of the upper case cable stuck to the keyboard ribbon cable, being careful not to disturb the keyboard ribbon cable in the process.
-
-
-
Pull the top upper case ribbon cable connector out of its socket under the trackpad.
-
-
-
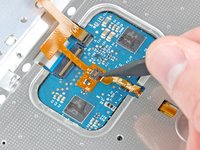
Use the tip of a spudger to flip up the retaining flap on the mouse button ribbon cable socket.
-
-
-
Pull the mouse button ribbon cable out of its socket.
-
-
-
Use the flat end of a spudger to help peel the last portion of the upper case ribbon cable off the adhesive securing it to the underside of the trackpad.
-
-
-
Remove the upper case cable from the upper case.
-
-
-
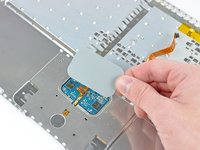
Use the flat end of a spudger to carefully peel up the adhesive around the perimeter of the plastic panel stuck to the underside of the trackpad.
-
Remove the panel from the upper case.
-
-
-
Carefully peel the upper case cable and the piece of clear tape off the bottom of the upper case.
-
-
-
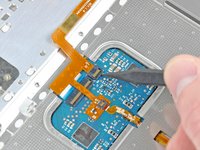
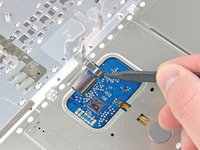
Use the tip of a spudger to flip up the retaining flap on the upper case cable ZIF socket.
-
-
-
Pull the upper case cable out of its socket and remove it from the upper case.
-


To reassemble your device, follow these instructions in reverse order.
crwdns2935221:0crwdne2935221:0
crwdns2935229:033crwdne2935229:0

crwdns2947410:01crwdne2947410:0
Andrew you are the best.Very easy to follow instructions.I will replace mind,90 points
Mosua Patrick - crwdns2934203:0crwdne2934203:0 crwdns2950251:0crwdne2950251:0