crwdns2915892:0crwdne2915892:0
Replacing a defective fan is pretty easy and will keep your laptop running cool.
crwdns2942213:0crwdne2942213:0
crwdns2936621:0crwdne2936621:0
-
-
Remove ten Phillips screws securing the lower case to the MacBook Air:
-
Six 2.8 mm screws
-
Two 3.8 mm screws
-
Two 5.4 mm screws
-
-
-
Slightly lift the lower case near the vents and push it toward the rear of the computer to free the mounting tabs.
-
-
-
Disconnect the battery connector by pulling it straight out of its socket.
-
-
-
Remove the following nine screws securing the battery to the Air:
-
Four 2.9 mm Phillips.
-
Four 3.8 mm Phillips.
-
One 7.2 mm Phillips.
-
-
-
Lift the battery out of the Air.
-
Charge it to 100%, and then keep charging it for at least 2 more hours. Then, unplug and use it normally to drain the battery. When you see the low battery warning, save your work, and keep your laptop on until it goes to sleep due to low battery. Wait at least 5 hours, then charge your laptop uninterrupted to 100%.
-
If you notice any unusual behavior or problems after installing your new battery, you may need to reset your MacBook's SMC.
-
-
-
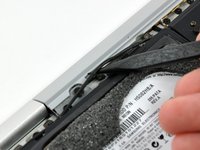
Disconnect the port hatch ribbon cable from the logic board by pulling it straight up by its black pull tab.
-
Pull the audio out ribbon cable off the adhesive securing it to the upper case.
-
Use a spudger to pry the audio out ribbon cable connector board off the hard drive bracket.
I skipped the step (6c) of prying the audio out ribbon cable connector board off the hard drive bracket (& disconnecting it), since it doesn't come off real easily, and I didn't want to damage it. It only requires a little more care when removing the HD from it's bracket if you skip step 6c.
-
-
-
Disconnect the audio out cable from its socket on the port hatch ribbon cable.
This is not necessary and looks pretty risky too.
Agreed, I encountered no issues when I skipped this on a Rev.B model.
-
-
-
-
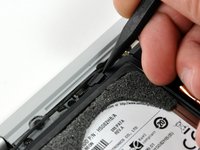
Use a spudger to pry the hard drive cable connector up off the logic board.
Reversing step 8 is where I ran into trouble. The replacement fan I had was slightly thicker than the original and caused the ZIF cable to work its way out of the tenuous connection it had to the SSD, resulting in a "?" missing boot drive error upon startup. Took me three tries to get it right! The difficulty is to get the drive connector to the logic board to reach and seat without pulling the other end out of the drive.
-
-
-
Use the sharp end of a spudger to de-route the microphone cable from the hard drive bracket.
-
Remove the cosmetic screw cover from the adhesive securing it to the hard drive bracket.
-
-
-
Remove the four Phillips screws securing the hard drive assembly to the upper case:
-
Two 4.7 mm screws.
-
Two 3.9 mm screws.
Longer screws on top.
Two 3.9 mm Phillips screws.
Two 4.7 mm Phillips screws.
There is a cable glued to the diskframe that must be loosened with a spudger before you can remove the frame.
-
-
-
Lift the hard drive assembly out of the upper case.
Ever since Steve Jobs died, Apple hasn't been what it used to be.
-
-
-
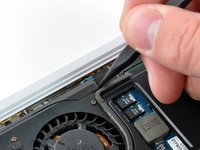
Use the tip of a spudger to pull the fan cable connector straight away from its connector on the logic board.
-
-
-
Use the tip of a spudger to move the cosmetic fan cover aside.
-
-
-
One 5.9 mm Phillips screw.
-
Two 1.9 mm Phillips screws.
-
One 1.9 mm Phillips screw.
-
One 5.0 mm Phillips screw
-
Five 1.9 mm Philips screws.
-
One 2.5 mm Phillips screw.
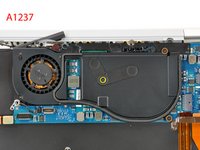
On A1237, the yellow screw is a bit longer then the two orange ones.
I have replaced several Logic boards at this point on the A1304 model, and realized that I did not need to remove the heatsink (Steps 14 through 17). You need to remove the screws around the fan, and disconnect the microphone cable (step 19). Of course if your replacement logic board doesn't include a heatsink, you need to take it off.
-
-
-
Lift the processor clamp off the heat sink.
-
-
-
Deroute the microphone cable away from the channel in the fan.
-
-
-
Lift the heat sink up off the logic board.
I removed the fan at this point as well. Disconnect the small connector from the fan to the logic board and lift out the fan. Good time to blow off the dust!
-
-
-
Remove the four 2.5 mm Phillips screws securing the fan to the heat sink assembly.
-
-
-
Lift the heat sink assembly up off the fan.
-
-
-
Lift the cosmetic fan bracket out of the fan.
-
Fan remains.
-


To reassemble your device, follow these instructions in reverse order.
To reassemble your device, follow these instructions in reverse order.
crwdns2935221:0crwdne2935221:0
crwdns2935229:024crwdne2935229:0

crwdns2947412:02crwdne2947412:0
This guide does not say anything about thermal paste. For the original Mac Book Air model, that requires the fan to be replaced together with the heatsink, the thermal paste should probably be removed and re-applied. Here's a guide on how to do it.
Can i replace the fan from a 2008 A1237 model with the one from the 2008-2009 A1304?