crwdns2915892:0crwdne2915892:0
- May cause kernel Panic with hibernation on certain MBA, this guide applies to Early 2015 model only*
- The 2015 MBA only has 4 PCI-e lanes so you will not be able to take full advantage of NVMe drives*
crwdns2942213:0crwdne2942213:0
-
-
MacBook Air Late 2010 - Working - High Sierra, Catalina, M2 Samsung Evo 860, Adapter
-
MacBook Air 2011 - Working - High Sierra, M.2 Transcend MTS830S SATA III, Long Adapter.
-
MacBook Air 2012 - Working - Catalina, M.2 Transcend MTS830S SATA III, Long Adapter.
-
MacBook Air 2013 - Unknown
-
MacBook Air 2014 - WD_black 500 + Sintech adapter, running MacOS Big Sur
-
MacBook Air Early 2015 - WORKING- Mojave 10.14.3 to Big Sur 11.0.1- Crucial P1 SSD NVME, Adapter.
-
MacBook Air 2017 - WORKING - High Sierra, Catalina and Big Sur, Monterey - Transcend MTE250S PCIe 4.0 4x NVMe, Long Adapter + Kapton Tape. / Transcend MTE260S PCie 5.0 (Testing, SSD works fine in Monterey 12.7.6 Blackmagic and AJA System Lite Disk Speed generate read errors. Employ only Amorphous Disk Test to Benchmark this PCIe 5.0 SSD.)
-
MacBook Air 2018 and forward - will not work, No removable drive
-
-
crwdns2935267:0crwdne2935267:0P5 Pentalobe Screwdriver Retina MacBook Pro and Air$5.99
-
Use a P5 Pentalobe driver to remove ten screws securing the lower case, of the following lengths:
-
Two 9 mm screws
-
Eight 2.6 mm screws
-
-
-
Wedge your fingers between the display and the lower case and pull upward to pop the lower case off the Air.
-
Remove the lower case and set it aside.
-
-
-
-
Grab the clear plastic pull tab attached to the battery connector and pull it parallel to the board toward the front edge of the Air.
-
-
-
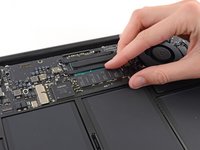
Remove the single 2.9 mm T5 Torx screw securing the SSD to the logic board.
-
-
-
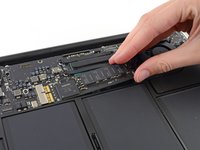
Gently lift the end of the SSD about half an inch and pull it straight out of its socket on the logic board.
-
-
-
Carefully insert the new SSD into the adapter, using the length of old drive as a reference for when the SSD is fully in the adapter. The lengths should be the same.
-
Insert the SSD and the adapter into the Socket, pushing inward in a straight fashion.
-
When reinstalling the SSD, be sure it is properly seated before reinstalling its retaining screw.
-


To reassemble your device, follow these instructions in reverse order.
crwdns2935221:0crwdne2935221:0
crwdns2935229:025crwdne2935229:0
crwdns2947412:017crwdne2947412:0
Please advise ! I installed the Crucial P1 ssd with the adapter, i booted with the option/alt key and the ssd is not present, only the bootable usb ! On a MacBook Air early 2015
The disk will not be seen by the Disk Utility. But if you boot from a USB disk (option_r during boot) and start the Disk Utility program you’ll be able to see the new unformatted disk. Erase the drive. Then you can restore from a Time Machine backup or restart without the USB….This worked for me.
I also have the same problem, do i need latest operating system to detect these new drives?
Why does the guide recommend 5 hours?
After reading, I think this should take 30-45 minutes or possibly a bit less. Maybe I overlooked a step, or something in particular takes extra long? I’m interested to hear how this went for others who have tried.
excellent write up tho, I didn’t know there were NVME adapters available for these, awesome!
The hardware only takes about a half hour, the installing the OS is what takes the time! To speed it up setup an external OS installer drive the faster the drive & interface the faster the install! A thunderbolt RAID’ed SSD is about as fast as you can get it takes just about an hour with it.
DanJ -