crwdns2915892:0crwdne2915892:0
Follow this guide to safely remove and replace the battery from your late 2018 MacBook Air.
To minimize risk of damage, turn on your MacBook and allow the battery to fully discharge before starting this procedure. A charged lithium-ion battery can be very dangerous if accidentally punctured. If your battery looks puffy or swollen, take extra precautions.
crwdns2942213:0crwdne2942213:0
-
-
If your MacBook is running Big Sur v11.1 or later, disabling Auto Boot may not work. You can proceed normally, but make sure to disconnect the battery as soon as you're inside.
-
Use a P5 driver to remove the following screws:
-
Two 7.9 mm screws
-
Two 7.1 mm screws
-
Six 2.6 mm screws
-
-
-
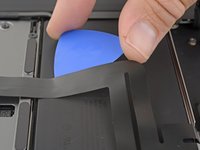
Wedge your fingers between the display and the lower case and pull upward to pop the lower case off the Air.
-
Remove the lower case.
-
-
-
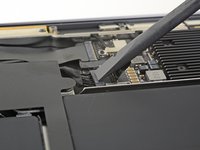
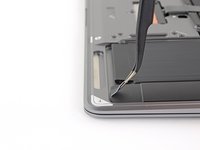
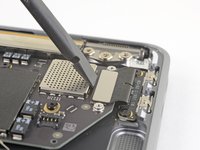
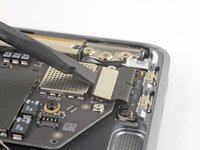
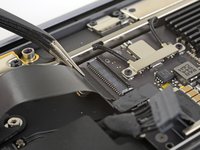
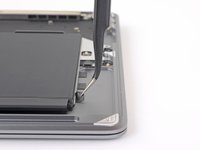
Peel back the tape covering the battery connector enough to reveal the connector underneath.
-
-
-
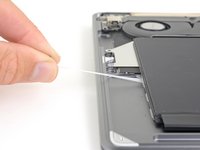
Use a spudger to slide the battery connector parallel to the logic board and out of its socket on the logic board.
-
-
crwdns2935267:0crwdne2935267:0Tweezers$4.99
-
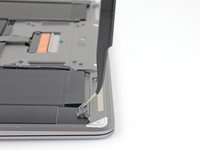
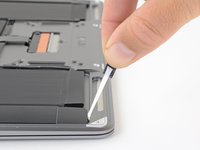
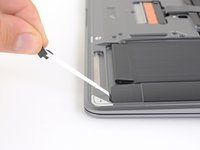
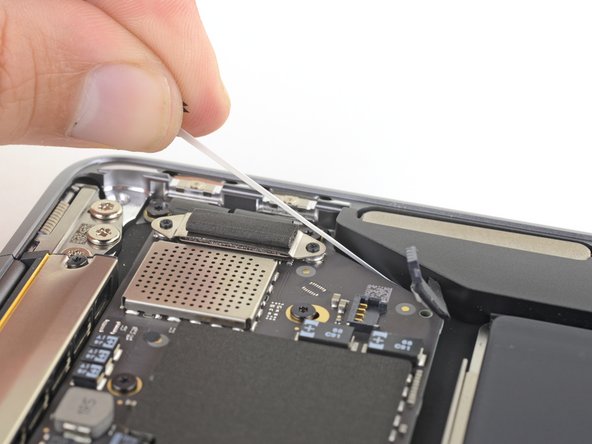
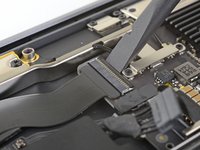
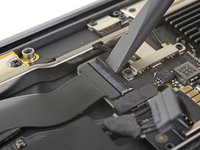
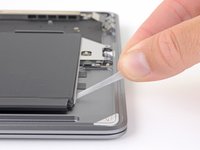
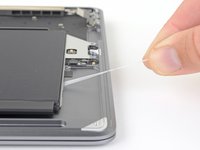
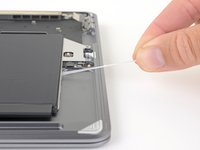
Use a pair of tweezers to lift up the black adhesive pull tab at the bottom of the right speaker, enough so you can grab it with your fingers.
-
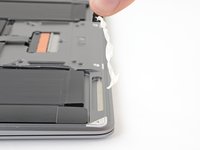
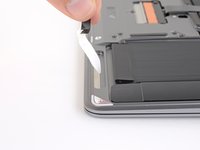
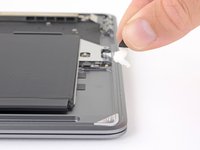
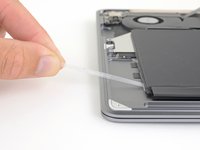
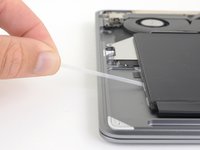
Grab the adhesive strip pull tab and slowly and carefully pull the adhesive strip out from under the speaker.
-
If the adhesive strip breaks, leave it in and proceed to the next step.
-
-
-
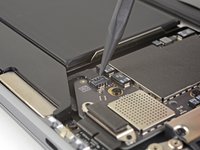
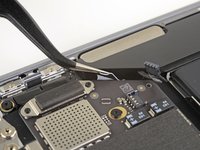
Slide the tip of a spudger underneath the right speaker cable and pry straight up to disconnect the speaker.
-
-
-
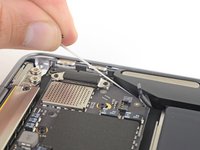
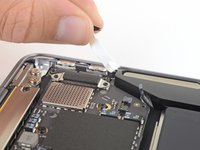
Use tweezers to lift the adhesive pull tab at the top of the right speaker enough that you can grab it with your fingers.
-
Grab the adhesive strip pull tab and slowly and carefully pull the adhesive strip out from under the speaker.
-
Apply heat to the speaker to soften the adhesive underneath.
-
Carefully slide a spudger or opening pick underneath the speaker to separate the adhesive.
-
-
-
Lift the right speaker straight up from the bottom and remove it.
-
-
crwdns2935267:0crwdne2935267:0Tweezers$4.99
-
Use a pair of tweezers to lift up the black adhesive pull tab at the bottom of the left speaker, enough so you can grab it with your fingers.
-
Grab the adhesive strip pull tab and slowly and carefully pull the adhesive strip out from under the speaker.
-
If the adhesive strip breaks, leave it in and proceed to the next step.
-
-
-
Slide the tip of a spudger underneath the left speaker cable and pry straight up to disconnect the speaker.
-
With the connector disconnected, slide the flat end of a spudger under the cable to separate the adhesive securing the cable to the logic board.
-
-
-
Use tweezers to lift the adhesive pull tab at the top of the left speaker enough that you can grab it with your fingers.
-
Grab the adhesive strip pull tab and slowly and carefully pull the adhesive strip out from under the speaker.
-
Apply heat to the speaker to soften the adhesive underneath.
-
Carefully slide a spudger or opening pick underneath the speaker to separate the adhesive.
-
-
-
Lift the left speaker straight up from the bottom and remove it.
-
-
-
-
Use a T3 Torx driver to remove the two 1.4 mm screws securing the trackpad connector bracket.
-
Remove the trackpad connector bracket.
-
-
-
Use the flat end of a spudger to pry the trackpad cable connector up and out of its socket.
-
-
-
Slide the tip of a spudger underneath the left speaker cable and pry straight up to disconnect the speaker.
-
With the connector disconnected, slide the flat end of a spudger under the cable to separate the adhesive securing the cable to the logic board.
-
-
-
Use a T3 Torx driver to remove the two 1.3 mm screws securing the USB-C port connector bracket.
-
Remove the USB-C connector bracket.
-
-
-
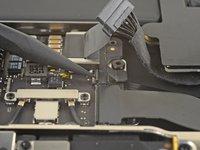
Use the flat end of a spudger to pry the USB-C cable connector up and out of its socket on the logic board.
-
-
-
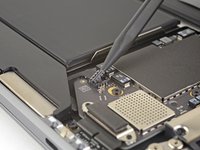
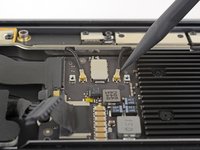
Use a spudger to lift up the small locking flap on the sound board cable's ZIF connector.
-
Slide the sound board cable out of the ZIF connector.
-
-
-
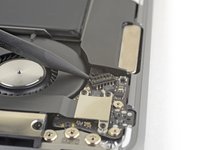
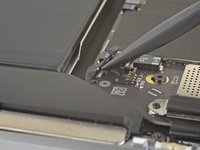
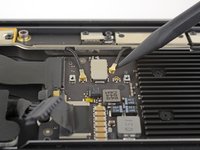
Peel back the black tape covering the fan cable connector.
-
-
-
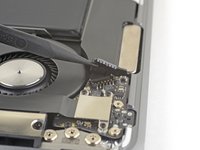
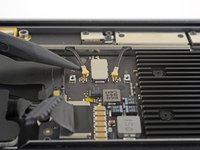
Use the tip of a spudger to lift up the locking flap on the fan cable's ZIF connector.
-
Slide the fan cable out of the ZIF connector.
-
-
-
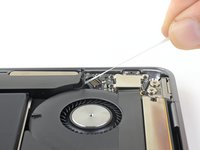
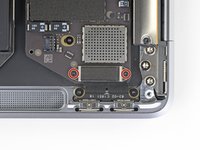
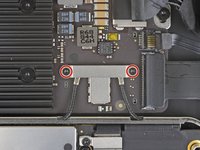
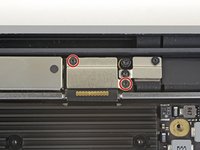
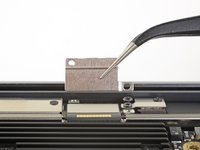
Use a T3 Torx driver to remove the two 1.4 mm screws securing the antenna cable bracket.
-
Remove the antenna cable bracket.
-
-
-
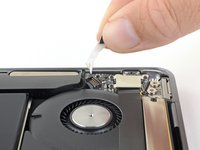
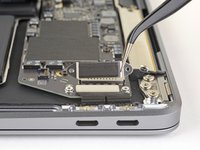
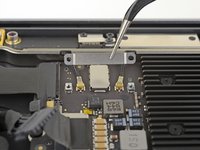
Insert the point of a spudger under one of the antenna cables close to the connector. Pry straight up to disconnect the cable.
-
Repeat for the other antenna cable.
-
-
-
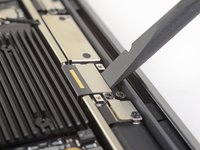
Use a T3 Torx driver to remove the two 1.5 mm screws securing the display cable connector bracket.
-
Remove the display cable connector bracket.
-
-
-
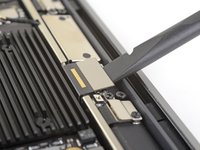
Use the flat end of a spudger to pry up the display cable connector.
-
-
-
Use a T5 Torx driver to remove the following screws:
-
One 5.5 mm screw
-
Three 2.6 mm screws
-
Two 1.9 mm screws
-
-
-
Remove the logic board.
-
-
-
Carefully slide an opening pick under the trackpad cable towards the keyboard connector to separate the adhesive securing it to the upper case.
-
-
-
Use the flat end of a spudger to lift the small locking flap on the keyboard ZIF connector.
-
Slide the keyboard cable straight out of its connector.
-
-
-
Carefully slide an opening pick under the trackpad cable to separate the adhesive securing it to the battery.
-
-
-
Use a T3 Torx driver to remove four 2.5 mm screws securing the battery.
-
-
crwdns2935267:0crwdne2935267:0Tweezers$4.99
-
Use a pair of tweezers to lift up the black adhesive pull tab on the side of the battery, enough so you can grab it with your fingers.
-
Grab the adhesive strip pull tab and slowly and carefully pull the adhesive strip out from under the battery.
-
If the adhesive strip breaks, leave it in and proceed to the next step.
-
-
-
Repeat the previous step to remove the next two adhesive strips on the same side of the battery.
-
If any adhesive strips break, leave them in and proceed to the next step.
-
-
-
Repeat the previous two steps to remove the three adhesive strips on the other side of the battery.
-
Carefully drip isopropyl alcohol along either edge of the battery, in the recessed part of the upper case, where the adhesive pull tabs were.
-
Let the alcohol soak into the adhesive for a minute or two.
-
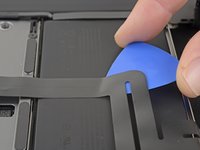
Use opening picks to gently pry the battery away from the upper case.
-
-
-
Remove the battery.
-
Calibrate your newly installed battery: charge it to 100%, and keep charging it for at least 2 more hours. Unplug and use it normally to drain the battery. When you see the low battery warning, save your work, and keep your laptop on until it goes to sleep due to low battery. Wait at least 5 hours, then charge your laptop uninterrupted to 100%.
-


Compare your new replacement part to the original part—you may need to transfer remaining components or remove adhesive backings from the new part before installing.
To reassemble your device, follow the above steps in reverse order.
Take your e-waste to an R2 or e-Stewards certified recycler.
Repair didn’t go as planned? Check out our Answers community for troubleshooting help.
crwdns2935221:0crwdne2935221:0
crwdns2935229:043crwdne2935229:0

crwdns2947412:015crwdne2947412:0
Well done article and I acheived my goal of changing out my very puffy old battery for the new one (still need to recycle the old… ASAP). Curiously, I had to open it again as I, somehow, didn’t get the battery cable pushed in far enough and it wasn’t working. Now, all is well. Strangely, even after a couple of attempts at resetting the SMC, my fan is running almost constantly. I’m kind of not sure what to do about that at this point (yes, I used the iFixIt guide to clean my fan as well). Anyway, thanks for the help.
great article, havent used it as yet, but just wanted to check the complexity before I purchased the battery
New battery is in and on 1st round of charging! Thank you very much!!!
As a note, I also purchased some Tesa tape with the battery as the shopping cart recommended it. I used that under the speakers before replacing them. The left & right sides of the batteries are kind of loose, but I’m not overly worried about that as it’s attached to metal backing.
Extremely pleased with this tutorial and the ifixit.com battery replacement kit. Since one of my USB-C ports died and the Apple certified folks told me to expect to pay over $500 to replace the port and battery I came here to sort it out myself. Happy to say with ifixit's awesome parts and tutorials that I have a fully functional Air again for about $150. I also recommend the magnetic project board as this was super helpful in keeping all of the various sized screws organized to the steps.
Great guide, except a small mistake in the required tools: we don't need a T4 screwdriver at all but we do need a T5 screwdriver.