crwdns2915892:0crwdne2915892:0
Use this guide to replace your MacBook Air's cooling fan.
crwdns2942213:0crwdne2942213:0
-
crwdns2935267:0crwdne2935267:0P5 Pentalobe Screwdriver Retina MacBook Pro and Air$5.99
-
Remove the following ten screws:
-
Two 8 mm 5-point Pentalobe screws
-
Eight 2.5 mm 5-point Pentalobe screws
-
-
-
Wedge your fingers between the display and the lower case and pull upward to pop the lower case off the Air.
-
Remove the lower case and set it aside.
-
-
-
Use the flat end of a spudger to pry both short sides of the battery connector upward to disconnect it from its socket on the logic board.
-
Bend the battery cable slightly away from the logic board so the connector will not accidentally contact its socket.
-
-
-
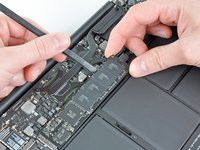
Remove the single 2.9 mm T5 Torx screw securing the SSD to the logic board.
What happens if the 2.9mm t5 screw got stripped?
So when i change my ssd in mac do i have to reinstall Mac OS
Correct, the SSD does not come with OS preinstalled. To install the OS you can completely clone your existing hard drive or you will need to create a bootable flash drive and format your SSD and create a partition in order to be able to install the OS.
So my wife spilled a Martini on her MacAir and it no longer works and is not repairable, all her music and pictures are stored on the drive, I would like to transfer these files to another drive. What is needed to read the drive once removed?
-
-
-
-
Use a spudger to help lift the free end of the SSD just enough to grab it with your other hand.
-
Pull the drive straight out of its socket and remove it from the logic board.
I performed all the steps above and fitted a Transcend JetDrive 500 which was very easy however when I re-assembled and turned on all I get is a question mark in the middle of the screen, can you explain if I did anything wrong?
-
-
-
Use the flat end of a spudger to pry the I/O board cable connector upward out of its socket on the I/O board.
-
-
-
While gently pulling the I/O board cable upward near its connection to the logic board, use the tip of a spudger to pry upward on alternating sides of the connector to help "walk" it out of its socket.
-
Remove the I/O board cable.
-
-
-
Use the tip of a spudger to carefully flip up the retaining flap on the fan cable ZIF socket.
-
-
-
Remove the following three screws securing the fan to the upper case:
-
Two 5.2 mm T5 Torx screws
-
One 3.6 mm T5 Torx screw
-
-
-
Lift the fan out of the upper case and carefully pull the fan ribbon cable out of its socket as you remove it from the Air.
-


To reassemble your device, follow these instructions in reverse order.
To reassemble your device, follow these instructions in reverse order.
crwdns2935221:0crwdne2935221:0
crwdns2935229:09crwdne2935229:0

crwdns2947410:01crwdne2947410:0
thanks a million—clear and accessible.And we did it!
I recommend that one of the tools you obtain is a jeweler's loupe that mounts on your glasses. It makes things easier.
blairweaver - crwdns2934203:0crwdne2934203:0
This is not correct. You need the pentalobe tool at this point.
Duane Hellums - crwdns2934203:0crwdne2934203:0