
Mac mini Mid 2010 Hard Drive Replacement

crwdns2944107:0crwdnd2944107:0Andrew Bookholtcrwdnd2944107:0crwdnd2944107:0crwdnd2944107:012crwdnd2944107:0crwdne2944107:0
crwdns2944111:0Maw 31, 2025crwdne2944111:0
crwdns2915892:0crwdne2915892:0
crwdns2942287:0crwdne2942287:0Use this guide to completely replace your mini's hard drive. Completing this guide requires rubber cement to stick the old thermal sensors to your new hard drive.
crwdns2942213:0crwdne2942213:0
crwdns2942215:0crwdne2942215:0
crwdns2942339:0crwdne2942339:0


crwdns2943213:0crwdne2943213:0


crwdns2943215:0crwdne2943215:0


crwdns2944105:0crwdne2944105:0

-
-
Place your thumbs in the depressions cut into the bottom cover.
-
Rotate the bottom cover counter-clockwise until the white dot painted on the bottom cover is aligned with the ring inscribed on the outer case.
-
-
-
Tilt the mini enough to allow the bottom cover to fall away from the outer case.
-
Remove the bottom cover and set it aside.
-
-
-
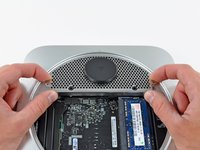
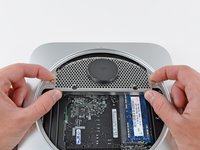
Remove the two 11.3 mm T6 Torx screws securing the fan to the logic board near the antenna plate.
-
-
-
Lift the ear of the fan nearest the RAM up off the standoff secured to the outer case.
-
-
-
Lift the fan out of the mini for enough clearance to access its connector.
-
Carefully pull the fan cables upward to lift the fan connector up out of its socket on the logic board.
-
Remove the fan.
-
-
-
Remove the single 3.5 mm T6 Torx screw securing the cowling to the heat sink.
-
-
-
Lift the cowling from the end nearest the antenna plate.
-
Rotate the cowling away from the outer case and remove it from the mini.
-
-
-
Remove the following screws securing the antenna plate to the mini:
-
Two 6.6 mm T8 or T9 Torx screws
-
Two 5.0 mm T8 Torx or 2.0 mm Hex screws (either will work)
-
-
-
Slightly lift the antenna plate from the end closest to the RAM.
-
Carefully pull the antenna plate straight away from the circular rim of the outer case.
-
-
-
Use the tip of a spudger to carefully pry the antenna connector up off the AirPort/Bluetooth board.
-
-
-
Remove the antenna plate from the mini.
-
-
-
Remove the following three screws:
-
One 5.0 mm T8 Torx or 2.0 mm Hex screw (either will work)
-
One 16.2 mm T6 Torx screw
-
One 26 mm T6 Torx standoff
-
-
-
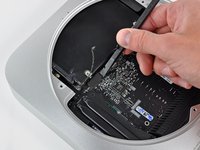
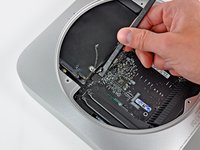
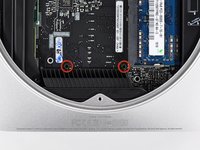
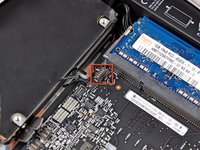
Carefully pull the wires for both hard drive thermal sensors upward to lift their connectors up and out of their respective sockets on the logic board.
BEWARE! Gently pulling one thermal sensor wire up from its logic board connector caused wire to rip loose from connector, leaving connector still in logic board socket. Using spudger on other connector caused same result. Even after wires ripped lose, it was impossible to get connector out of logic board socket (using spudger and needle nose pliers the connector came away in pieces). Connectors almost seem glued/fused into sockets and the wires will apparently break lose before the connector will release. What a terrible design. Here's hoping the mini will run without HDD thermal sensors :( I am experienced with repairing laptops and am kind of ticked because I am sure this damage was not due to incorrect/rough handling during attempt to disassemble.
Followup Note: Ending up with disconnected HDD thermal sensors due to breakage apparently causes the main system fan to run at full speed all the time. This is extremely loud and pretty much defeats the purpose of the Mini form factor. Going to have to try to rig something up with actual solder or adhesive tape.
This is just stupid. A computer where logic board connections get broken while replacing a frickin HDD. All in an attempt to do something about the pathetic and feeble hard disk the vendor includes with their crap hardware (50MB/s transfer--what is this 1998?). Last Mac Mini I will ever buy. Slow, yet expensive and fragile.
emcnally -
Not sure what emcnally is talking about but mine came off fine. I have a 2010 mac mini and just upgraded to a 500 gig WD drive. Everything worked went great and was easier than I thought. My connectors pulled right off with no damage.
tell the people to remove the superdrive’s thermal sensor as well! i just broke mine.
WARNING! Remove superdrive thermal sensor as well from the connector, or it will break in step 16.
The plastic part broke for me. Barely putting any pressure on the connector and the thin plastic covering the metal connectors broke and the wires came out leaving the plastic connector in place. I was able to get the connector out without any more damage. Can I purchase a new thermal connector for this? I can't find the part listed anywhere.
In the meantime I'm going to try and get the wires rigged to the board some how. Super glue them to the connector maybe. But I'm not sure if there is a polarity concern. Can the wires go to either pin on the board?
I was able to get the plastic connector back in place, and fit the wires into it. Polarity is needed. First time I got the fan running full. Switched the wires and now I think the fan is running normally.
But I don't trust this connection over and time would like to find a replacement hard drive thermal sensor wire assembly.
Each of the hard drive temperature cable connectors have tiny little tabs on the sides. I found success using a small needle to carefully push under and pop the tab out.
Thanks, that's a nice way, works really well for me. Just try to stick a needle on the side and lift it up, if it has come up a little you can gently pull the cable and it will come off with very little force on the cable.
gertjan -
These connectors are fairly easy to unplug. You can pull up on the wires GENTLY to remove them. I used a wooden spudger to pry gently and the connectors popped right out. Putting them back in is easy just make sure they are right side up and they snap right back in.
This is where I got in trouble too. No problems on the first of my Minis, but this time one of these sockets had poor soldering and just came off the board. Basically no solder connection to the posts that are there to hold the socket in place. I ended up using a pin to pry the rest of them off, in case the others were also poorly connected. The outside of the socket is U shaped, with 2 small tabs at the lower end of the U. I inserted a pin next to these tabs and it let me lever the connectors out easily. Now I get to practice my soldering!
I used a pick (like a fine ice pick - available at Harbor Freight) to pry up the plastic clips while gently pulling at the wires with tweezers. They pull straight up. There are tiny tabs on the sides that kind of lock them in. I would not try just pulling on the wires. Everything is tiny and yrying to fix wires pulled out of the connectors would be very difficult.
The pin method is definitely better. I used the pin to slightly spread the "wings" of the connector on the board. Then I levered out the part that is attached to the wires. All done with the aid of a magnifying loop.
I broke mine as well, did not replace the thermal sensor for the HDD, fan runs at full speed and is noisy. Went ahead and downloaded software fan control to reduce fan speed.
With all the good comments above, I was extra cautious, my two connectors have solid black covers and I couldn’t find the tabs for the needles. So I read ahead a few steps. I was able to skip this step 13 and steps 15 and 16 and take out the drive without force. Step 14 worked as described. I have a mid-2010 without an optical drive so there was only a hard drive connector.
Hi, i just used the flat end of ifixit’s plastic spudger to lift the tiny connectors without any tugging on the wires. First, i was a trained auto mechanic for 10 years then i got my electrical engineering degree! Started fixing macs in 1979 with an oscope, soldering iron and the ic circuit handbook plus chips from apple.
Apples construction methods have sure gotten more and more fragile over the years. Glad i still have great eyes! Rossmon
Thanks for the wonderful story, incredibly helpful to anyone reading it. A definite must for those upgrading their Minis. Perhaps an autobiography is in store for the future? I can only hope… I'd die knowing my life was complete if Im lucky enough to read such an intriguing story. OMG, and if it was hard back, I'd pass it down to the generations succeeding me so they too will grace this life changing experience. BRAVO to you sir !??
AJ GREEN -
I broke the connector too, but was able to make a secure connection despite this. You will need a good magnifier glass/visor and fine tweezers. I added a drop of Crazy glue to secure it. Photo: https://ibb.co/ZcsnvNC
After the plastic of the connector of the thermal sensor falls in tiny little parts after manipulating with pludger, tweezers and all I can find in my home I just let the connector in place on the logic board. Like written down in step 15 and 16 I pulled the whole logic board just a little bit out of the housing, so there’s just enough room for pulling the old HDD out of the housing. Put away the different adhesive tapes HDD (main connector and thermal sensor). Put away main connector and the thermal sensor from the HDD. Then I put everything in place to the new SSD and stick the thermal connector with the the old adhesive stribe at the SSD. I never would try to disconnect the thermal sensor again from the logic board!!!
I highly recommend TG Pro to solve this absurd hard disk temperature problem. After replacing my HDD with an SSD, the fan ran nutso just like everyone else’s. Sensors are in place on the drive, but they don’t seem to work. I even tried thermal paste, but no luck. While I could try replacing the temperature sensors, what’s the point? Having a quality SSD should remain far cooler than any HDD, regardless of the conditions.
My Samsung EVO SSD has its own internal SMART temperature sensor built into it. TG Pro detects it fine. The reason I recommend TG Pro is that I tried others. TG Pro is top-of-the-line quality, imo. It even allows total override of system fan control, solving the runaway fan problem once and for all. While this is hypothetically a safety issue, since I began using the software 3 years ago, I’ve come to trust it more than whatever is built into my Macs. (I own three MacBooks in addition to my Mac Mini.)
My 2010 is considered out of date, but with an SSD, it’s still a great little music server.
Found a 4,1 for $20, and flew too close to the sun. Thermal connections falling off everywhere. Will TG Pro (or something similar) allow me to just ignore replacing the HD sensors and the OD sensor?
I wanted to change the Superdrive on a 2010 Mac mini and when I took off the thermal connector from the hard drive, one of the two cables came off.
The hard drive has 2, it is the one on the other side of the SATA connector.
If you don't connect that cable, the fan always starts at 5000rpm. It is Apple Part Number: 076-1369
I was looking on Ebay/Ali and the cable is for €9, luckily you can insert the cable back into the connector and put a drop of thermal silicone to apply force and so far it works ok.
-
-
-
Use the flat end of a spudger to pry both the hard drive and optical drive connectors up out of their sockets on the logic board.
-
-
-
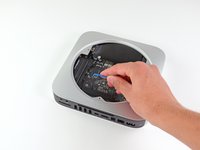
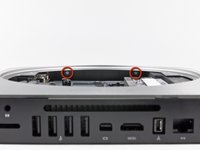
Insert a Mac mini Logic Board Removal Tool into the two holes highlighted in red. Be sure it makes contact with the outer case below the logic board before proceeding.
-
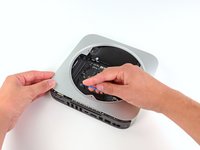
Carefully pull the tool toward the I/O board. The logic board and I/O board assembly should slightly slide out of the outer case.
-
Cease prying when the I/O board is visibly separated from the outer case. Remove the Mac mini Logic Board Removal tool.
-
-
-
Simultaneously push the two plastic clips on the far left and right sides of the I/O board toward the middle of the I/O board and pull the I/O board slightly away from the outer case.
-
-
-
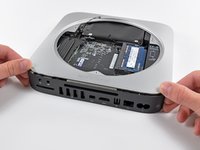
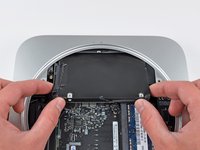
Lift the hard drive from the edge nearest the logic board and remove it from the mini, minding the RAM socket and any cables that may get caught.
-
-
-
Remove the strip of tape covering the hard drive connector.
-
-
-
Remove the hard drive cable by pulling its connector straight away from the hard drive.
-
-
-
Remove the piece of tape covering the thermal sensor attached to the edge of the hard drive.
-
-
-
Carefully peel the thermal sensor off the end of the hard drive.
-
-
-
Remove the two 6.2 mm T8 Torx screws from the side of the hard drive.
-
-
-
Carefully peel the hard drive cover off the hard drive.
-
Hard drive remains.
-


To reassemble your device, follow these instructions in reverse order.
To reassemble your device, follow these instructions in reverse order.
crwdns2935221:0crwdne2935221:0
crwdns2935229:0426crwdne2935229:0
crwdns2947821:0crwdne2947821:0
crwdns2947823:0crwdne2947823:0


crwdns2947412:038crwdne2947412:0
These instructions and a little common sense can also be used to replace the lower hard drive in the server version of the Mac Mini. Luckily that was the drive that had failed in my case. Replacing the upper drive looks like a tougher proposition.
Fantastic guide, thank you very much Mr. Bookholt!
As with the above commenter, I accidentally mistook the fan's standoff for a screw and removed it while removing the fan. Also the top right fan screw's standoff came out along with it. I edited the guide with a note on this.
While replacing the antenna, it wasn't immediately clear why the screws weren't lining up, until I realized that two of the screws were in the (otherwise free-floating but for the back grommets) hard drive, I also added a note on that.
STEP 15: If you don't have the time to purchase the Mac Mini Logic Board Removal Tool, the round stock on a large binder clip is PERFECT for the job. It requires a little bending and cutting but it worked perfectly!!
And as jon jon stated, it works like a lever - not a pull. You can feel it kind of click in to the lever points below.
Bravo to ifixit.com for the easy to follow instruction!!
Hey, what about the 2nd harddrive? how does that come out?
This was a superb guide. Thank you very, very much.
Ok, just did here. 1 tera HD working fine. Thanks iFixit, for repacking my tools because the Brazilian mail lost them. So, for those who want to do the same, just have in mind that not ALL things happen just like the how-to. I have to figure out What to do with the logic board removal tool... And, no, I did not fuss with those initial thermal stuff, because they are impossible to unplug. I only fuss with the HD thermal.
Excellent guide -- worked exactly as defined. I ordered the replacement kit (drive + tools) and its working great. Thank you!
Followed the guide and it worked perfectly. One thing to note: when replacing the hard drive which is 9.5mm thick with a newer SSD that is only 7mm thick, it's useful to use a cushion of some double sided foam tape on the top of the SSD. This prevents the SSD from angling down towards the rear of the mini (assuming you have the lugs placed back in the grommets in Step 17), which makes replacing the 2 6.6 mm T8 Torx screws in Step 8 easier since they screw into the bottom of the hard drive or SSD.
Thank you for this guide - it was very helpful and well written. I highly recommend buying the mac mini logic board tool - it made a huge difference in the ease of that step. Now I have a 1TB HDD in my trusty mini and it took less than one hour to do - thank you.
Excellent guide. Much less scary than it might look. Just take your time and read each steps comment before executing the step.
I followed these instructions diligently. After re-assembly and booting the system, I am experiencing intermittent video, mostly black screen with flashing grey and brief appearance of the Apple logo. While I cannot say for sure, the boot process makes it as far as the filevault login screen. I have tried multiple boot drives with no change. It seems like the system has been bricked.
Has anyone seen this before? It does not matter if I tap into the HDMI or mini-display port.
Thanks in advance.
It is extremely irritating to take the whole thing apart and replace the upper drive, only to find that it was the other drive I needed to replace. As far as I know there is know way of telling which drive was faulty!
I removed the drive without doing steps 15 and 16. I was able to pry it out with a little bit of force and then I installed an SSD. There is enough room for the hard to come out if you just nudge it out. Someone suggested using foam to make up for the 2.5mm difference in thickness. I used a piece of paper that I folded 3 or 4 times and then taped it to the SSD. The SSD slid in with no problem.
Thank you so much, this worked perfectly and helped me bring a mid-2010 mac mini back to life with a brand new Crucial MX200 500 GB SSD!
Step 8 - The antenna has a lip on it (the half crescent side). After the other side is lined up and in the groove, use a pair of tweezers or two mini screw drivers and stick them in two holes near the side that won't fit. Gently lift the antenna grill into place as you push it towards the edge of the Mac mini.
I was nervous about trying this, but making sure to read all comments, it worked! Reinstalling the antenna cover plate was the most difficult part as the tolerances are very tight.
Brilliant! Took me longer than 55 minutes (90?) but no big problems thanks to the guide and the other user comments. I was able to reattach the thermal sensors with tape I had removed from the drive. My Mac mini is now twice as fast to start up (5 minutes to 2.20), cooler, totally silent (no fan in use because it's cooler) and much more productive. It had fallen into disuse due to the time it took to do ANYTHING, but now it's fine again. Many thanks.
Hi where and how did you re-attach the thermal sensor onto the new SSD? Thanks
Many thanks for not only documenting the steps but also for encouraging not to afraid to go for it... It took about half-an-hour to replace my HDD with SDD (i had to carefully use plyers twice instead of missing torx). My Mini 2010's performance was strongly impacted by going to Mavericks and later OS, but the new SSD has compensated some of this loss :)
HI What odd is there is only 3 connectors on motherboard and no 4th one for cable piece that just stuck on top of hard drive for thermal sensor cable.
I've started the disassembly for this repair before realizing that I had the dual-hard drive/no optical drive 2010 Mac Server. I don't see any instructions for removing the dual hard drive assembly (the factory dual-hard drive, not the aftermarket optical drive/hard drive swap out. I don't see any instructions for my model, or did I miss them somewhere? I've got everything out of the mini shell except for the power supply. I've got both hard drives on the table - one in the protective plastic sheath (with glued sensors, cables, etc.) and the other in a plastic frame that slides out of the mini shell from its deepest parts. Incredibly, both hard drives are failing at the same time. Everything's backed up and I'm ready to replace with two 1TB drives that I've removed from MacBook Pros.
Does anyone know what the max height for a 2.5" SATA hard drive is when replacing either of the hard drives in the dual-hard drive systems?
I swapped out the 320 gig disk in my 2010 mini not long ago, I replaced it with a 1 TB to hold audio imported into iTunes with the Apple lossless codec. I managed to do the swap without disconnecting anything other than the SATA cable. I tried disconnecting the thermal sensor wires, but due to the age of the hardware, I figured it would turn out badly trying to get those tiny brittle plastic connectors apart. So with some careful work I got the sensors unstuck from the old disk and placed on the new one, got it into place, tightened all fasteners, and reassembled. Now this box, which is dedicated to CD importing and streaming audio via iTunes, can hold all the CDs I have on hand to import and then some.
On my Mini, the 26mm T6 screw and stand-off removed in step 12 goes through the fan and has to be removed in step 3. Not sure if that was a design change mid production.
When Disk Utility refers to the “upper” drive, is that the bottom drive when repairing because it’s upside down?
Mid 2010 mac mini
I cocked mine up, one of the heat sensor connectors broke whilst trying to lift out with pry tool,
i got the new hard drive in and got it all back together but there is no sign of life, the light doesn’t even come on the front,
My external hard drive lights up so there is power going though, and the hdmi changes on my tv, but nothing else happens,
i should have just stuck to the memory upgrade as changing it from the 2x 1gb to 2x 8gb made it a lot smoother than it ever has been!!
alas I didn’t leave it there and I now have no working Mac mini :(
Paul
Worked perfectly. The photos make it incredibly easy. I opted for a Samsung 860EVO 500GB SSD (Amazon.com had on sale for $99 + free next day shipping with Prime). Prying the logic board to move was a little sticky … and the other comment about the thickness of the SSD vs the old HDD is correct. I saw that some kits come with a rubber grommet, which would be helpful, but not required. It probably took more time to get the OS back on compare to swapping the drive out. Thank again.
Excellent guide, thank you iFix it. It is the second time I follow this , the first one I upgraded to a larger drive (1Tb) and now I switched to a SSD.
I still need the now “legacy” DVD for some old movies :). At some point I may replace it with a second HDD (storage) .
sono riuscito-a-cambiarlo-saltando-passo-15
Very nice instructional. Replaced a dead HD and am now installing Mint Linux. This will make a nice media server for the house. Thanks!
Step 21 - Removing the thermal sensor needs to be updated to emphasise how delicate this part is. Just saying “Carefully peel the thermal sensor…” is not good enough for people like me. I am careful, but the gum holding the tiny circuit board is very sticky. An indication of the consequences of not being extremely careful with this fragile component would be helpful ie crazy fan noise until it is replaced.
Mac Mini Server 2010
I just replaced the lower HD of our MacminiServer Mid 2010 with a SSD. The replacement worked very well, although one has to very carefully disassemble especially the various little contacts of the heat sensors from the mother board.
Before doing so in case of a Macmini with server software I strongly recommend to make a clone of the whole server hard disk with CarbonCopyCloner to an external Fire-Wire HD. Then this clone is bootable. After reassembling all parts of the macmini I copied the clone back to the new SSD and rebooted the server from the SSD. Everything works perfect now and missing speed is no matter at all any more.
Excellent guide and it still works. Bought the Logic Board Removal Tool from iFixit, which made the swap a breeze. Thanks!
i skip step 12-16, Great doc as always.
Alright, just went through the motions despite much trepidation after reading about the flimsy connectors. Here’s what worked for me, mostly based on the step-level comments.
- since I was upgrading the RAM as well I pulled it out, and was glad to have it out of the way;
- I removed the long 3rd fan screw at step 3 and was glad I did;
- I unplugged all the ZIF connectors, including the IR sensor (4-wire), peace of mind when pulling logic board
- I left the Airport connector in place, as per one comment; I placed a finger on it when pulling out the antenna plate; not an issue afterwards during the various operations;
- I used a 2mm Allen key to move the logic board. Think of it as pulling out a drawer from inside, the drawer’s face being the black plate with the outside connectors at the back; the Allen key found something to leverage on upon contacting the underside of the top of the case, it was then a matter of gently prying from both holes a bit at a time;
- more in following comment!
- I somehow missed the step about disconnecting the drives. The HD connector simply popped out, though;
- unsticking the HD heat sensor: the trick about rotating it works (think DJ and turntable, just more gentle);
- standing the Mini on its CD-slot face to nudge a thinner SSD in place (pegs in holes) works; connected antenna plate not an issue); temporarily placing the T9 screws on the drive to help manoeuvre it is helpful, just don’t forget to remove them before trying to put the antenna plate back in place;
- putting the antenna plate back: its long lip goes under the case’s lip, but the “teeth” of the antenna’s surface plate go over it. Once almost in place but not entirely aligned, I placed the two T9 HD screws and one of the T8 at the lefthand side, all a bit loose to allow for wiggle. With a fine tool in the holes at the edge of the lip, careful not to touch circuitry below, I nudged some of the little teeth over the ledge. I ended up pushing firmly the antenna onto this ledge until the satisfying ‘snap!’
Excellent - worked great, had the HDD replaced with an SSD in just under 1 hour (with an iFixIt tool kit of torx/spudgers etc, of course!).. Thanks everyone for posting helpful comments on the various steps (such as removing the 3rd screw on the Fan - made this much easier).
I ran into a snag at step 12. The t6 stand-off is completely stripped. Any tips on how to remove it without wrecking the computer?
+1 on these steps - I had to take my time, especially during the re-assembly - and when things are positioned right they tend to "snap" into place, which is great feedback that the part or cable was connected properly. I also did not let the lack of the logic board removal tool stop me - I used 2 small screwdrivers that fit nicely into the holes for the tool, and the leverage points inside the holes are easy to find. Used this guide to replace a hard drive with an SSD in my Mac Mini Mid-2010 pulled from a dumpster of a company that was moving - and it is a nice file server for my home network to this day.