crwdns2915892:0crwdne2915892:0
If your MSI GS66 Stealth laptop (model 11UE-007) is having problems with the overall cooling system and it is not the cooling fan, the thermal paste might need to be replaced.
Thermal paste is used to transfer heat away from the CPU and the cooling system. Loss of effectiveness from this part can result in the laptop heating up to dangerous levels that put other components of the laptop at risk.
This part can dry up over time and will need replacement at some point. This guide has the necessary steps to fully replace the thermal paste and return the laptop to peak efficiency.
crwdns2942213:0crwdne2942213:0
-
-
Orient your laptop so that the bottom is facing up and the hinge is away from yourself.
-
-
-
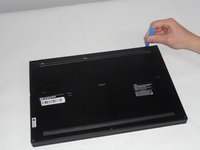
Identify the nine screws around the perimeter. One screw will be under the factory seal sticker.
-
Remove eight 10mm Phillips J1 screws.
-
Remove one 7mm Philips J1 screw from the center bottom of backplate.
-
-
-
Use the tip of the blue plastic opening tool to slip between the backplate and the body of the laptop at the hinge side.
-
Wiggle the blue plastic opening tool as you slide it around the perimeter of the backplate to separate is from the body of the laptop.
-
-
-
-
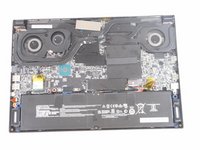
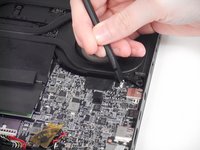
Disconnect the wires from the cooling fan.
-
-
-
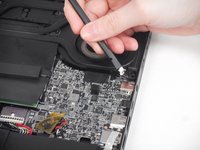
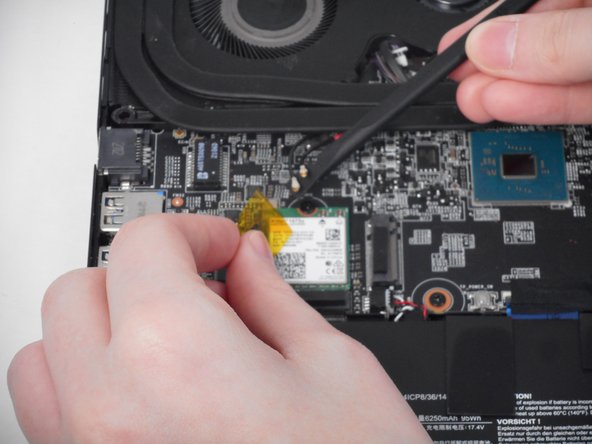
Disconnect the two wires from the Wi-Fi card.
-
-
-
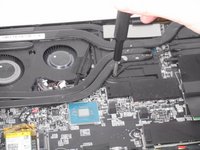
Remove the tape connecting the fans to the fan housing.
-
-
-
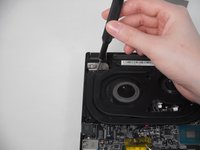
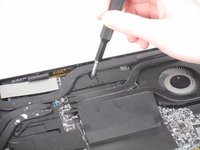
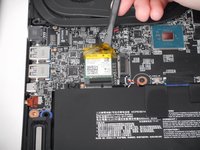
Lift up the cooling unit like it is hinged at the back.
-
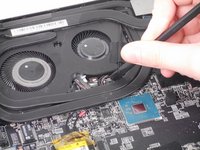
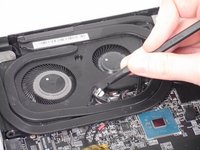
Replace thermal paste.
-


To reassemble your device, follow these instructions in reverse order.
To reassemble your device, follow these instructions in reverse order.
crwdns2935221:0crwdne2935221:0
crwdns2935229:02crwdne2935229:0
crwdns2915084:0crwdne2915084:0

University of Memphis, Team 1-4, Sneed Fall 2023 crwdns2935289:0University of Memphis, Team 1-4, Sneed Fall 2023crwdne2935289:0
UM-SNEED-F23S1G4
crwdns2931471:04crwdne2931471:0
crwdns2935297:06crwdne2935297:0
crwdns2947412:011crwdne2947412:0
When putting the heatsink back on, do we only need to reapply cpu thermal paste, or do we have to replace the pink stuff? If so, what is the pink stuff, and where can I get it?
If you only have issues with thermals on your cpu then I would just replace the gray thermal paste directly on the cpu. The “pink stuff” is also thermal paste for the other components. It would normally have thermal pads but there must not have been enough room for them in the design.
Hi, do you need to disconnect the battery before doing this. As I have tried and mine is not coming out no matter what. Thanks
It’s not necessary to disconnect the battery. It’s just best practice to. Is the connector not coming out or the battery itself?
The connector itself will not come out even with what I’d consider excessive force. I am looking to clean my fans and repaste. Are there any other precautions I should take if I were to remove the cooler without disconnecting the battery? Thanks.
I should add I am doing this to clean the larger of the 2 gpu fans as it has started to buzz sometimes and I have not repasted in about 3 years due to fear of breaking my laptop.
You can try to take a pointy or thin flat plastic tool and put it between the connector and where it connects. It’ll be at the very side of it and alternate between the side pushing away from the connection point or twist the flat tool slightly. It will take a couples of times going between the two side for you to wiggle it out. If that doesn’t work or you don’t want to do that I would just suggest being careful to not let any small metal pieces lay on the circuit board(screws and things). It shouldn’t be a problem to replace the paste without disconnecting the battery. Another option is to run the laptop till it dies to deplete the battery for extra precaution.
Also make sure the laptop isn’t on.
Buzzing from the fan could be from some dirt and debris in the fan. I would take some canned air and spray a little at a time in it to try and clear it out before going through the process of reapplying thermal paste. Make sure to use canned air and not air from a compressor because it could contain water in it. And don’t fully blast the fan and let it spin really fast because that could damage the fan itself so short bursts are better.
Thank you very much for the advice. I will give that a try sometime when I’m next free. Have a nice day and thanks again. :)
No problem! Have a great day!