crwdns2933423:0crwdne2933423:0

Logitech MX Vertical Battery Replacement

crwdns2942213:0crwdne2942213:0

  1. Logitech MX Vertical Battery Replacement, Turn off the mouse: crwdns2935265:01crwdnd2935265:01crwdnd2935265:01crwdne2935265:0
    • Before you begin, flip the mouse's power switch into the OFF position.

  2. Logitech MX Vertical Battery Replacement, Lay the mouse buttons-side down: crwdns2935265:02crwdnd2935265:01crwdnd2935265:01crwdne2935265:0
    • The mouse's unique shape prevents it from laying flat. If you need to, lay it button-side down onto a soft towel to prevent wobble.

  3. Logitech MX Vertical Battery Replacement, Heat the feet adhesive: crwdns2935265:03crwdnd2935265:01crwdnd2935265:02crwdne2935265:0 Logitech MX Vertical Battery Replacement, Heat the feet adhesive: crwdns2935265:03crwdnd2935265:02crwdnd2935265:02crwdne2935265:0
    • If you're planning to reuse your existing mouse feet, note that the adhesive needs to be thoroughly heated for them to be cleanly removed.

    • Heat an iOpener and apply it to the feet on the mouse's underside for about two minutes.

    • Alternatively, a hair dryer or a heat gun may also be used, but be careful not to overheat the mouse.

  4. Logitech MX Vertical Battery Replacement, Remove the mouse feet: crwdns2935265:04crwdnd2935265:01crwdnd2935265:03crwdne2935265:0 Logitech MX Vertical Battery Replacement, Remove the mouse feet: crwdns2935265:04crwdnd2935265:02crwdnd2935265:03crwdne2935265:0 Logitech MX Vertical Battery Replacement, Remove the mouse feet: crwdns2935265:04crwdnd2935265:03crwdnd2935265:03crwdne2935265:0
    crwdns2935267:0crwdne2935267:0
    Tweezers
    $4.99
    • Insert one arm of a pair of sharp tweezers underneath the end of one foot.

    • Grip the foot and begin to peel it away from the bottom of the mouse.

    • Peel slowly, making sure the foot and its adhesive are removed in one piece.

    • The foot should come away from the mouse without the need for much force. If it feels stuck, apply more heat and try again.

  5. Logitech MX Vertical Battery Replacement: crwdns2935265:05crwdnd2935265:01crwdnd2935265:03crwdne2935265:0 Logitech MX Vertical Battery Replacement: crwdns2935265:05crwdnd2935265:02crwdnd2935265:03crwdne2935265:0 Logitech MX Vertical Battery Replacement: crwdns2935265:05crwdnd2935265:03crwdnd2935265:03crwdne2935265:0
    • Use a pair of tweezers to peel the foot away from the mouse to completely remove it.

    • Place the foot adhesive-side up on a clean surface.

  6. Logitech MX Vertical Battery Replacement: crwdns2935265:06crwdnd2935265:01crwdnd2935265:03crwdne2935265:0 Logitech MX Vertical Battery Replacement: crwdns2935265:06crwdnd2935265:02crwdnd2935265:03crwdne2935265:0 Logitech MX Vertical Battery Replacement: crwdns2935265:06crwdnd2935265:03crwdnd2935265:03crwdne2935265:0
    • Insert a tweezer arm underneath the end of the second foot.

    • Peel the foot away from the mouse to completely remove it.

    • The foot should come away from the mouse without much force. If it feels stuck, apply more heat and try again.

    • Place the foot adhesive-side up on a clean surface.

    • During reassembly, remove any leftover adhesive before installing new feet.

  7. Logitech MX Vertical Battery Replacement, Remove the case screws: crwdns2935265:07crwdnd2935265:01crwdnd2935265:01crwdne2935265:0
    • Use a Phillips screwdriver to remove the five 6.5 mm recessed screws securing the two halves of the mouse casing together.

  8. Logitech MX Vertical Battery Replacement, Separate the two halves: crwdns2935265:08crwdnd2935265:01crwdnd2935265:03crwdne2935265:0 Logitech MX Vertical Battery Replacement, Separate the two halves: crwdns2935265:08crwdnd2935265:02crwdnd2935265:03crwdne2935265:0 Logitech MX Vertical Battery Replacement, Separate the two halves: crwdns2935265:08crwdnd2935265:03crwdnd2935265:03crwdne2935265:0
    • Don't try to completely remove the upper half, as both halves are connected with a fragile ribbon cable.

    • Lift the top half of the mouse away from the bottom half.

    • Lay the top half of the mouse, buttons down, onto your work surface.

    • Take care to not strain the ribbon cable connecting the two halves.

  9. Logitech MX Vertical Battery Replacement, Disconnect the battery: crwdns2935265:09crwdnd2935265:01crwdnd2935265:02crwdne2935265:0 Logitech MX Vertical Battery Replacement, Disconnect the battery: crwdns2935265:09crwdnd2935265:02crwdnd2935265:02crwdne2935265:0
    crwdns2935267:0crwdne2935267:0
    Tweezers
    $4.99
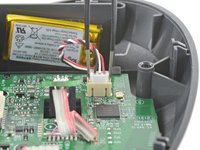
    • Use a pair of blunt tweezers to grip the edges of the battery cable connector, and pull up to disconnect it from the motherboard.

    • Always pull cables by their connectors and not the wires themselves.

  10. Logitech MX Vertical Battery Replacement, Remove the battery: crwdns2935265:010crwdnd2935265:01crwdnd2935265:02crwdne2935265:0 Logitech MX Vertical Battery Replacement, Remove the battery: crwdns2935265:010crwdnd2935265:02crwdnd2935265:02crwdne2935265:0
    • Peel the battery away from its shelf.

    • The battery is secured with some light adhesive.

    • Remove the battery.

    • To install a replacement battery:

    • Remove any leftover adhesive from the battery shelf.

    • Apply double sided tape or pre-cut adhesive to secure the new battery.

crwdns2915888:0crwdne2915888:0

To reassemble your device, follow the above steps in reverse order.

Take your e-waste to an R2 or e-Stewards certified recycler.

Repair didn’t go as planned? Check out our Answers community for troubleshooting help.

crwdns2935229:09crwdne2935229:0

Carsten Frauenheim

crwdns2935283:003/10/20crwdne2935283:0

138.776 crwdns2915208:0crwdne2915208:0

crwdns2935297:0379crwdne2935297:0

crwdns2915084:0crwdne2915084:0

iFixit crwdns2935289:0iFixitcrwdne2935289:0

Staff

crwdns2931471:0121crwdne2931471:0

crwdns2935297:019.857crwdne2935297:0

crwdns2947412:08crwdne2947412:0

¡Excelente guia! ¡Parece haber sido hecha por el fabricante! ¡Muchas gracias!

Erick Caliz Morales - crwdns2934203:0crwdne2934203:0

Where can I purchase a known good new battery (OEM preferred)?

Frank - crwdns2934203:0crwdne2934203:0

Is it actually important to replace with the same mAh value?
Or can I go with something bigger as long as the voltage is 3.7V, the connector is the same and the battery actually fits inside the mouse?

Gunnar Arneby - crwdns2934203:0crwdne2934203:0

Looking for the same info as the other commenters, where can I find the replacement battery for sale and are the other ones you sell for similar logitech models good enough to replace for this one?

Dylan - crwdns2934203:0crwdne2934203:0

You can find the replacment battery here: https://www.cutratebatteries.com

Just search AHB521630PJT-04

You're welcome!

Kilowatt - crwdns2934203:0crwdne2934203:0

Thx for the great disassembly instructions - my mouse stopped charging, but un-plugging and re-plugging the battery did the trick.

davidglynn - crwdns2934203:0crwdne2934203:0

This initially seemed to work and power the mouse but it wouldn’t charge. I tried disconnecting and reconnecting the battery as well as trying several USB sources but nothing worked (and yes, I am using the Logitech cable that came with the mouse). With the battery still connected even the option of powering the mouse with a cable stopped after a few minutes. I’m not sure if I’ve done something wrong or if I’m just unlucky but my mouse will now have to be permanently cabled which, to be honest, isn’t really much different for where I use it. It’s frustrating though, why a device like this couldn’t have just used AA batteries.

Robert - crwdns2934203:0crwdne2934203:0

mA value not important. Only 3.7V important.

The higher the mAh, the longer it can be used, also the higher mAh, usually battery is longer or wider and heavier. A little bit bigger size and weight will not matter at all.

Happy Zahn - crwdns2934203:0crwdne2934203:0

crwdns2917038:0crwdne2917038:0

crwdns2936625:0crwdne2936625:0:

crwdns2936751:024crwdne2936751:0 29

crwdns2936753:07crwdne2936753:0 147

crwdns2936753:030crwdne2936753:0 717

crwdns2942667:0crwdne2942667:0 25,682